MERITBOX HELP CENTER

Your MeritBox LMS guide

Choose your role. Find a feature. Follow the steps with helpful screen guides.

4 user roles68 detailed guidesStep-by-step help

Search your selected role and Getting started. Switch roles to explore other features.

START HERE

Getting started

4 guides

The essentials for every user. Select a topic to see the full guide.

Sign in and open your dashboard

Where to go: Login

Before you start: Have the account details and password provided by your school ready.

Follow these steps

  1. Open MeritBox LMS. Teachers and School Admins enter their registered email address. Students enter their Student ID. Parents use the login ID or email address provided by the school.
  2. Enter your password. Select Stay signed in on this device only on a device you own. Click Log in.
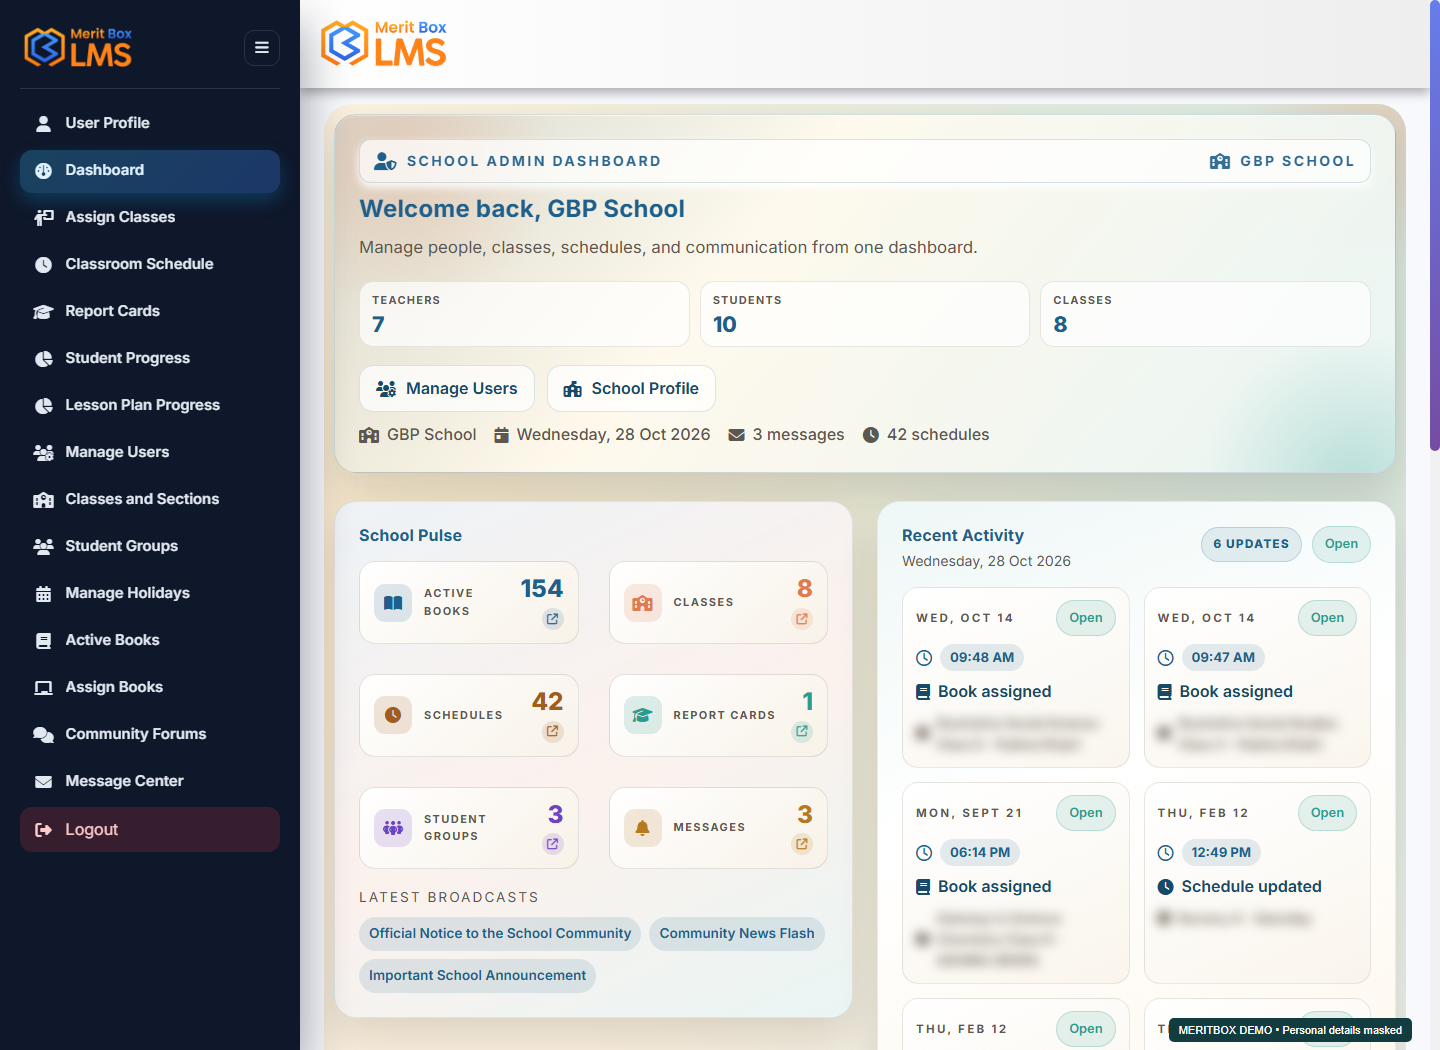
  3. Check that the dashboard matches your role. School Admin, Teacher, Student and Parent accounts have different screens and permissions.
  4. If sign-in fails, check for extra spaces in the ID, confirm the password and check Caps Lock. Ask your School Admin to verify your login ID and account status.
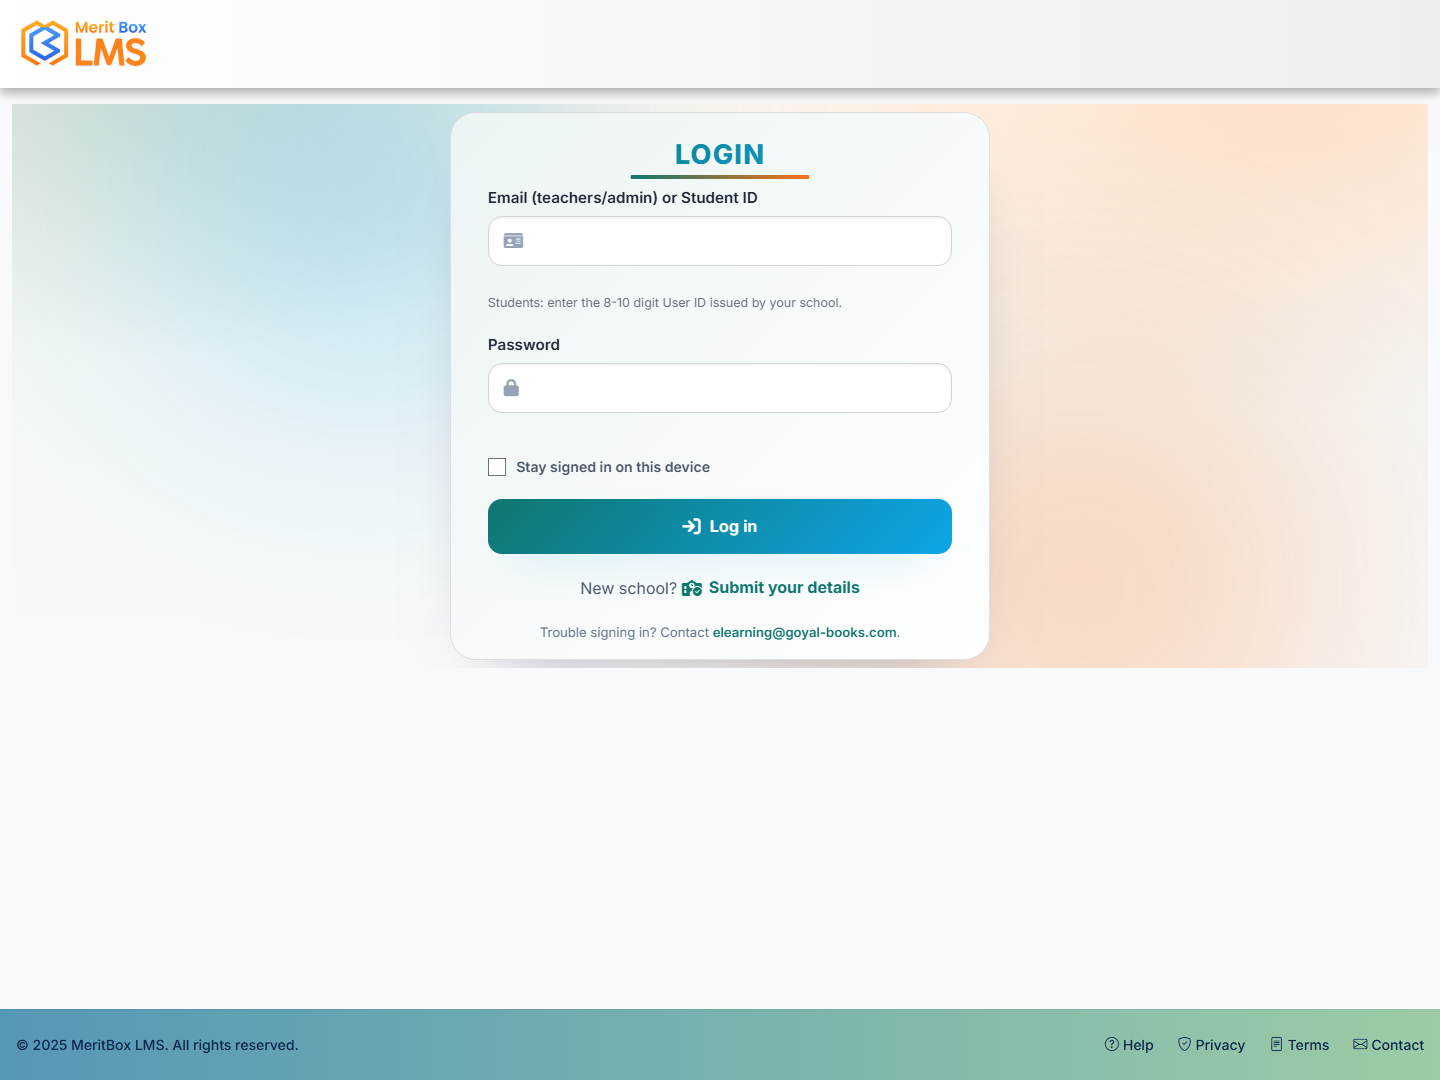
Sign in and open your dashboard — MeritBox LMS screen View full-size screenshot
Demo screen · Personal details are masked where needed.
Expected result

The dashboard for your role opens.

Troubleshooting

Confirm the Parent login format with your school. Ask the school to correct the existing account details rather than creating duplicate accounts.
Use the menu, filters and navigation

Where to go: Header menu → Sidebar

Before you start: Sign in to your account.

Follow these steps

  1. Click the menu button with three horizontal lines to open the sidebar. On mobile, the sidebar closes after you select a feature.
  2. Choose a feature. On list screens, select the available class, section, subject, date or search filters, then click Apply, Load or Search as shown.
  3. Use Back or Cancel to return from an edit or detail screen. After changing a form, click Save or Create and check the confirmation.
  4. In this guide, choose your role and search for a topic. Click a topic heading to expand or collapse its steps. Use Print / Save PDF to save the visible guide for the selected role.
Use the menu, filters and navigation — MeritBox LMS screen View full-size screenshot
Demo screen · Personal details are masked where needed.
Expected result

You can open the right feature and view information for the intended class or student.

Troubleshooting

If a feature is missing, check your account role and school assignment. Open this screen links require sign-in and permission for that feature; viewing the guide does not change your permissions.

Manage your profile, password and sign-out

Where to go: Sidebar → Account/Profile / Logout

Before you start: Use your own account.

Follow these steps

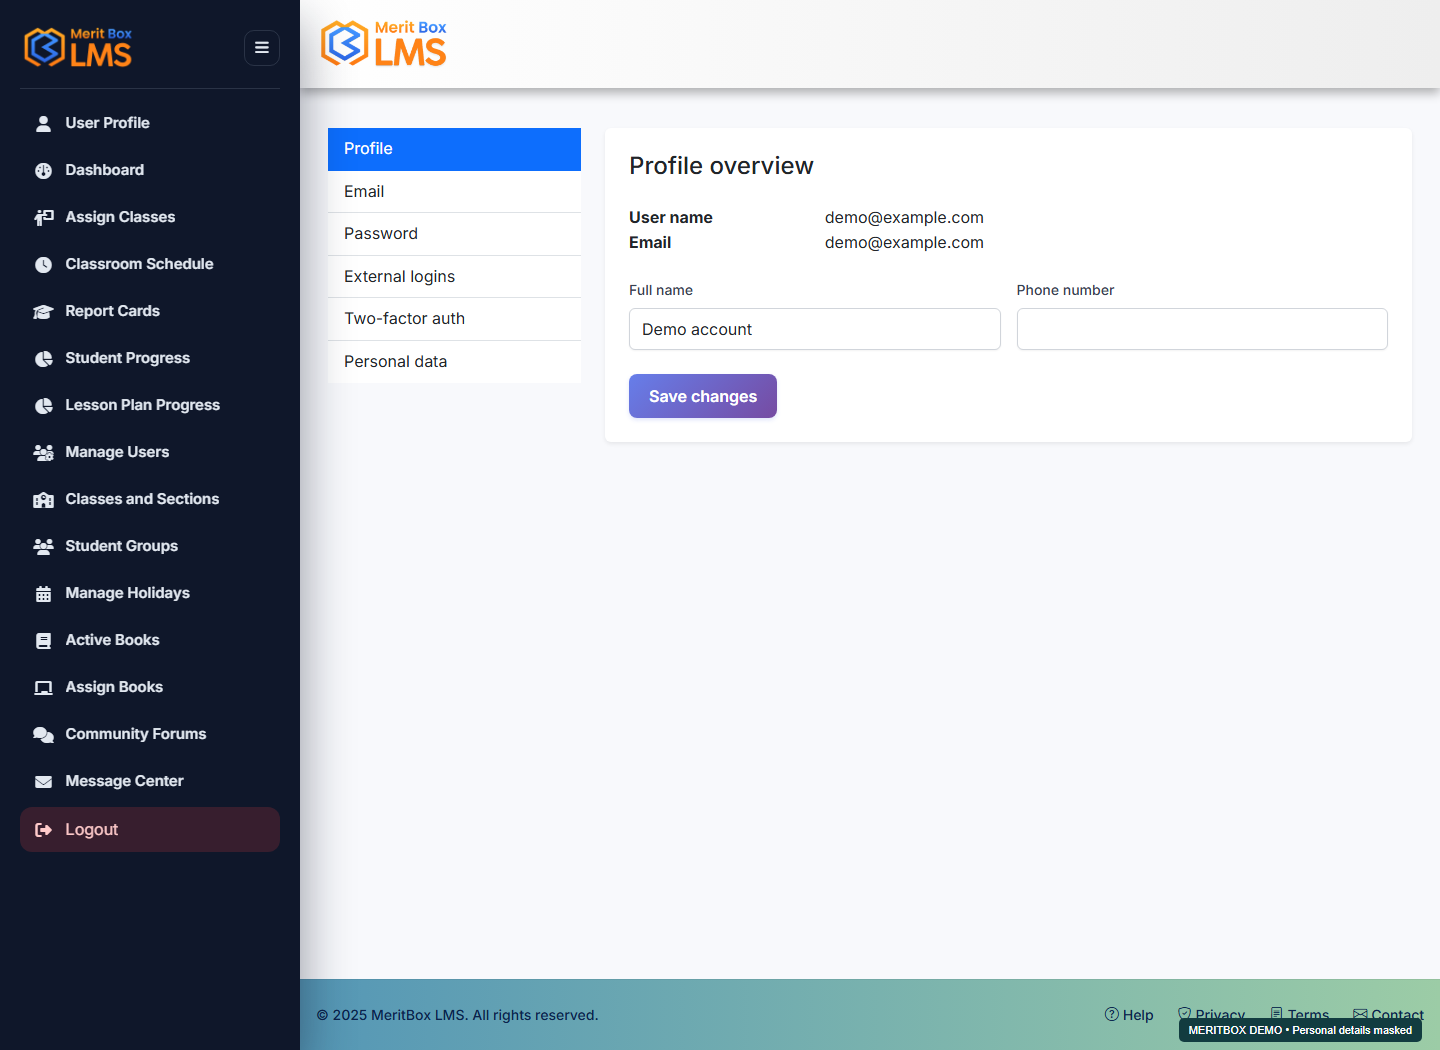
  1. Open account management from the account or profile link in the sidebar. Update the available profile fields, click Save and check the confirmation.
  2. To change your password, open the Password section in account management. Enter the requested current and new password details, then save the change.
  3. Click Logout when you finish using a shared computer. Closing the browser tab alone does not sign you out.
Manage your profile, password and sign-out — MeritBox LMS screen View full-size screenshot
Demo screen · Personal details are masked where needed.
Expected result

A confirmation appears after a successful profile or password update. Signing out returns you to the login screen.

Troubleshooting

If you have forgotten your current password, ask your school for account recovery help. Use your own account rather than another person's account.

Use the mobile app and open learning files

Where to go: Mobile browser → MeritBox LMS

Before you start: Use an up-to-date browser with an internet connection.

Follow these steps

  1. Open the LMS in your mobile browser and sign in. Use the menu to choose features. Scroll wide tables sideways to see additional columns.
  2. If an App installation button appears, click it and follow the browser's installation instructions. The button depends on browser and device support.
  3. Allow PDFs, videos and presentations to finish loading. If a new tab is blocked, check the site's pop-up settings in your browser.
  4. If the connection drops, reconnect and reload the page. Before submitting a form again, check whether the previous save succeeded.
Use the mobile app and open learning files — MeritBox LMS screen View full-size screenshot
Demo screen · Personal details are masked where needed.
Expected result

On supported devices, the LMS can open like an installed app. Learning files open in the browser.

Troubleshooting

The installed app still needs an internet connection for live data. If a file will not open, tell your teacher or admin the file name, feature and error message.

YOUR WORKSPACE

School Admin

17 guides

Manage school users, classes, teaching assignments, timetables, and school communications.

Your quick-start path

Classes and Sections → Teachers/Students → Parent linking → Assign Classes → Active Books/Assign Books → Classroom Schedule → Messages and reports.

Create and edit school calendar events

Where to go: Calendar events

Before you start: Have the school event title and date/time ready.

Follow these steps

  1. Use Open this screen to open Calendar events, then select the available create action.
  2. Enter the event title, dates/times, and other available details in the form.
  3. Save and verify the event in the list or calendar. To make changes, select the corresponding edit action.
Create and edit school calendar events — MeritBox LMS screen View full-size screenshot
Demo screen · Personal details are masked where needed.
Expected result

The school event is saved and appears to the relevant users according to its visibility settings.

Troubleshooting

Check the date/time and school context. Calendar events and holidays are managed in separate modules.

Dashboard and school overview

Where to go: Sidebar → Dashboard

Before you start: Your School Admin account must be linked to the correct school.

Follow these steps

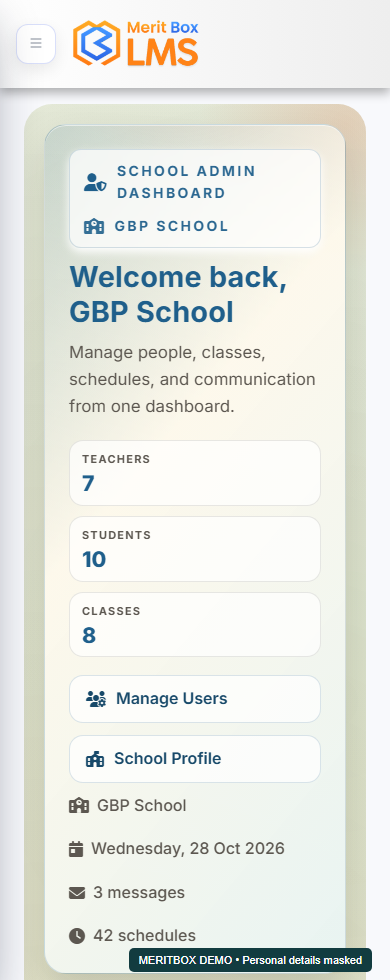
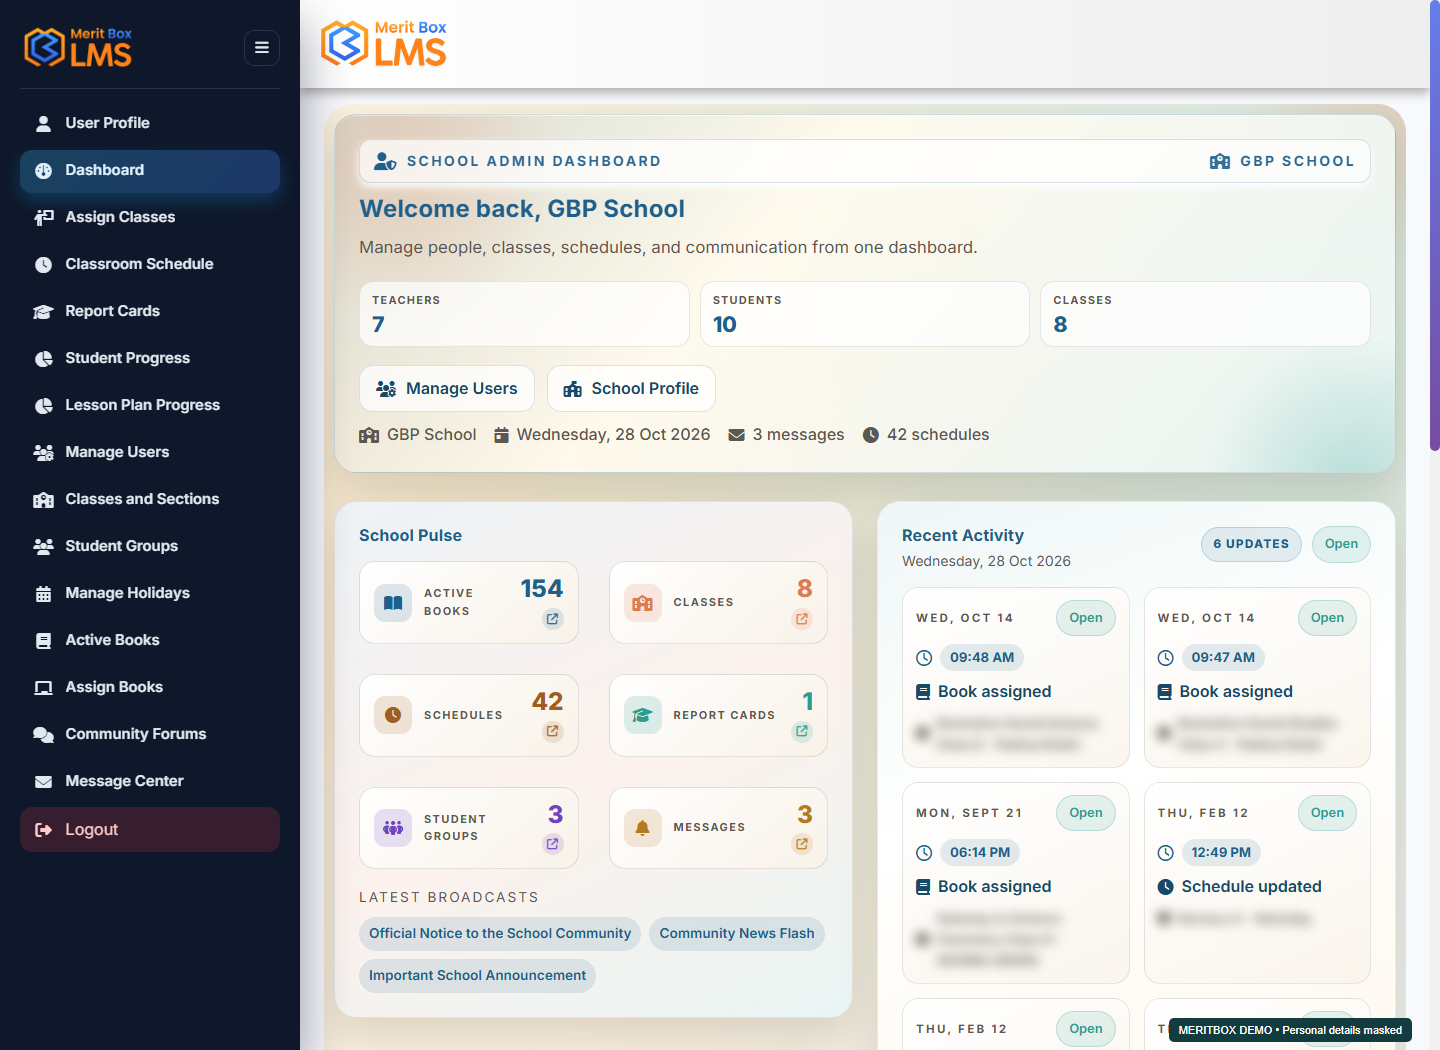
  1. Open Dashboard to view the school overview and available summaries.
  2. Open the card or sidebar link for the module you want to use.
  3. After creating a class or user, open the corresponding list and verify the new entry.
Dashboard and school overview — MeritBox LMS screen View full-size screenshot
Demo screen · Personal details are masked where needed.
Expected result

You can view your school overview and access its modules.

Troubleshooting

If school information is incorrect or missing, ask platform support to verify the school-account mapping.

Create classes and sections

Where to go: Classes and Sections

Before you start: Decide which classes and sections your school needs.

Follow these steps

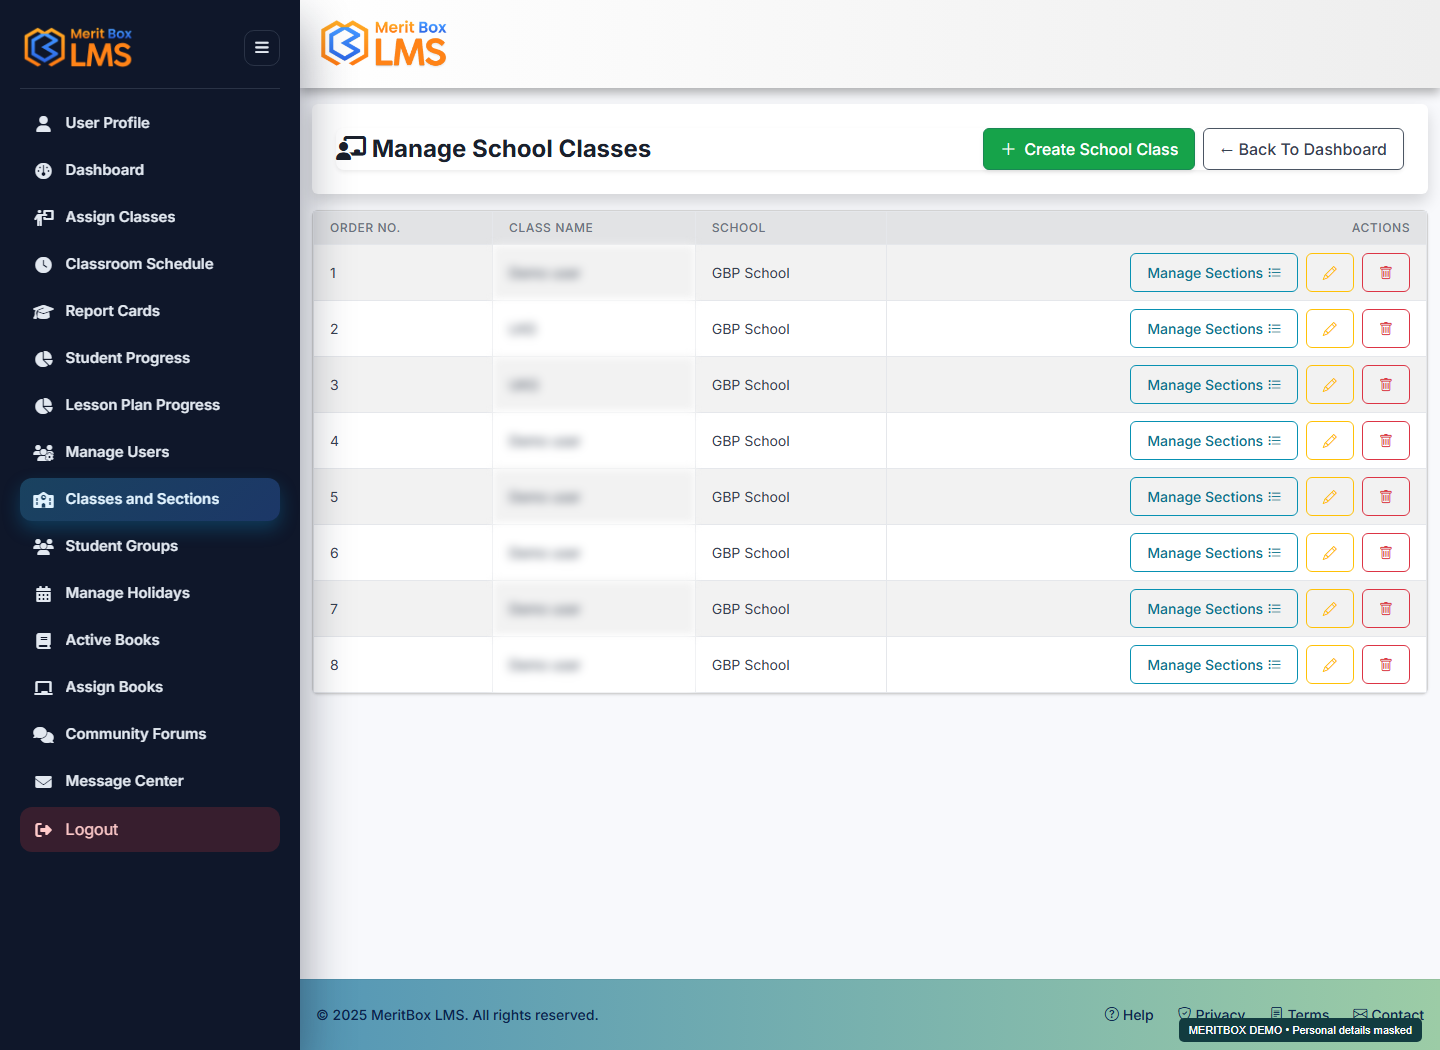
  1. Open Classes and Sections, enter the new class name, and add it. Use the available order field to set its display sequence.
  2. Open Sections for the class and add section names such as A or B.
  3. To rename an entry, select its edit action and save the change.
  4. Before assigning users, confirm that the correct class and sections appear in the list.
Create classes and sections — MeritBox LMS screen View full-size screenshot
Demo screen · Personal details are masked where needed.
Expected result

The classes and their sections become available in user forms and assignments.

Troubleshooting

Avoid creating duplicate classes with the same name. Check linked users and timetable entries before removing a class or section.

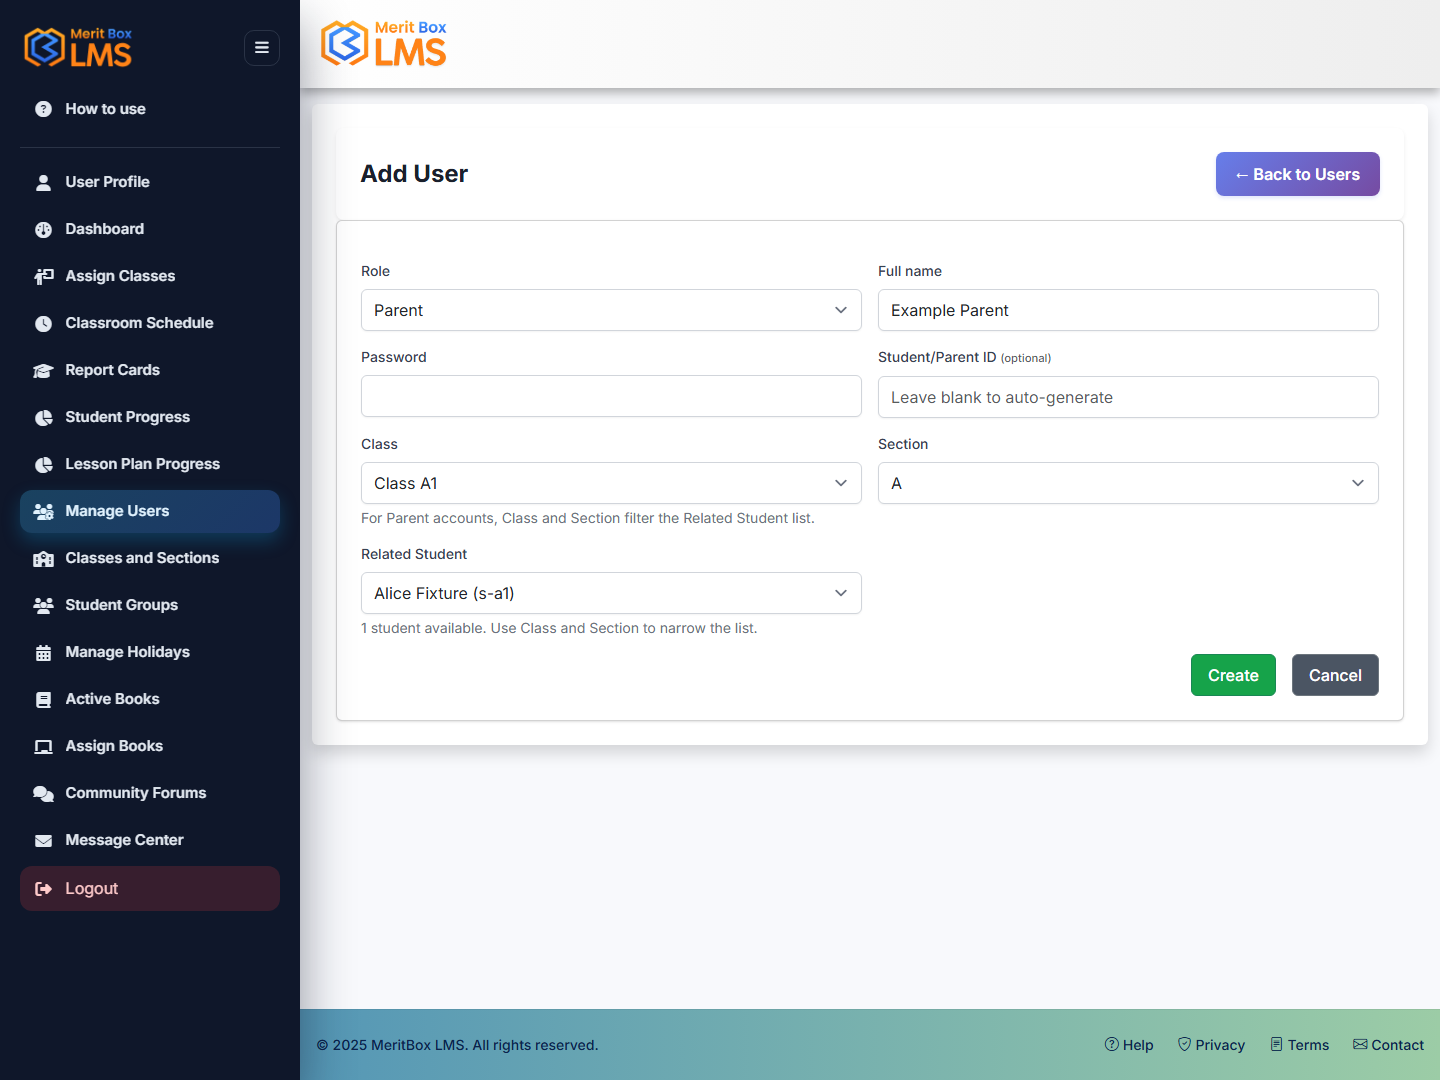
Add teachers, students, and parents

Where to go: Manage Users → Add User

Before you start: Create the student's class and section first. A parent account requires an existing related student.

Follow these steps

  1. Select Teacher, Student, or Parent under Role. Enter the full name and requested account details.
  2. For a teacher, enter an email and password. For a student, select the class and section, and follow your school's ID policy when the Student/Parent ID field is available.
  3. For a parent account, use Class and Section to filter the Related Student list, then select the correct student. Enter the parent ID if required by your school and provide a password.
  4. Select Create. In the user list, verify the role, class/section, and related student.
Add teachers, students, and parents — MeritBox LMS screen View full-size screenshot
Demo screen · Personal details are masked where needed.
Expected result

The new user is added to the school with the correct role.

Troubleshooting

Resolve validation messages such as a duplicate email/ID or missing class. Linking a parent to the wrong student can display incorrect or empty dashboard data. If no students appear, verify the selected school and clear the Class and Section filters.

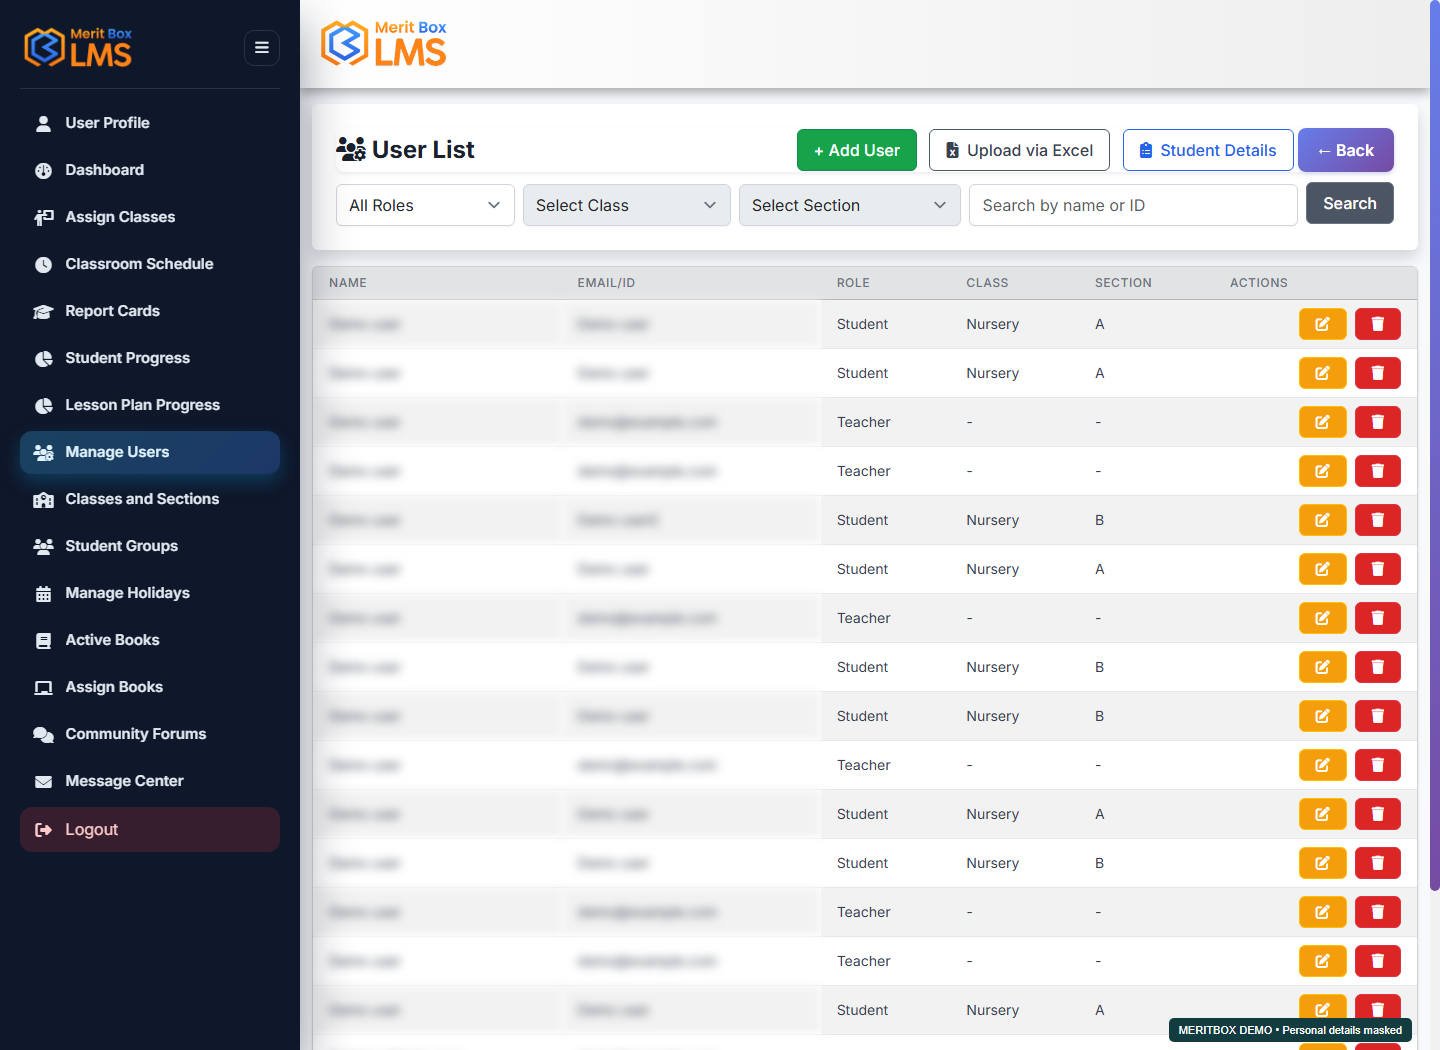
Find a user and update their information

Where to go: Manage Users → Edit / Student Details

Before you start: Confirm the identity of the user whose information you need to change.

Follow these steps

  1. In Manage Users, use the available search and role/class filters to find the user.
  2. Check the name and ID, then open Edit for the correct row. Update the available profile, class/section, or related-student information.
  3. After saving, verify the values in the list or Student Details. Use the student detail editing screen to update any additional available fields.
Find a user and update their information — MeritBox LMS screen View full-size screenshot
Demo screen · Personal details are masked where needed.
Expected result

The updated user information appears when you next open the relevant screens.

Troubleshooting

Reload the page after changing an account or class. Check login credential issues separately from student profile issues.

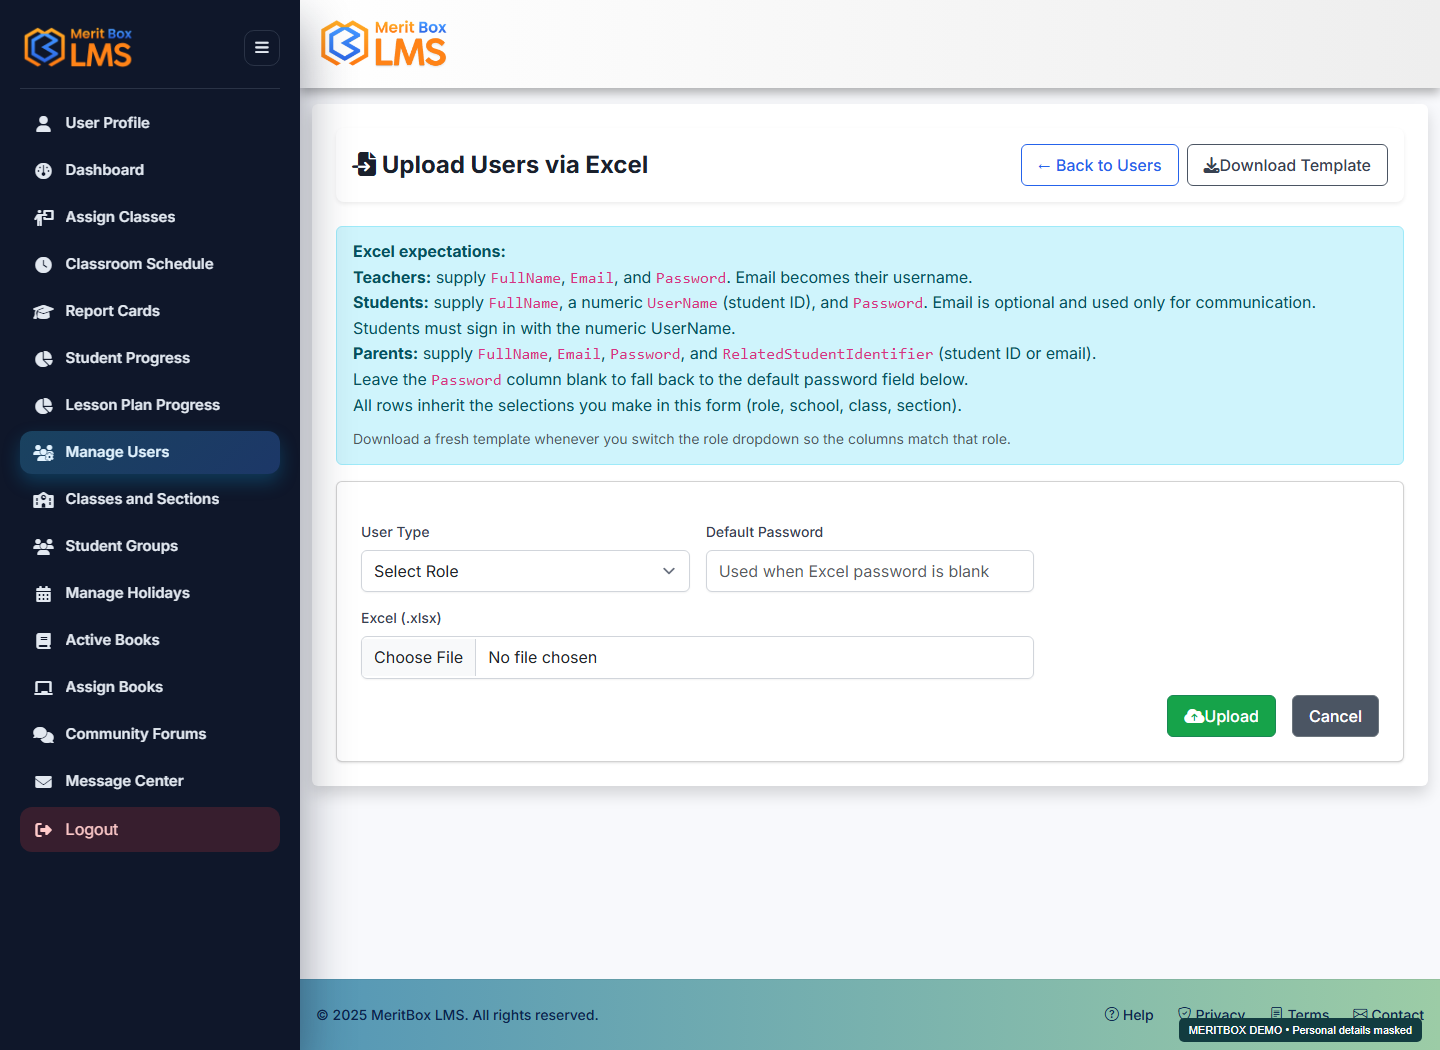
Upload users in bulk with Excel

Where to go: Manage Users → Bulk Upload

Before you start: Download a fresh .xlsx template for the correct role. Create the required class and section before uploading students.

Follow these steps

  1. Select User Type and choose Download Template. Download a new template whenever you change the role.
  2. For teachers, fill in FullName, Email, and Password. For students, fill in FullName, a numeric UserName (Student ID), and Password; email is optional. For parents, fill in FullName, Email, Password, and RelatedStudentIdentifier (the student's ID or email).
  3. Select the students' class and section in the form. All rows inherit the selected role, class, and section. If a password is blank in Excel, the Default Password field is used.
  4. Upload the .xlsx file and review the successful and failed rows. Correct the causes of failed rows and upload only the entries that still need to be added.
Upload users in bulk with Excel — MeritBox LMS screen View full-size screenshot
Demo screen · Personal details are masked where needed.
Expected result

Users are created from valid rows, and the upload results are displayed.

Troubleshooting

Do not rename template columns. Check numeric student IDs and each parent's RelatedStudentIdentifier. Make sure Excel does not unintentionally remove leading zeros from IDs.

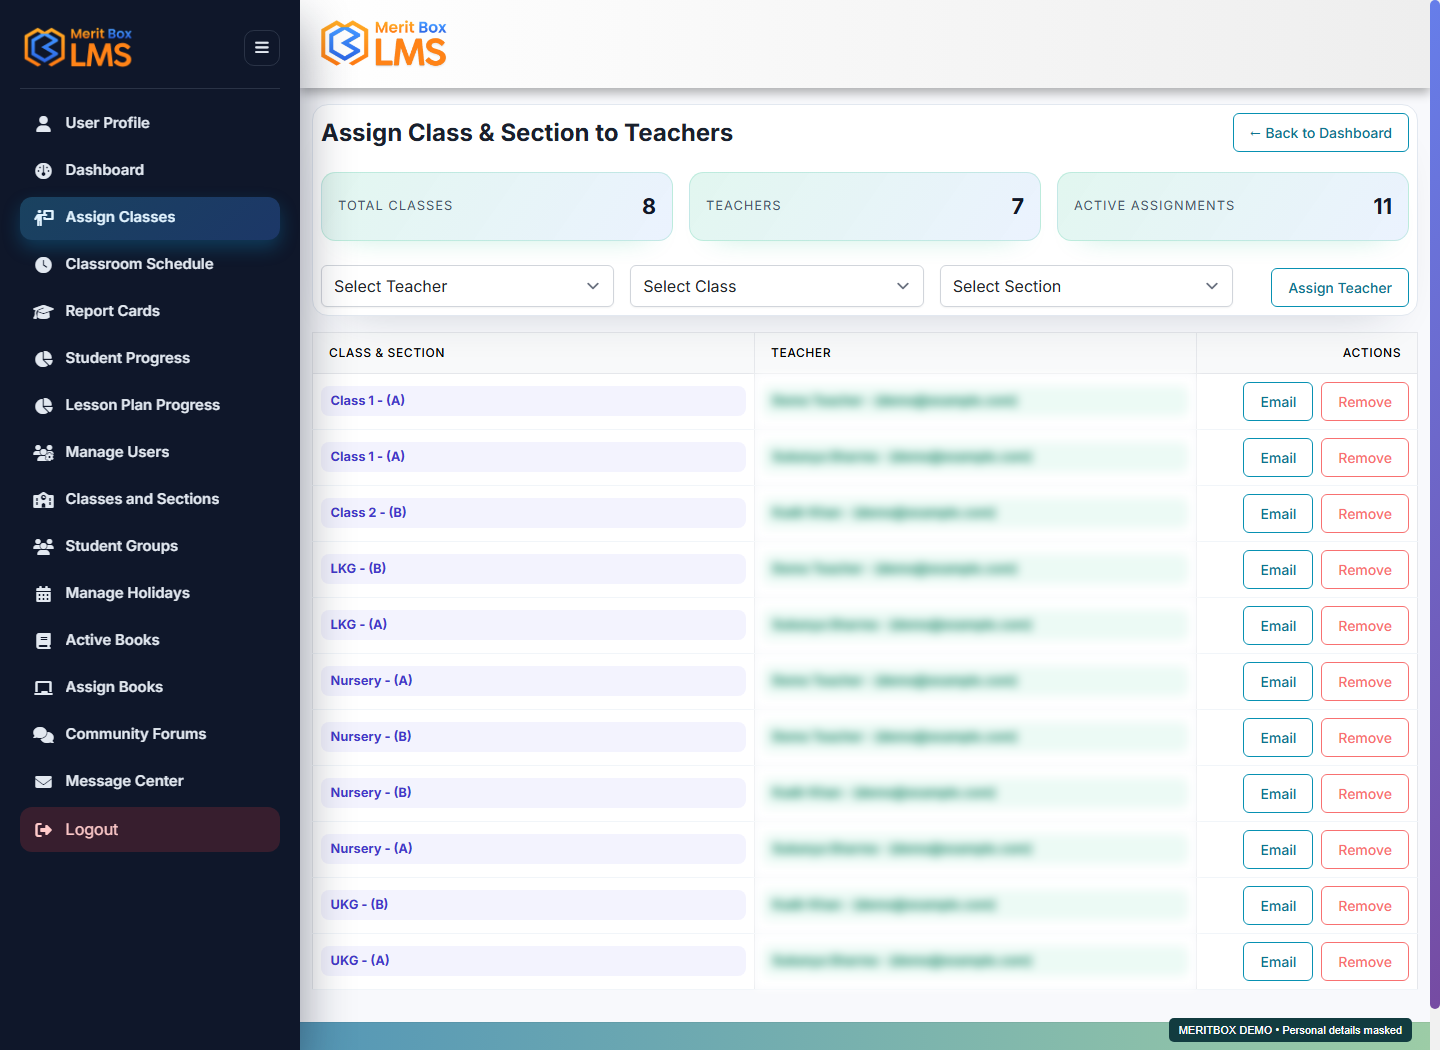
Assign classes and sections to a teacher

Where to go: Assign Classes

Before you start: Create the teacher account, school class, and section first.

Follow these steps

  1. Open Assign Classes and select the relevant teacher.
  2. Select the class and section the teacher will teach, then use the available assign/save action.
  3. Review the teacher's current assignments and assign any other required sections.
Assign classes and sections to a teacher — MeritBox LMS screen View full-size screenshot
Demo screen · Personal details are masked where needed.
Expected result

Assigned classes become available in the teacher's relevant teaching and student selectors.

Troubleshooting

If the teacher cannot see students, check the section mapping as well as the class assignment. Assigning a book does not also assign a class.

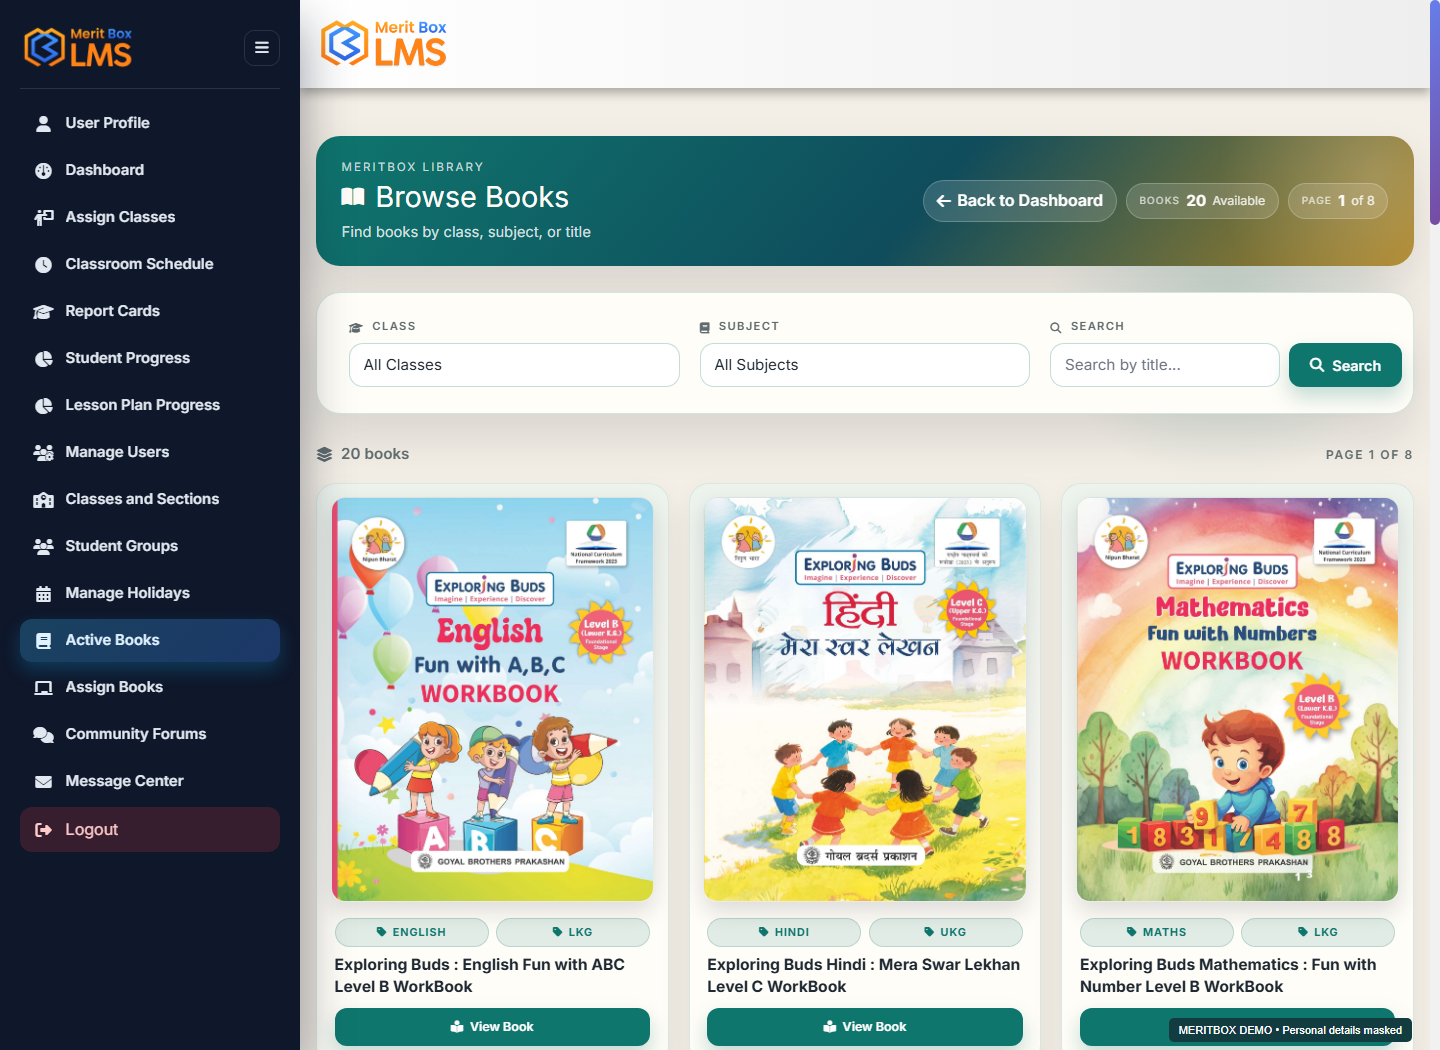
View the school's active books

Where to go: Active Books

Before you start: The school's books must be activated on the platform.

Follow these steps

  1. Open Active Books. Find a book using the master class, subject, or search filters.
  2. Open the book to view its chapters, topics, and available plans or resources.
  3. If a required book is missing, clear the class/subject filters and search again. Ask platform support to verify the school's book activation.
View the school's active books — MeritBox LMS screen View full-size screenshot
Demo screen · Personal details are masked where needed.
Expected result

The book catalog and learning content available to your school are displayed.

Troubleshooting

School Admins assign activated books to teachers. Contact platform support for school-level book activation.

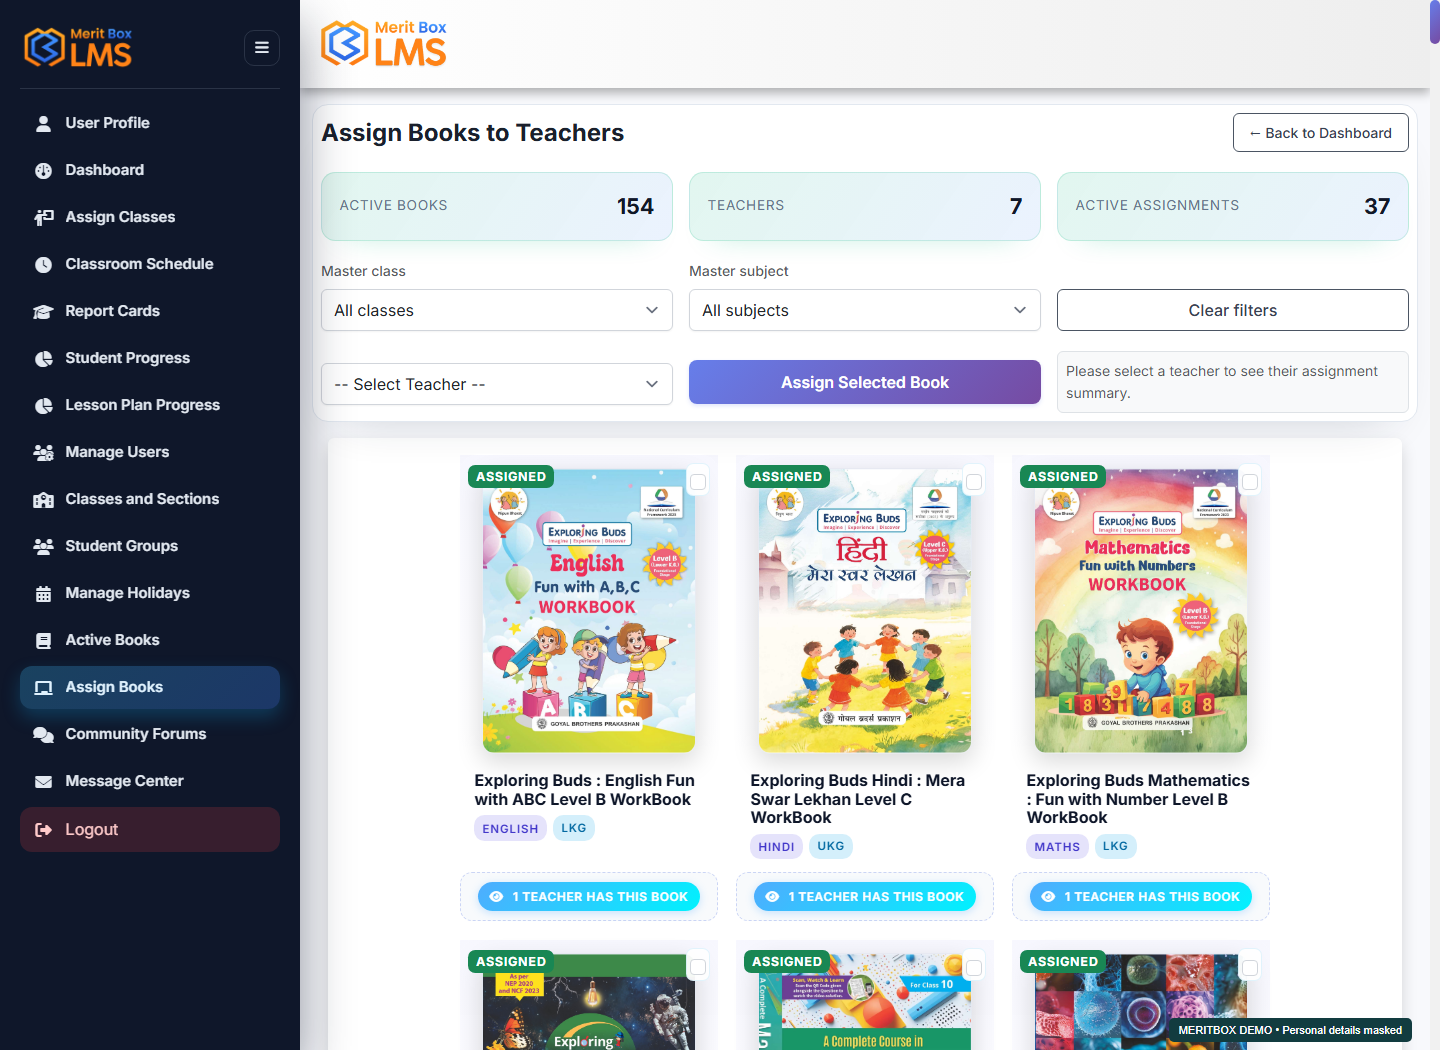
Assign books to a teacher

Where to go: Assign Books

Before you start: The book must be active for the school, and the teacher account must exist.

Follow these steps

  1. In Assign Books, use the Master class and Master subject filters to find the book.
  2. Select the book and the relevant teacher, then choose Assign Selected Book.
  3. Open the book's assignments list and verify that the correct teacher is listed.
  4. Before removing an incorrect assignment, check the teacher and book names.
Assign books to a teacher — MeritBox LMS screen View full-size screenshot
Demo screen · Personal details are masked where needed.
Expected result

The assigned book becomes available in the teacher's My Books screen.

Troubleshooting

If the book is missing, first check its activation in Active Books. Then verify the teacher's book assignment and any active filters.

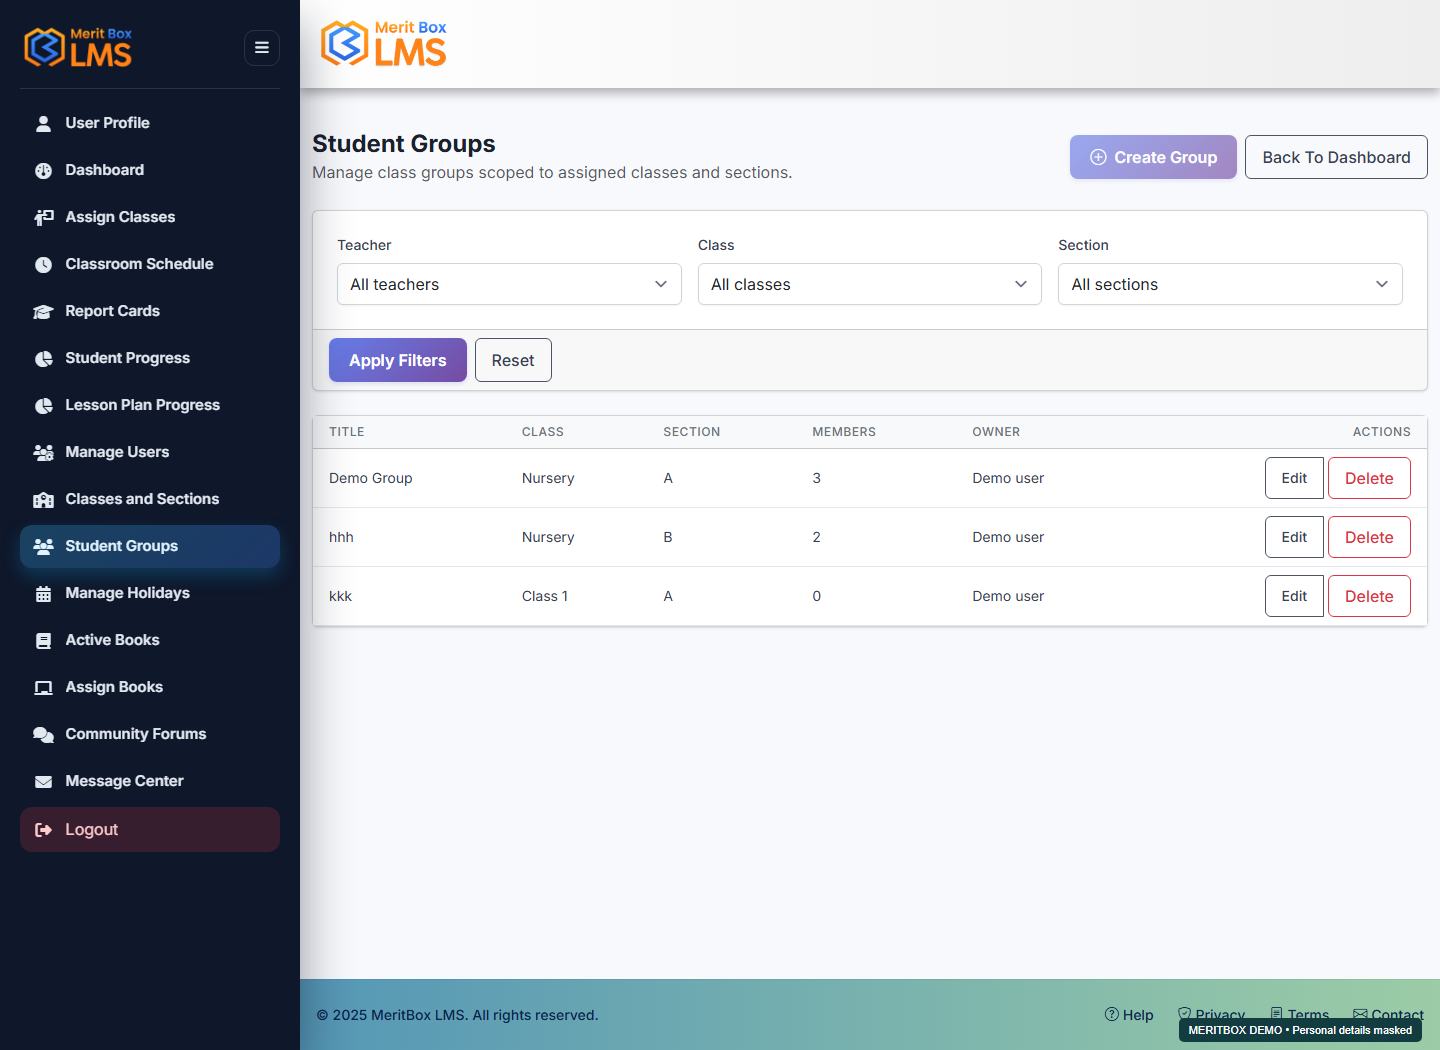
Create student groups and select members

Where to go: Student Groups

Before you start: Students must be mapped to the correct classes and sections.

Follow these steps

  1. Open Student Groups. Select a Teacher and choose Apply Filters. New Group remains disabled until a teacher is selected.
  2. Open New Group. Enter a group name and select students from the chosen teacher's assigned classes and sections.
  3. Save and verify the group members. Edit the group when you need to change its membership.
Create student groups and select members — MeritBox LMS screen View full-size screenshot
Demo screen · Personal details are masked where needed.
Expected result

The group becomes available for targeted learning-content sharing.

Troubleshooting

If a student is missing, check the selected teacher's class/section assignments and the student's mapping. Groups belong to a teacher, and membership changes can affect the audience for shared content.

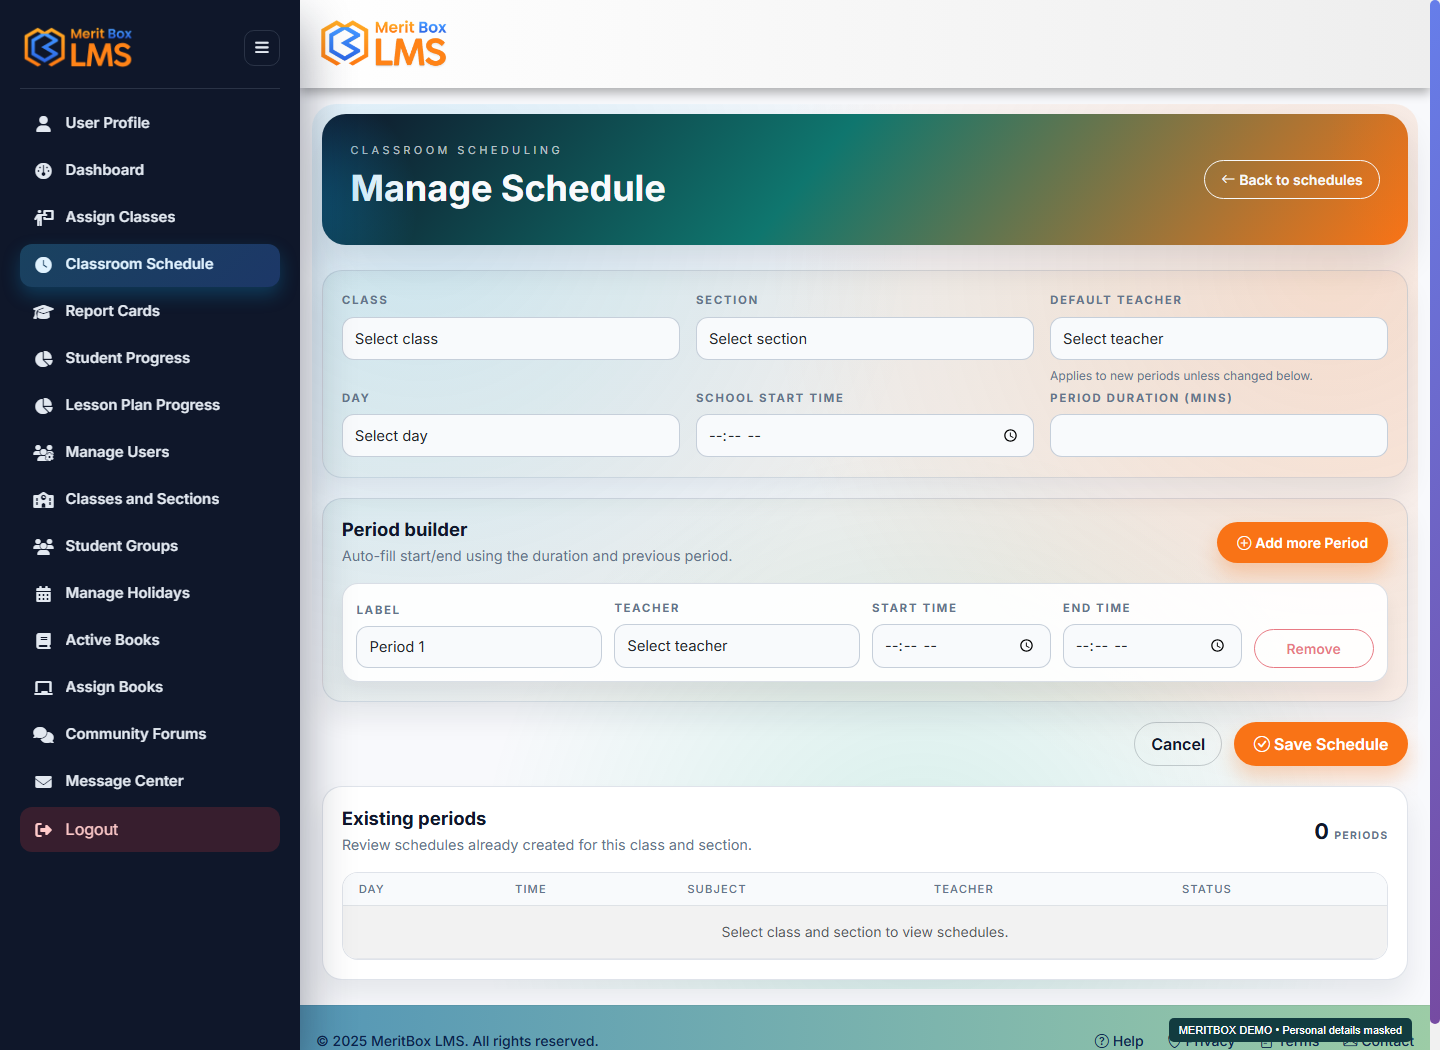
Create and update the classroom timetable

Where to go: Classroom Schedule

Before you start: Set up classes, sections, and teacher assignments first.

Follow these steps

  1. Open a new schedule in Classroom Schedule. Select Class, Section, Default teacher, and Day.
  2. Enter School start time and Period duration (mins). In the Period builder, review each row's Label, Teacher, Start time, and End time. Default teacher is applied to new rows; change an individual row's teacher when needed.
  3. Use Add more Period to add the remaining periods, and Remove to delete unwanted rows. Check Existing periods for duplicate or overlapping times, then select Save Schedule.
  4. Verify the day and time in the list. To change a saved entry, open Edit. Review the teacher, timing, and Active status in the single-entry form, then save.
Create and update the classroom timetable — MeritBox LMS screen View full-size screenshot
Demo screen · Personal details are masked where needed.
Expected result

Active schedule entries appear on the relevant teacher and student schedule screens.

Troubleshooting

If a teacher or class option is missing, check the assignments. Each period's end time must be after its start time. The bulk Period builder on Create and the single-entry Edit form have different controls.

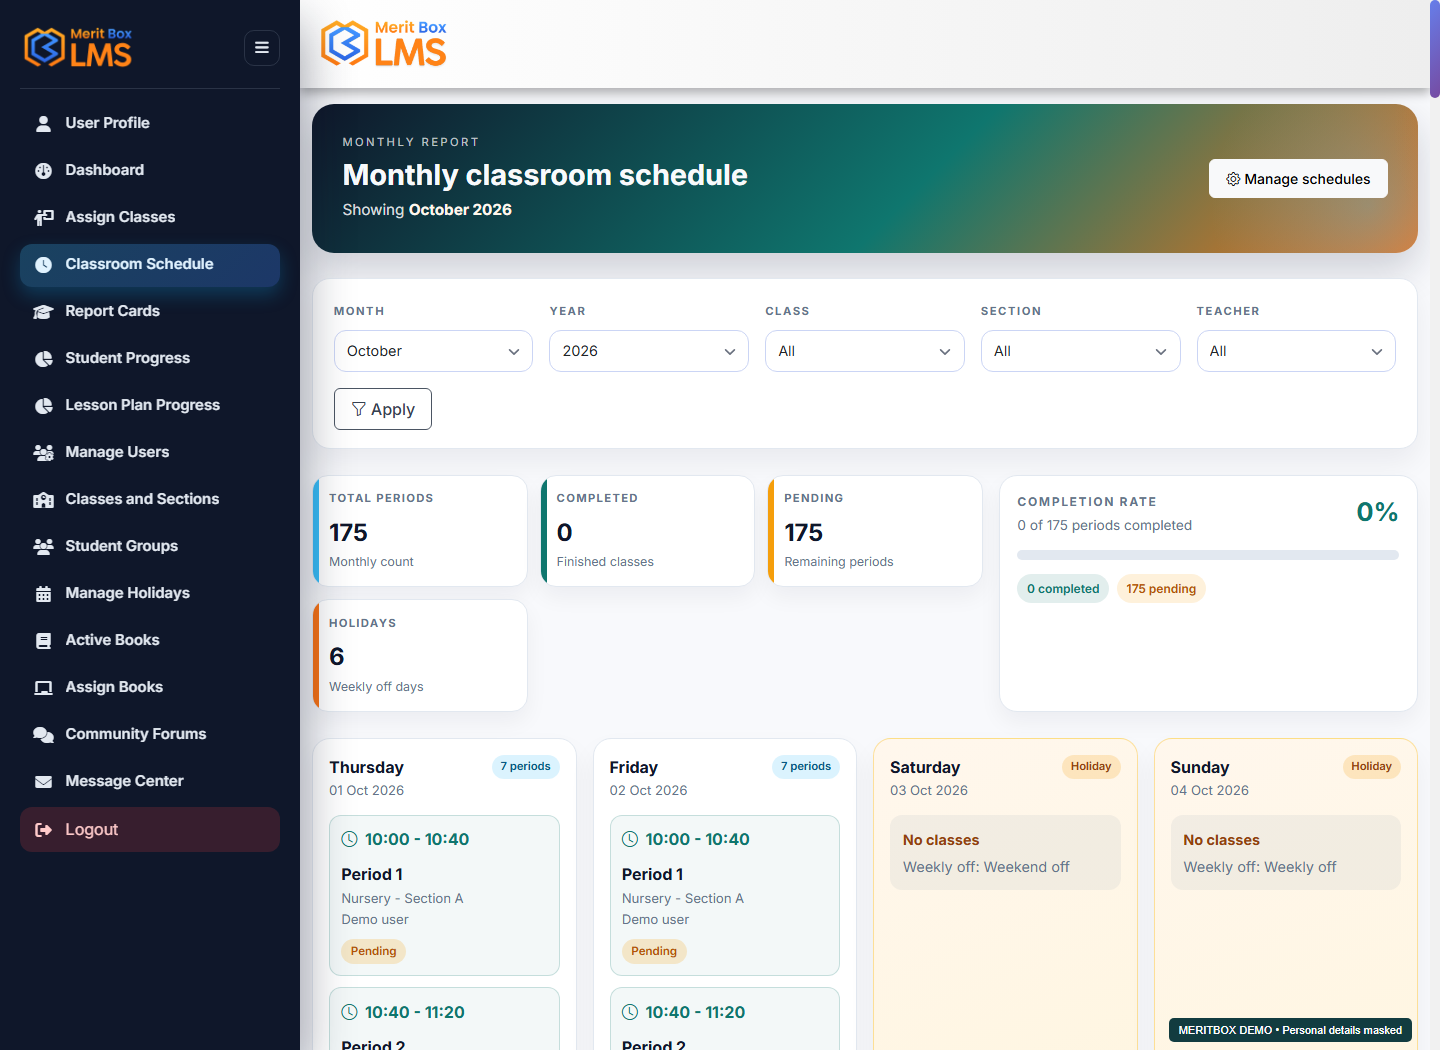
View periods and completion in Monthly Schedule

Where to go: Classroom Schedule → Monthly Schedule

Before you start: The school timetable and relevant teaching completion records must be available.

Follow these steps

  1. Open Monthly Schedule from Classroom Schedule.
  2. Select the available Class, Section, Teacher, Month, and Year filters, then load the report.
  3. Review the selected month's periods, school-day statuses, and recorded completion. For an incorrect or missing entry, check the same date and timetable mapping.
View periods and completion in Monthly Schedule — MeritBox LMS screen View full-size screenshot
Demo screen · Personal details are masked where needed.
Expected result

The classroom schedule report shows the selected month and filter results.

Troubleshooting

If the report is blank, check Month/Year and the class, section, and teacher filters. Period completion and student attendance are separate records.

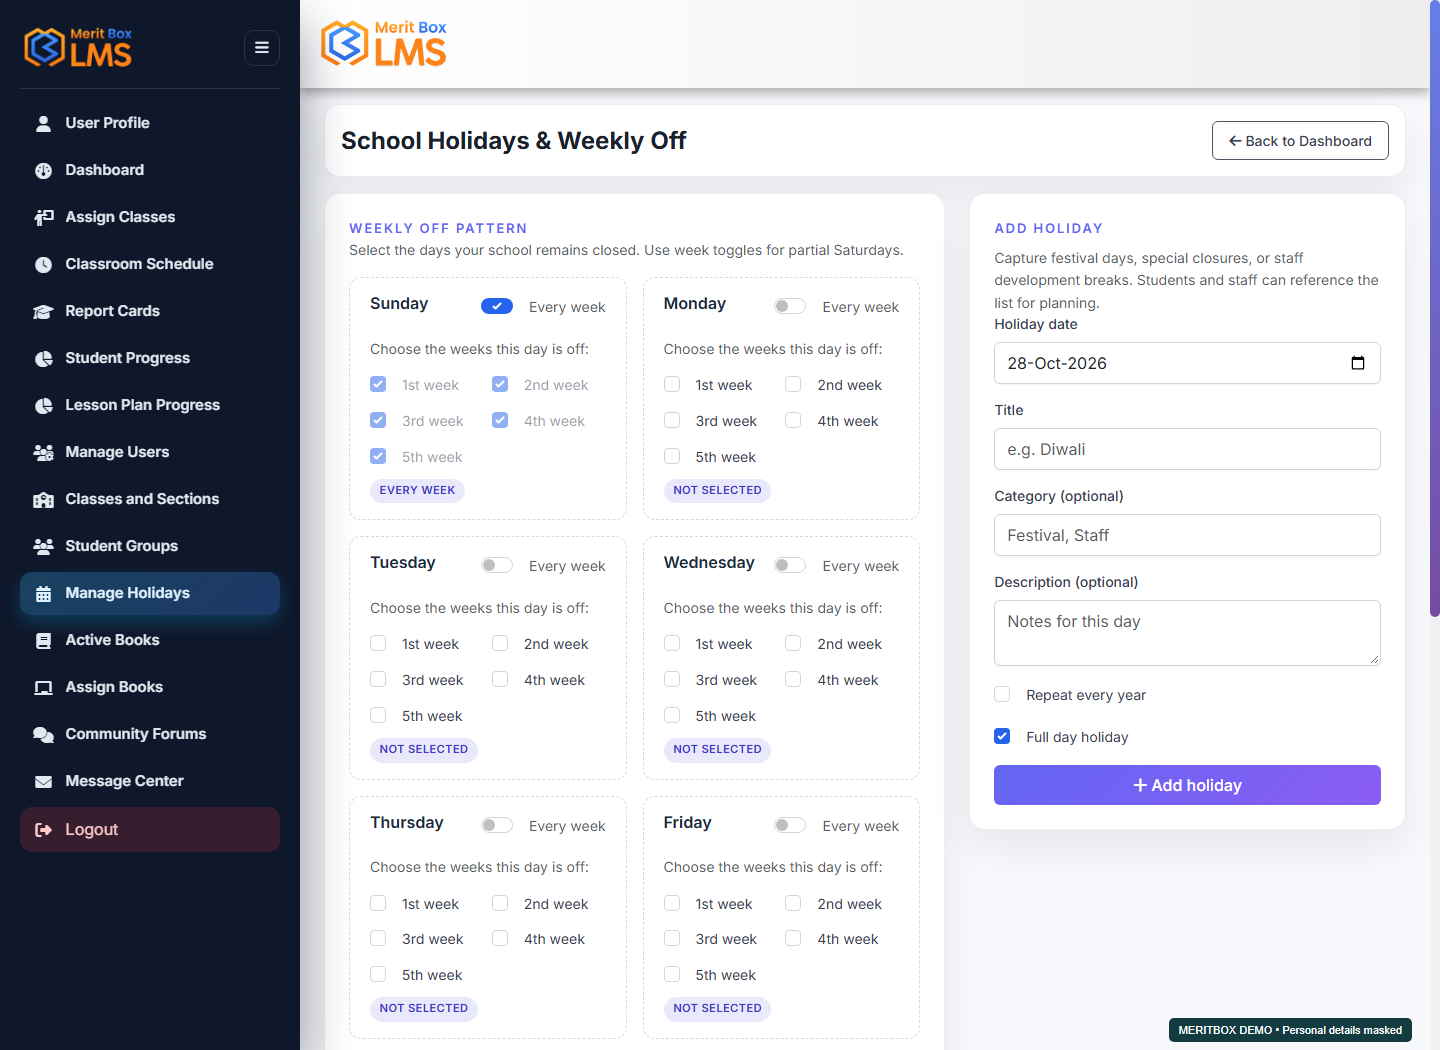
Manage school holidays and weekly off patterns

Where to go: Manage Holidays

Before you start: Have the school's approved holiday dates ready.

Follow these steps

  1. Open Manage Holidays. Under Weekly off pattern, select Every week for a weekday that is always a day off. If only certain weeks are days off, select that weekday's 1st–5th week checkboxes. Choose Save weekly off pattern.
  2. For a special holiday, enter Holiday date and Title in the Add holiday form. Category and Description are optional. Select Repeat every year for an annual holiday, and Full day holiday for a whole-day closure.
  3. Select Add holiday. Verify the date and Annual/One-time status in the saved holidays list. To correct a holiday, remove it from the list and add it again with the correct details. Check the name and date in the removal confirmation.
  4. After saving weekly offs and holidays, review the relevant classroom schedule and attendance dates.
Manage school holidays and weekly off patterns — MeritBox LMS screen View full-size screenshot
Demo screen · Personal details are masked where needed.
Expected result

Recurring weekly offs and special holidays are saved separately and used in the relevant school-day status calculations.

Troubleshooting

If a holiday appears incorrectly, check the weekday/week pattern, Holiday date, and Repeat every year setting. This screen has no holiday date-range or inline Edit form; the saved holiday list provides a Remove action.

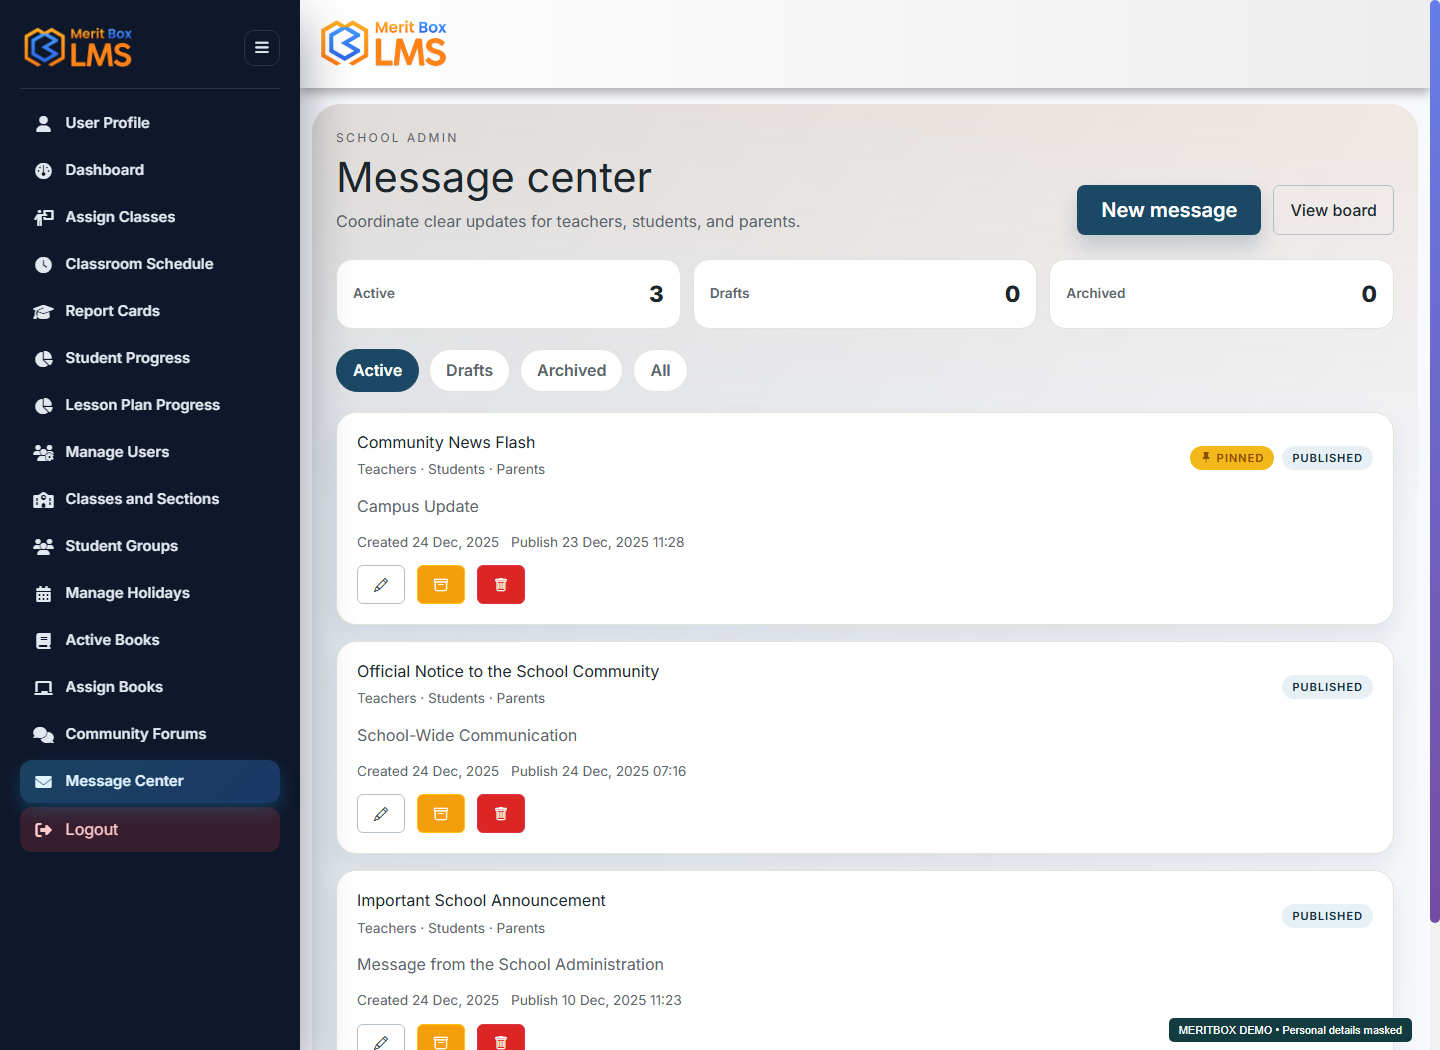
Messages: drafts, scheduling, publishing, and archiving

Where to go: Message Center

Before you start: Prepare the message text and decide who should receive it.

Follow these steps

  1. Create a new message in Message Center. Select Teachers, Students, and/or Parents under Audience.
  2. Enter Title, Summary, and Body. You can select Pin to top for an important message.
  3. Select Save as draft if the message needs further review. Set PublishAt to schedule future publication. Check the audience and date before publishing.
  4. After saving, review the message's draft/published status. Use the available Edit or Archive actions when needed.
Messages: drafts, scheduling, publishing, and archiving — MeritBox LMS screen View full-size screenshot
Demo screen · Personal details are masked where needed.
Expected result

Published messages appear in the selected audience's Message Center once their publication time is reached.

Troubleshooting

If a message is missing, check its draft flag, future publication time, archive status, and audience. Parent-school/student mappings must also be correct for the parent audience.

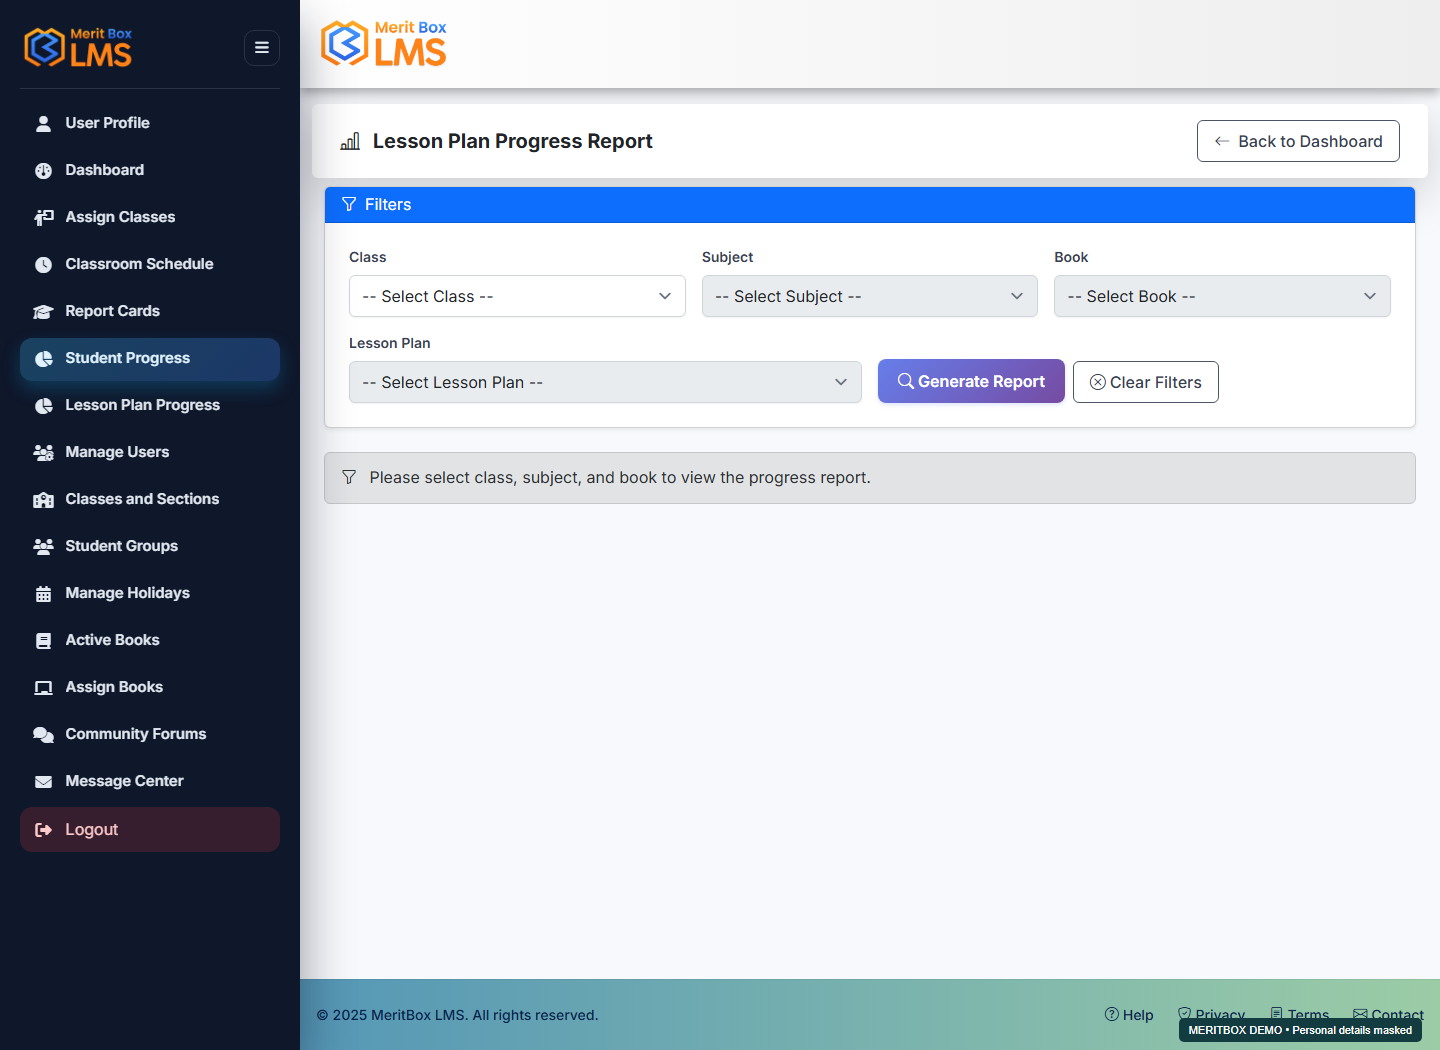
Student Progress and Lesson Plan Progress

Where to go: Student Progress / Lesson Plan Progress

Before you start: Teachers must have shared content, and students must have recorded learning activity.

Follow these steps

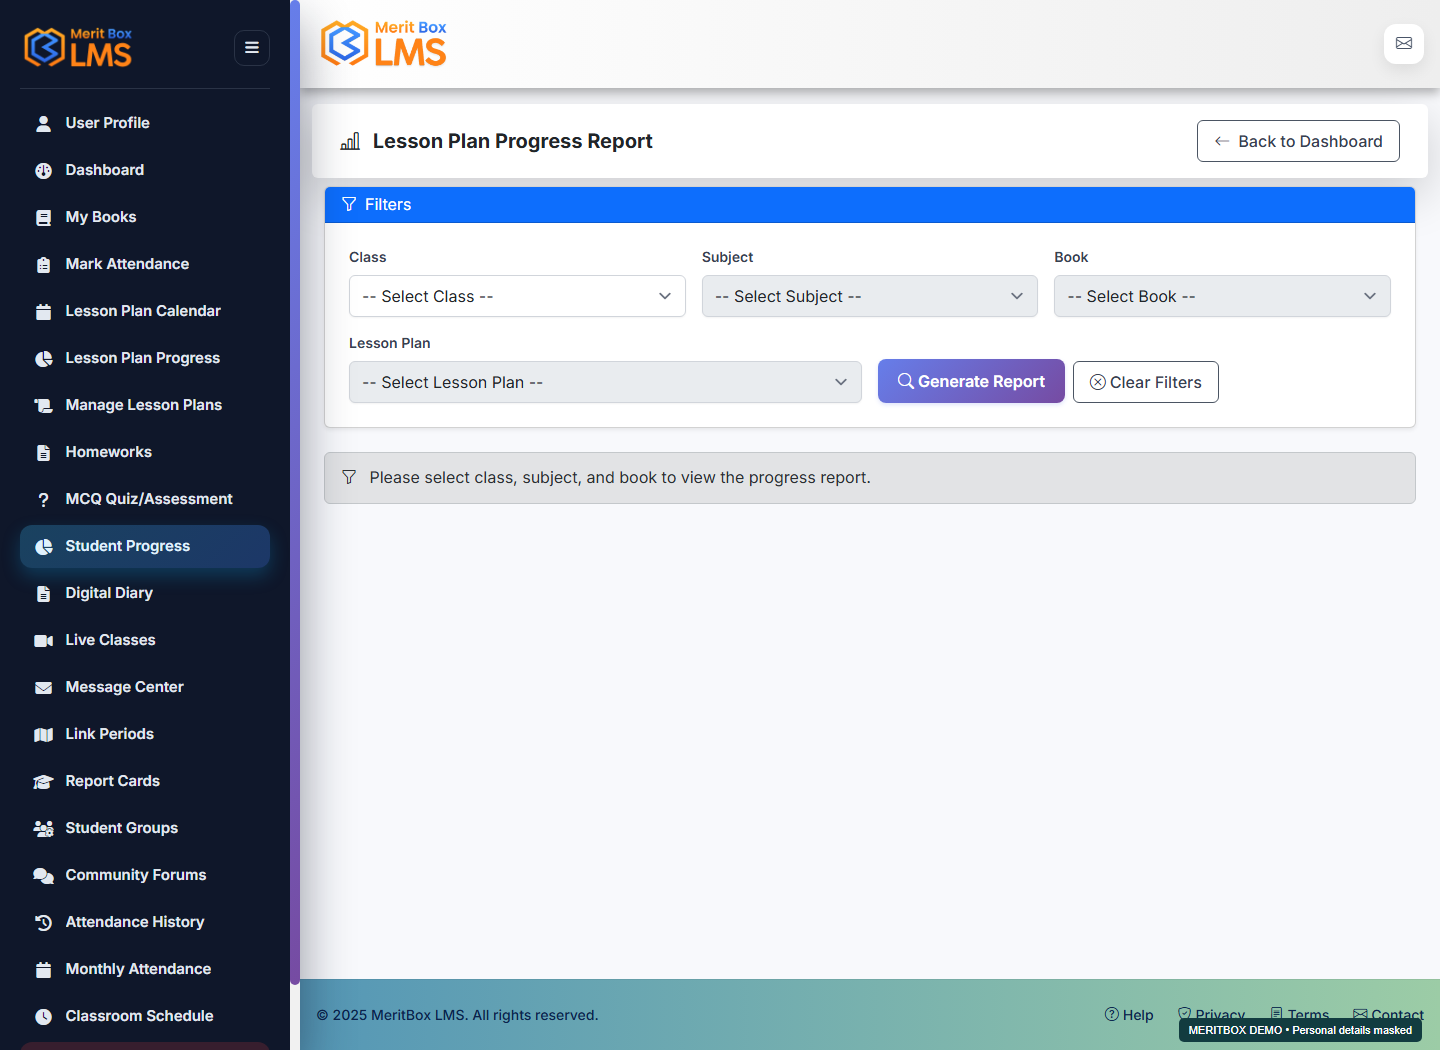
  1. Open Student Progress. Select Class, then Subject and Book, allowing dependent options to load. Select a Lesson Plan if needed, then choose Generate Report.
  2. Review Resources, Quizzes, Additional, Total Progress, Completion %, and Last Activity in the student rows. Open a student's name or detail link for detailed progress. Use Export to CSV to download the current report.
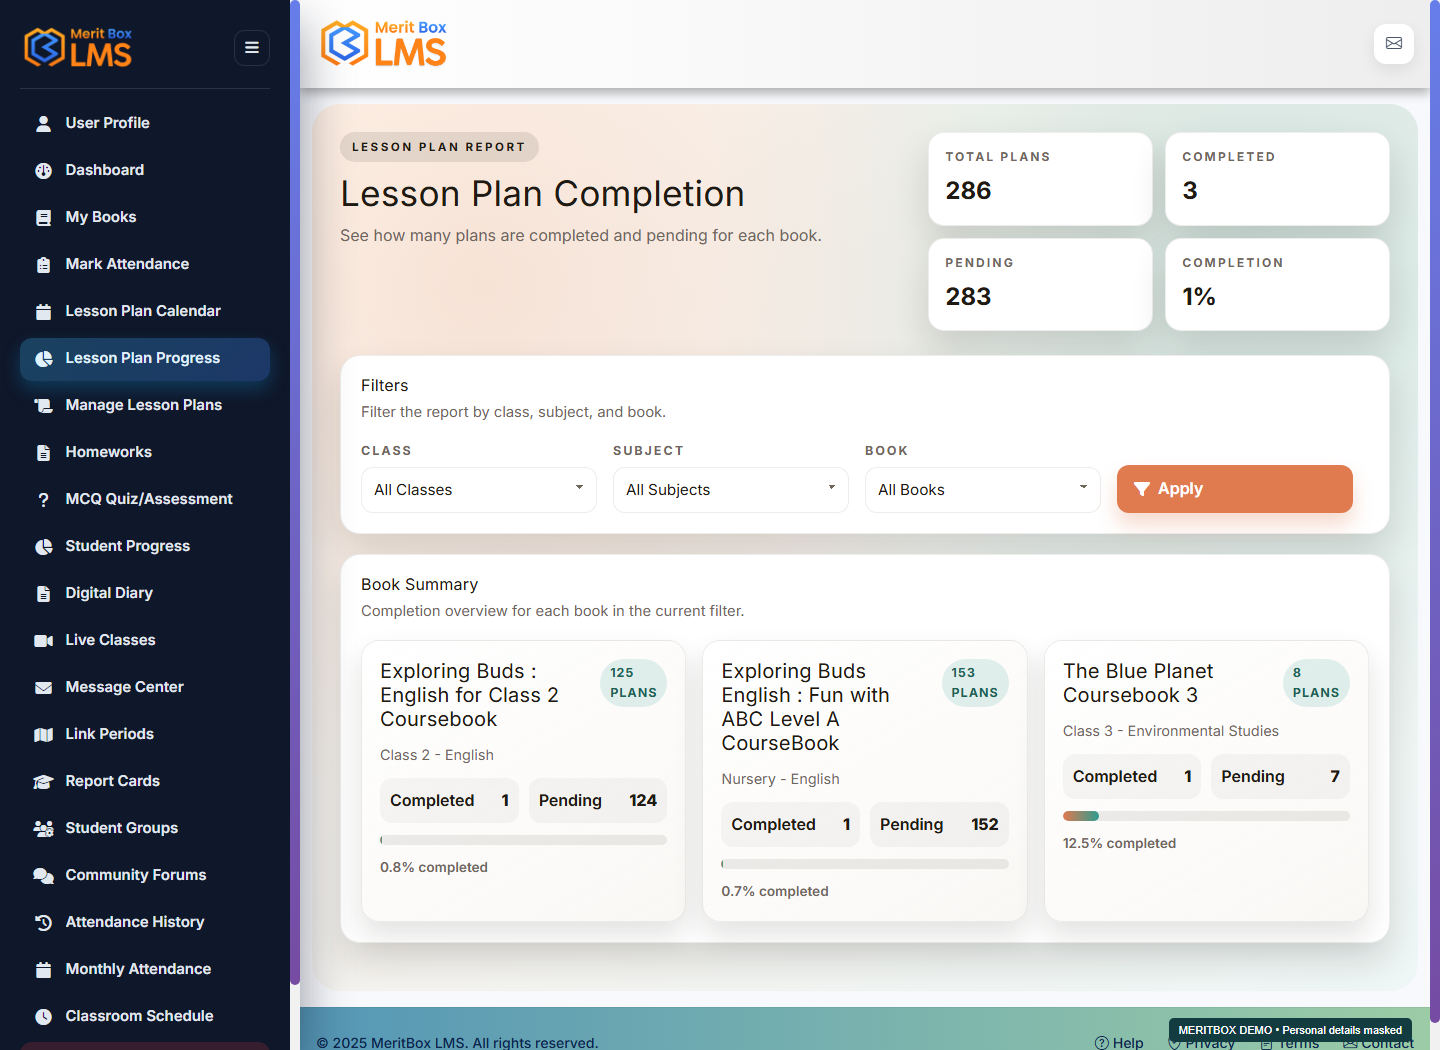
  3. Open Lesson Plan Progress. Select Class, Subject, and Book filters, then choose Apply. In Book Summary, review total plans, Completed, Pending, and completion percentage.
  4. If progress is low, verify content sharing and completion recording with the teacher. Interpret student activity and book-level plan completion within their respective report contexts.
Student Progress and Lesson Plan Progress — MeritBox LMS screen View full-size screenshot
Demo screen · Personal details are masked where needed.
Expected result

You can view filtered student activity and lesson-plan completion summaries.

Troubleshooting

Complete the Class → Subject → Book selection first. Incomplete filters show a selection message instead of a report. If there is no data, check the selected book/plan, sharing, and mappings. The initial Student Progress screen has no separate Section, Student, or Date filters.

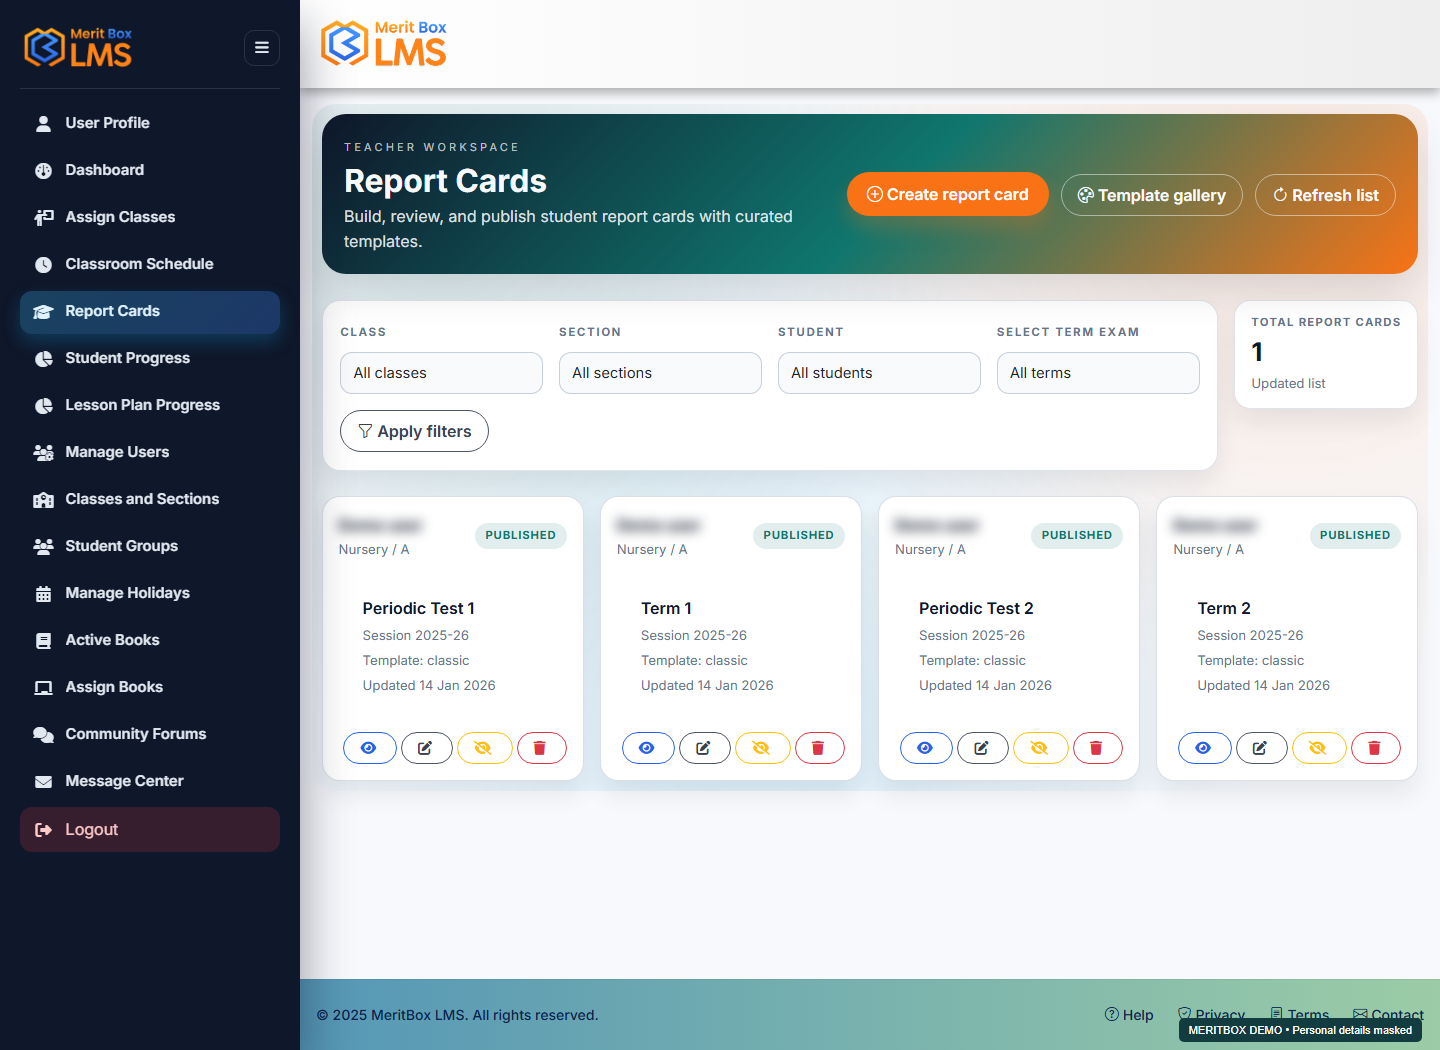
Report cards: creation, templates, and publishing

Where to go: Report Cards

Before you start: Student records and assessment marks must be available.

Follow these steps

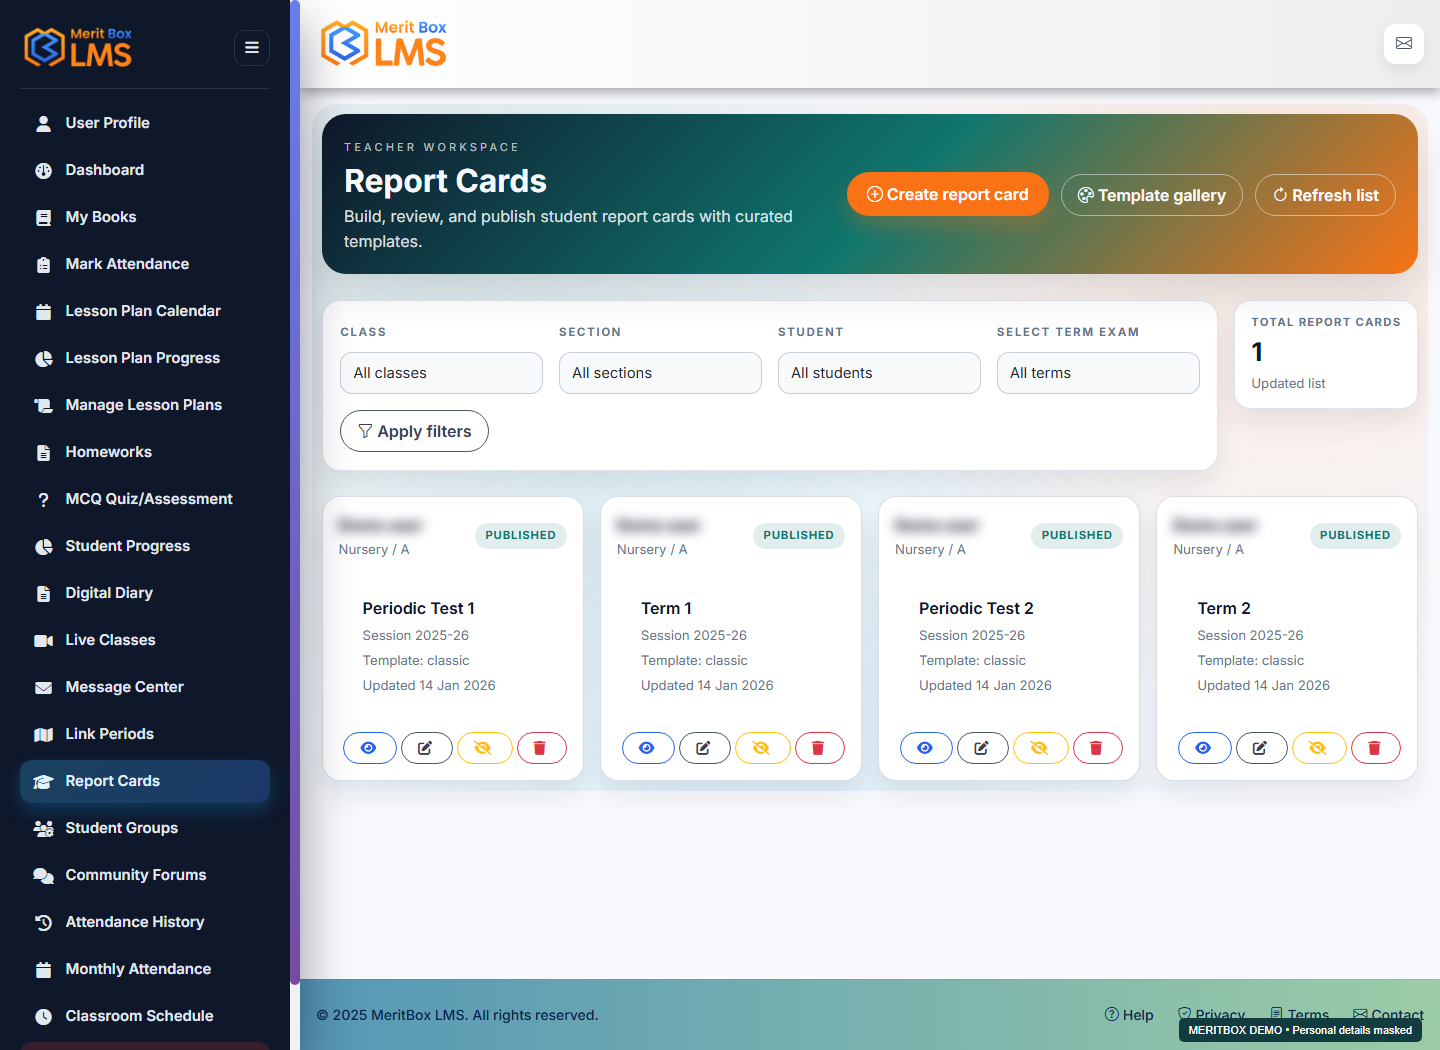
  1. In Report Cards, use the class, section, student, and term filters to find the correct student. Open the create/manage action.
  2. Select the student and term. Enter the available subject marks, maximum marks, grades/remarks, and other report fields.
  3. Choose a template and check the student, marks, and term in preview/details. Save the report.
  4. Publish the relevant term/stage. A saved draft alone is not visible to the student or parent. Verify the publication status again after making corrections.
Report cards: creation, templates, and publishing — MeritBox LMS screen View full-size screenshot
Demo screen · Personal details are masked where needed.
Expected result

The published term/stage becomes available in Report Cards for the student and linked parent.

Troubleshooting

If a card is missing, check the student-parent link and term/stage publication. Open the correct term to fix incorrect marks.

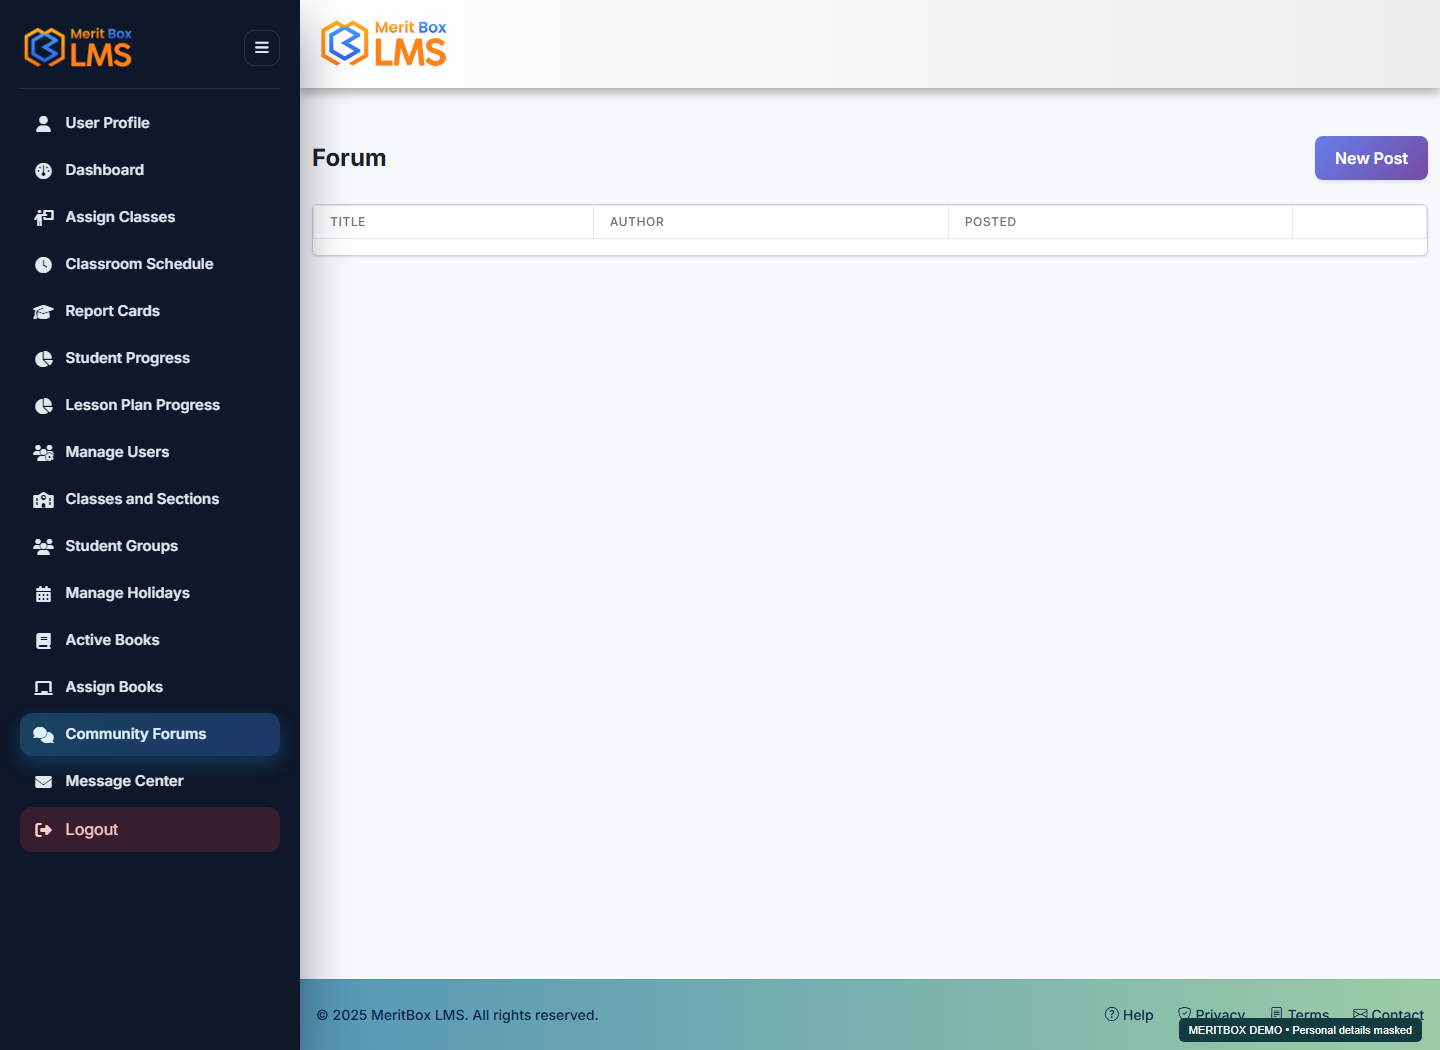
Post and reply in Community Forums

Where to go: Community Forums

Before you start: Prepare a discussion appropriate for your school or community.

Follow these steps

  1. Open Community Forums and read the existing discussions.
  2. For a new discussion, open the Create action. Enter the title, body, and any available media links.
  3. To reply to an existing discussion, open it and use its available reply action. Review the text before publishing.
Post and reply in Community Forums — MeritBox LMS screen View full-size screenshot
Demo screen · Personal details are masked where needed.
Expected result

Your post or reply appears in the forum thread.

Troubleshooting

If the post is missing, check the correct thread and school context. Do not include personal account details in a discussion.

YOUR WORKSPACE

Teacher

25 guides

Plan lessons, share content, take attendance, run assessments, and review student progress.

Your quick-start path

Verify My Books and assigned classes → Check your schedule → Prepare and share lesson plans → Take attendance → Assign homework and quizzes → Review progress and report cards.

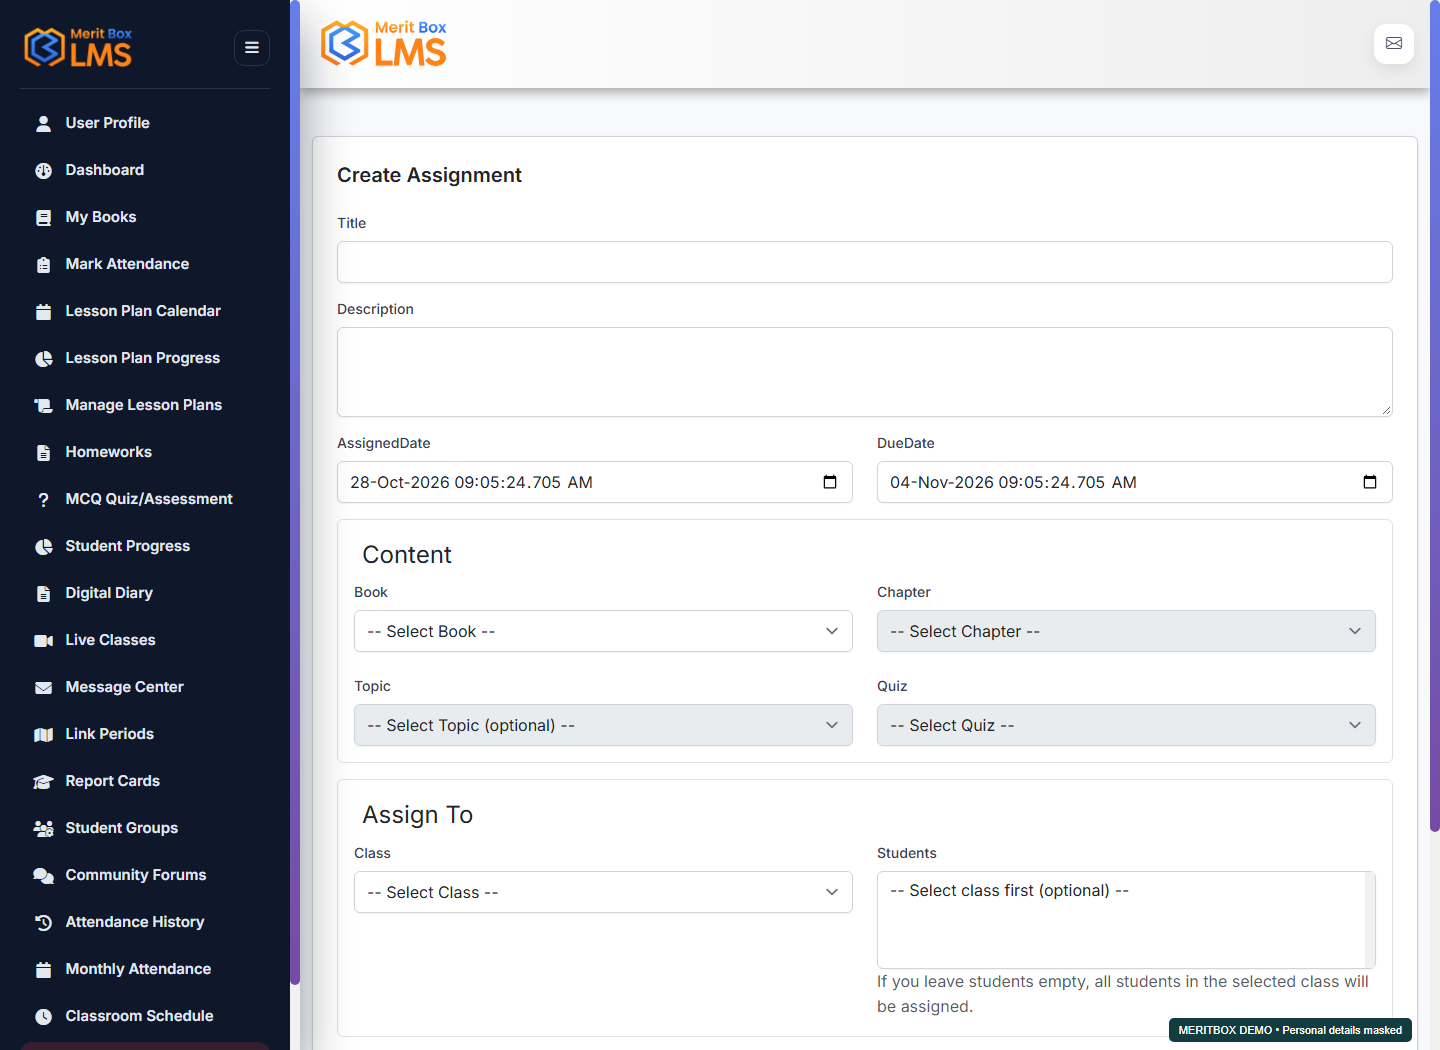
Assign work and an attached quiz

Where to go: Assignments (direct screen)

Before you start: Have an assigned book and class, the intended students, and an optional quiz ready.

Follow these steps

  1. Use Open this screen to go to Assignments, then select Create.
  2. Choose an available book, chapter, topic, and class. Select specific students and an optional quiz.
  3. Enter the instructions and other required fields. Selecting a class without individual students may target the entire selected class, so review the recipients.
  4. Save and verify the assignment in the list. Ask students to open the direct My Assignments screen.
Assign work and an attached quiz — MeritBox LMS screen View full-size screenshot
Demo screen · Personal details are masked where needed.
Expected result

The assignment is available to the selected students.

Troubleshooting

Assignments is separate from Homework and currently has no sidebar shortcut. The book and class must be assigned to the teacher.

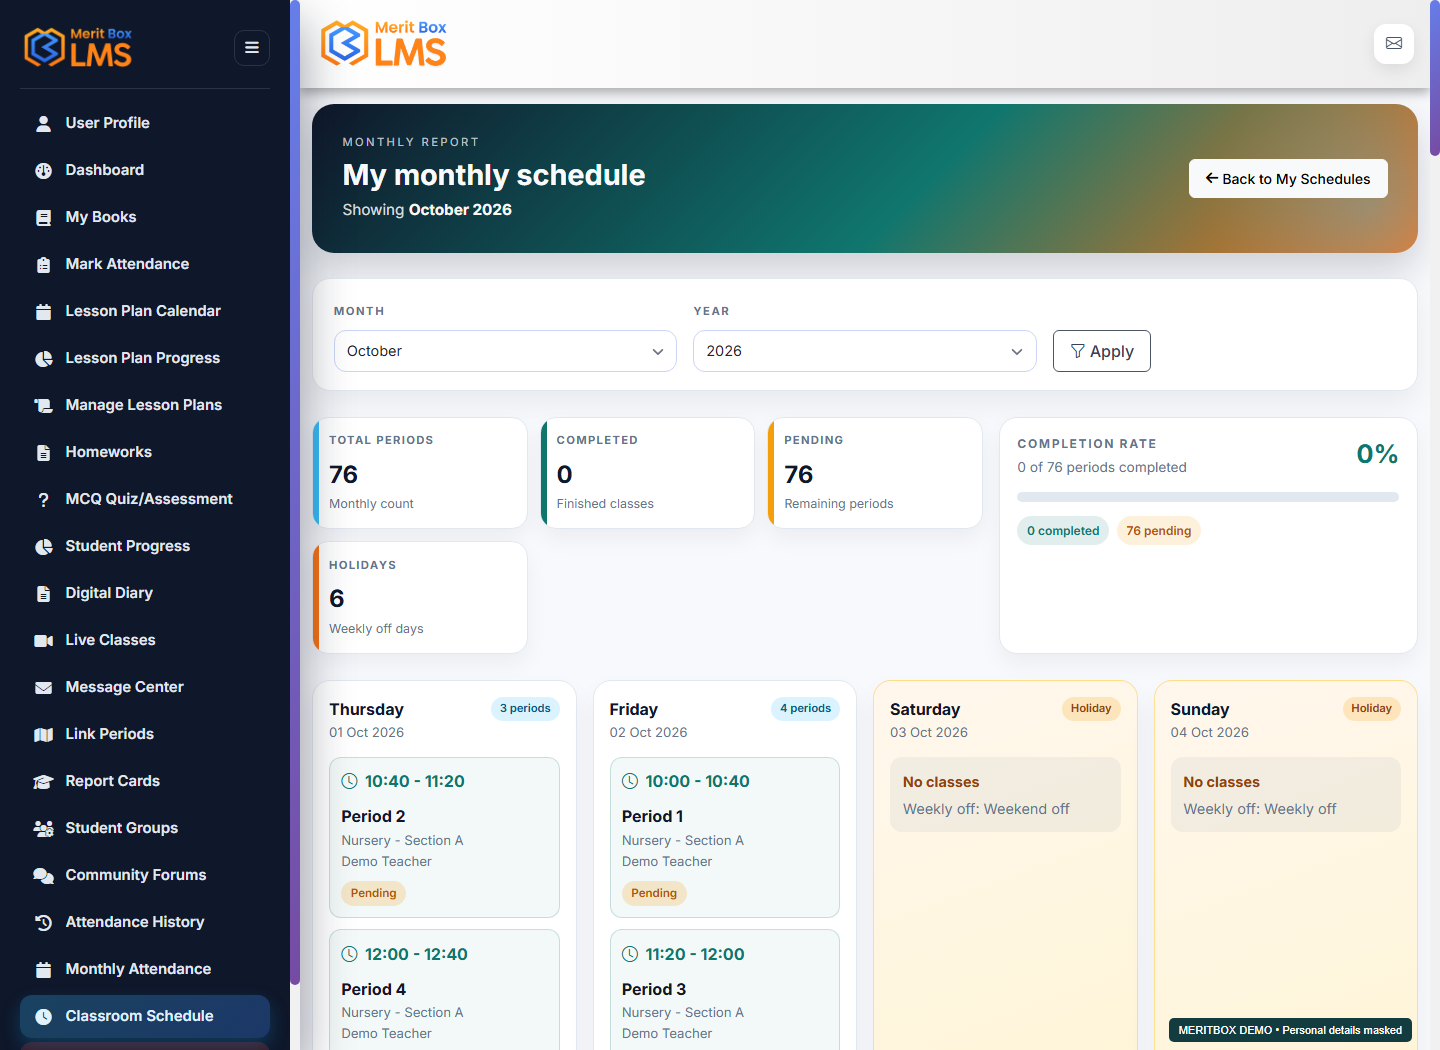
Monthly classroom schedule report

Where to go: Classroom Schedule → Monthly report

Before you start: An active timetable and session records should be available.

Follow these steps

  1. Open the monthly report and select Month and Year.
  2. Review your periods and the available completion and day statuses.
  3. For a missing session, verify the date and the schedule details.
Monthly classroom schedule report — MeritBox LMS screen View full-size screenshot
Demo screen · Personal details are masked where needed.
Expected result

The report shows your teaching periods for the selected month.

Troubleshooting

Check the report year and month, along with your active schedule assignments.

Teacher Dashboard and daily planning

Where to go: Dashboard

Before you start: The School Admin should have assigned your classes, sections, and books.

Follow these steps

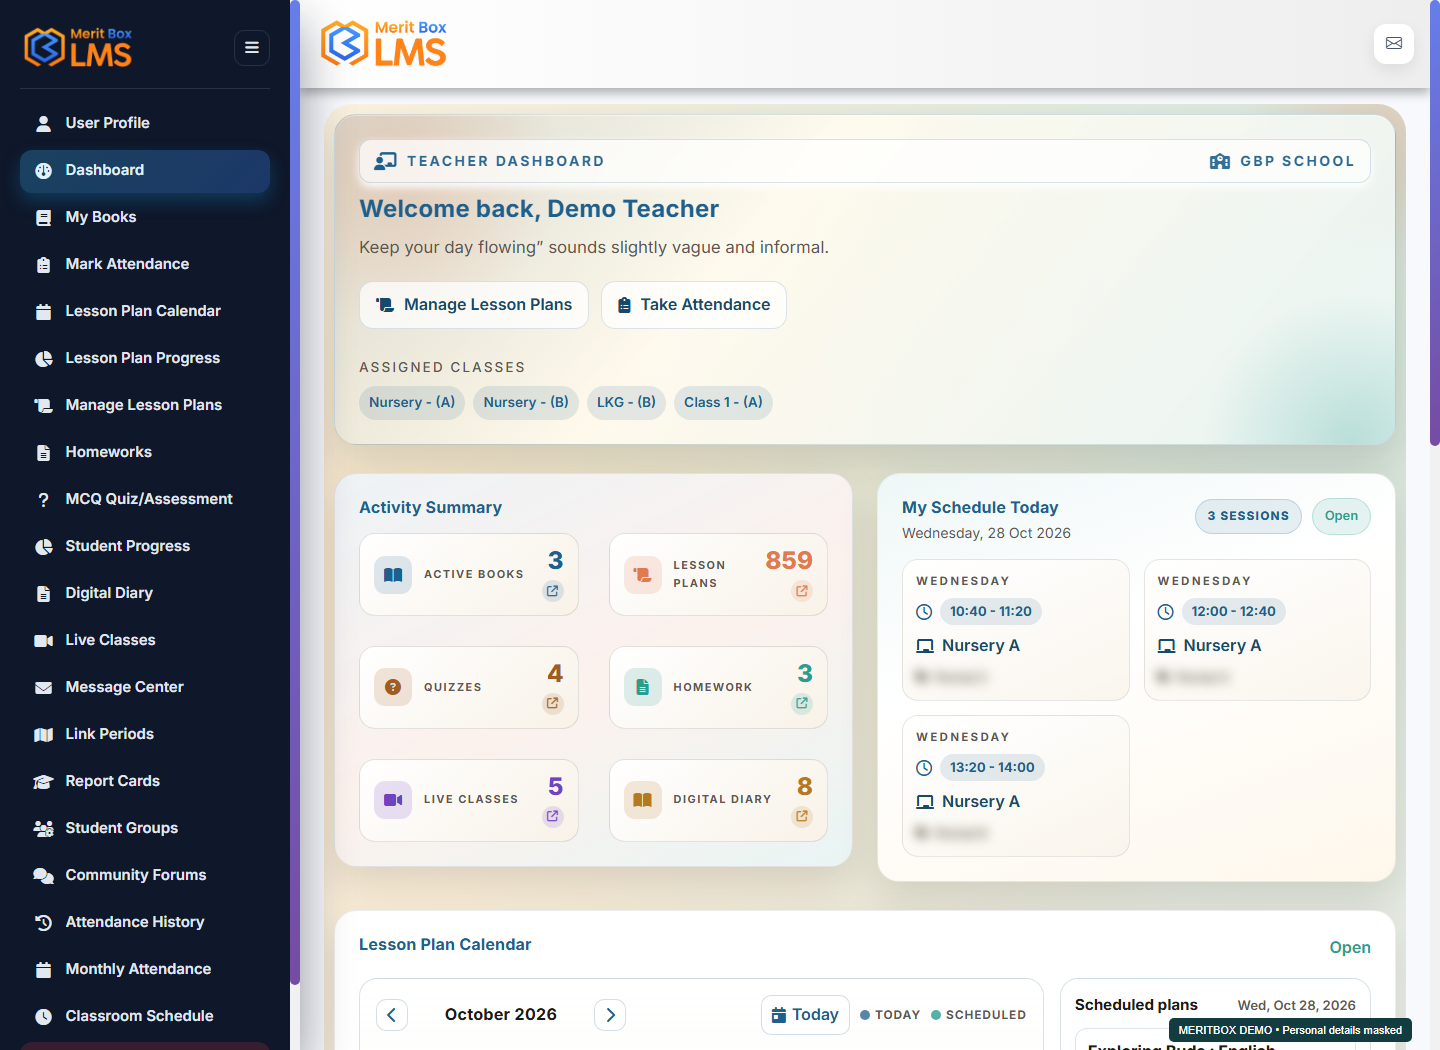
  1. Open Dashboard and review the available teaching summaries and shortcuts.
  2. Use sections such as today's lessons or schedule to identify the day's work.
  3. Select the correct class, section, and book before starting.
Teacher Dashboard and daily planning — MeritBox LMS screen View full-size screenshot
Demo screen · Personal details are masked where needed.
Expected result

You can quickly reach the day's teaching activities.

Troubleshooting

If a class or book is missing, ask the School Admin to verify both Assign Classes and Assign Books.

My Books, chapters, topics, and resources

Where to go: My Books

Before you start: The book must be assigned to your account.

Follow these steps

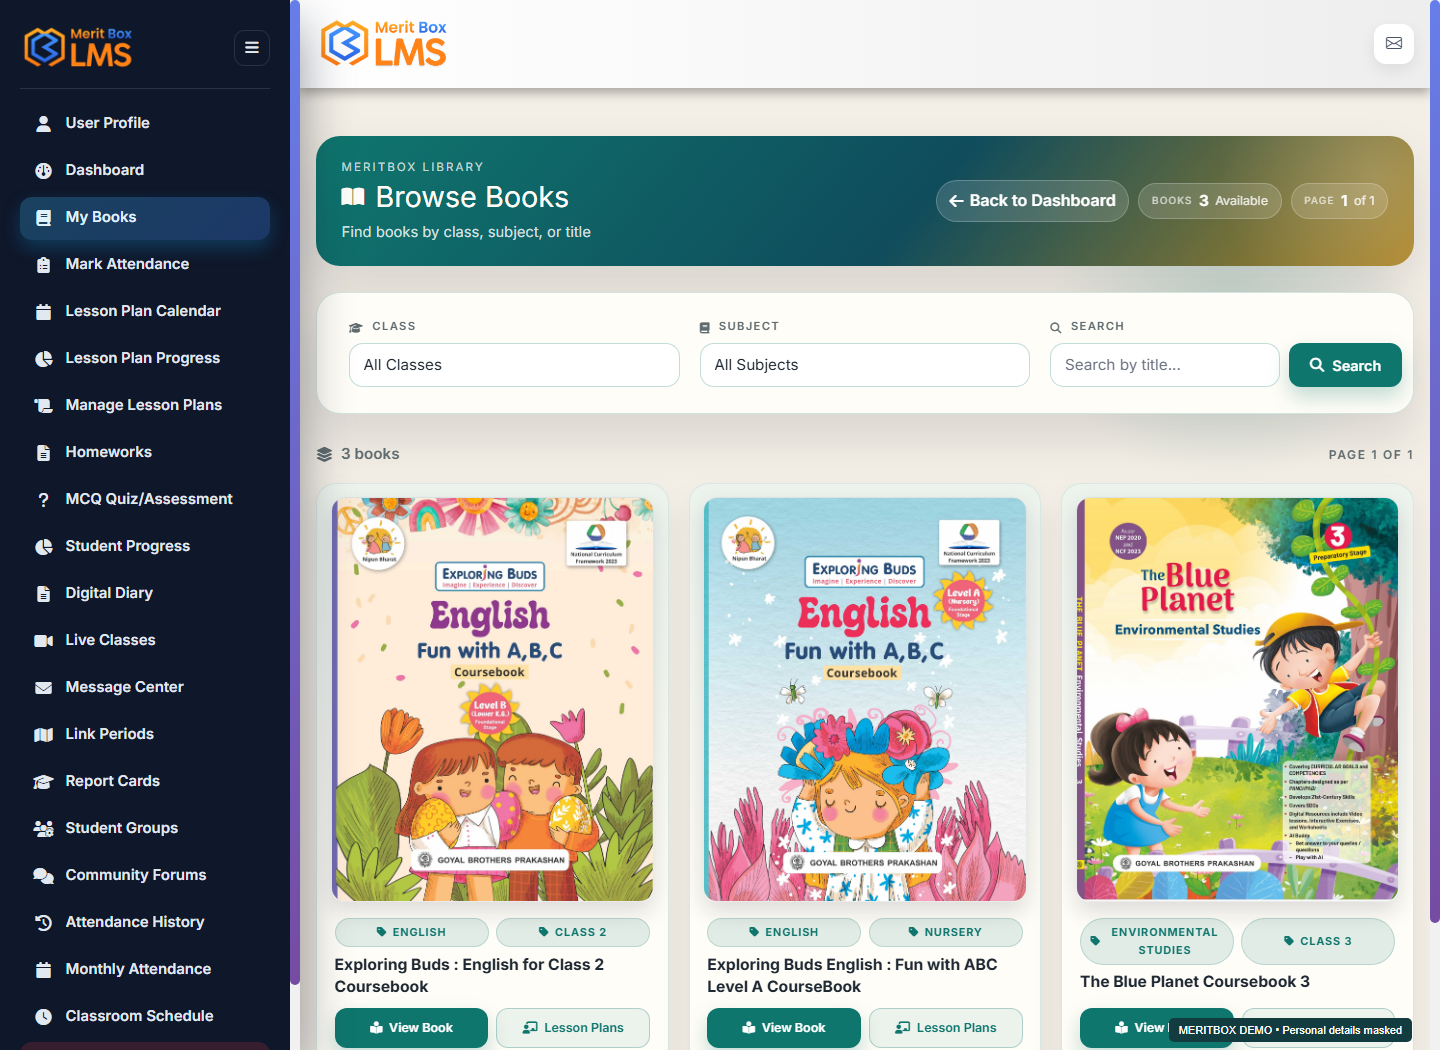
  1. Open My Books. Find a book using the available class, subject, and search filters.
  2. Open the book and select a chapter or topic. Review its lesson plans and resources.
  3. Use the resource's open or view action to play a video or open a PDF, presentation, or other available material.
  4. Use the book navigation to move to another chapter.
My Books, chapters, topics, and resources — MeritBox LMS screen View full-size screenshot
Demo screen · Personal details are masked where needed.
Expected result

The relevant learning content opens for the selected book.

Troubleshooting

If the book is still missing after clearing the filters, check its assignment with the admin. Not every book or topic includes every resource type.

Create and edit lesson plans and add resources

Where to go: Manage Lesson Plans

Before you start: Have the required book, chapter, topic, and resource material available.

Follow these steps

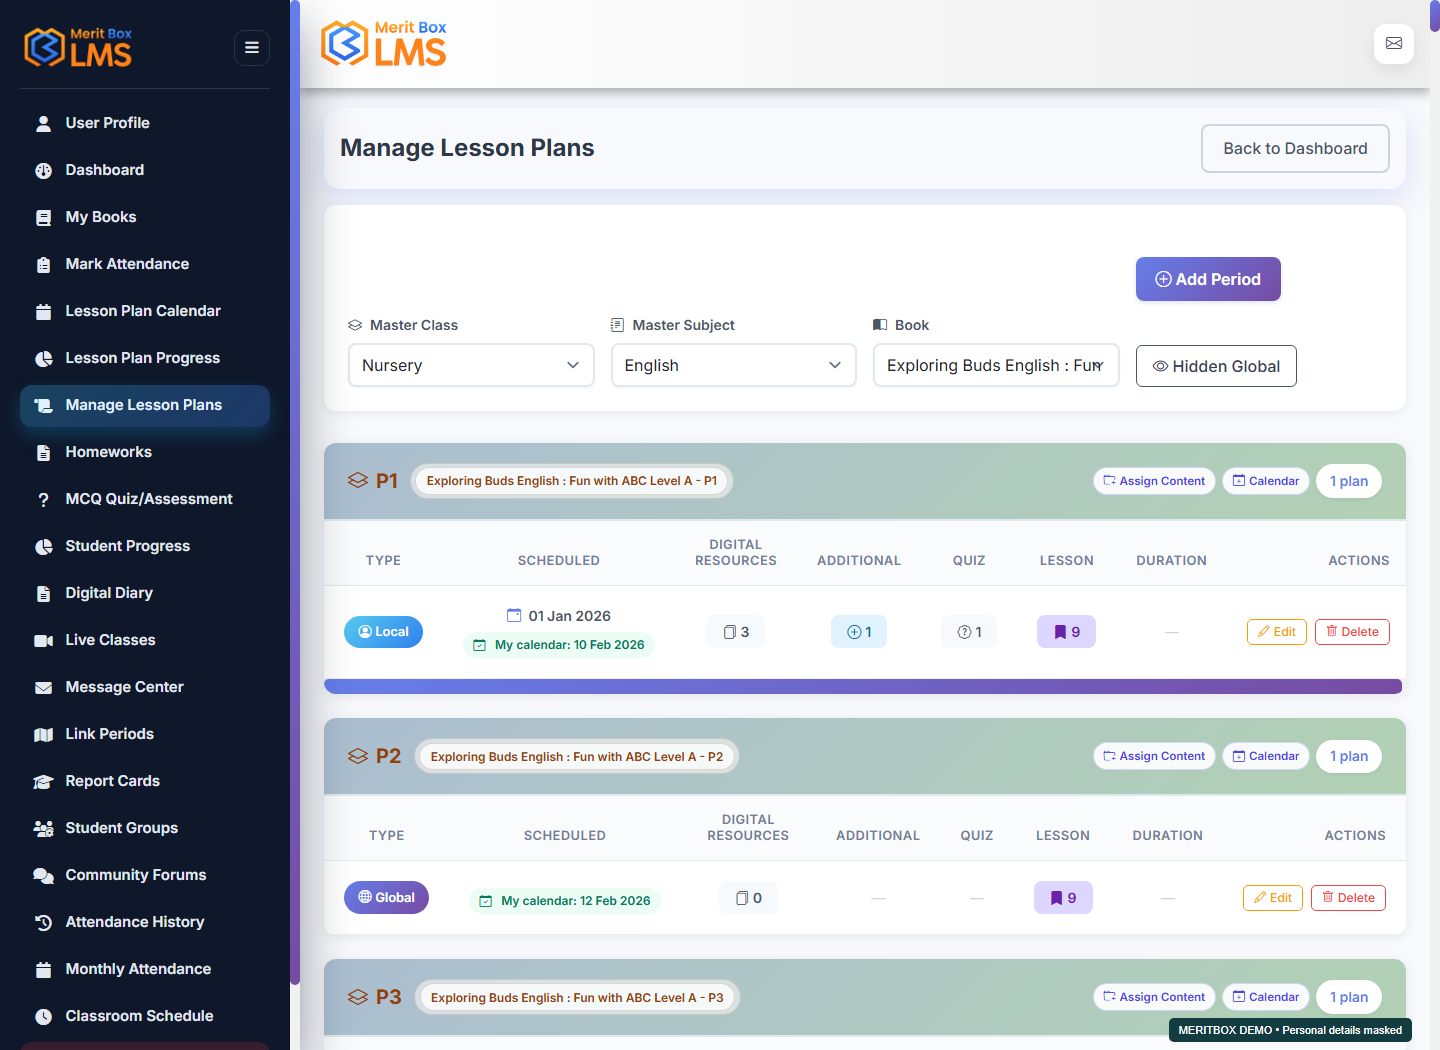
  1. Open Create in Manage Lesson Plans. Enter Title, Description, Scheduled Date, and Book.
  2. To create a calendar event as well, enable Add to Calendar and enter Calendar Start and Calendar End. Select Create Lesson Plan.
  3. Use the plan's Edit screen to change its details. To add resources and quizzes, open Assign Content for the plan; see the separate guide below.
  4. Use Copy in the plan list to create an editable copy. Where Hide and Unhide controls are available, use them to manage visibility in your own list; these controls do not replace student sharing.
Create and edit lesson plans and add resources — MeritBox LMS screen View full-size screenshot
Demo screen · Personal details are masked where needed.
Expected result

The plan is saved. Assigning content and sharing it with students are separate actions.

Troubleshooting

If saving fails, check the required fields and file or link format. Complete the sharing step to make the content available to students.

Assign Content: resources, quizzes, and additional material

Where to go: Manage Lesson Plans → Assign Content

Before you start: The book and selected lesson plan should be available.

Follow these steps

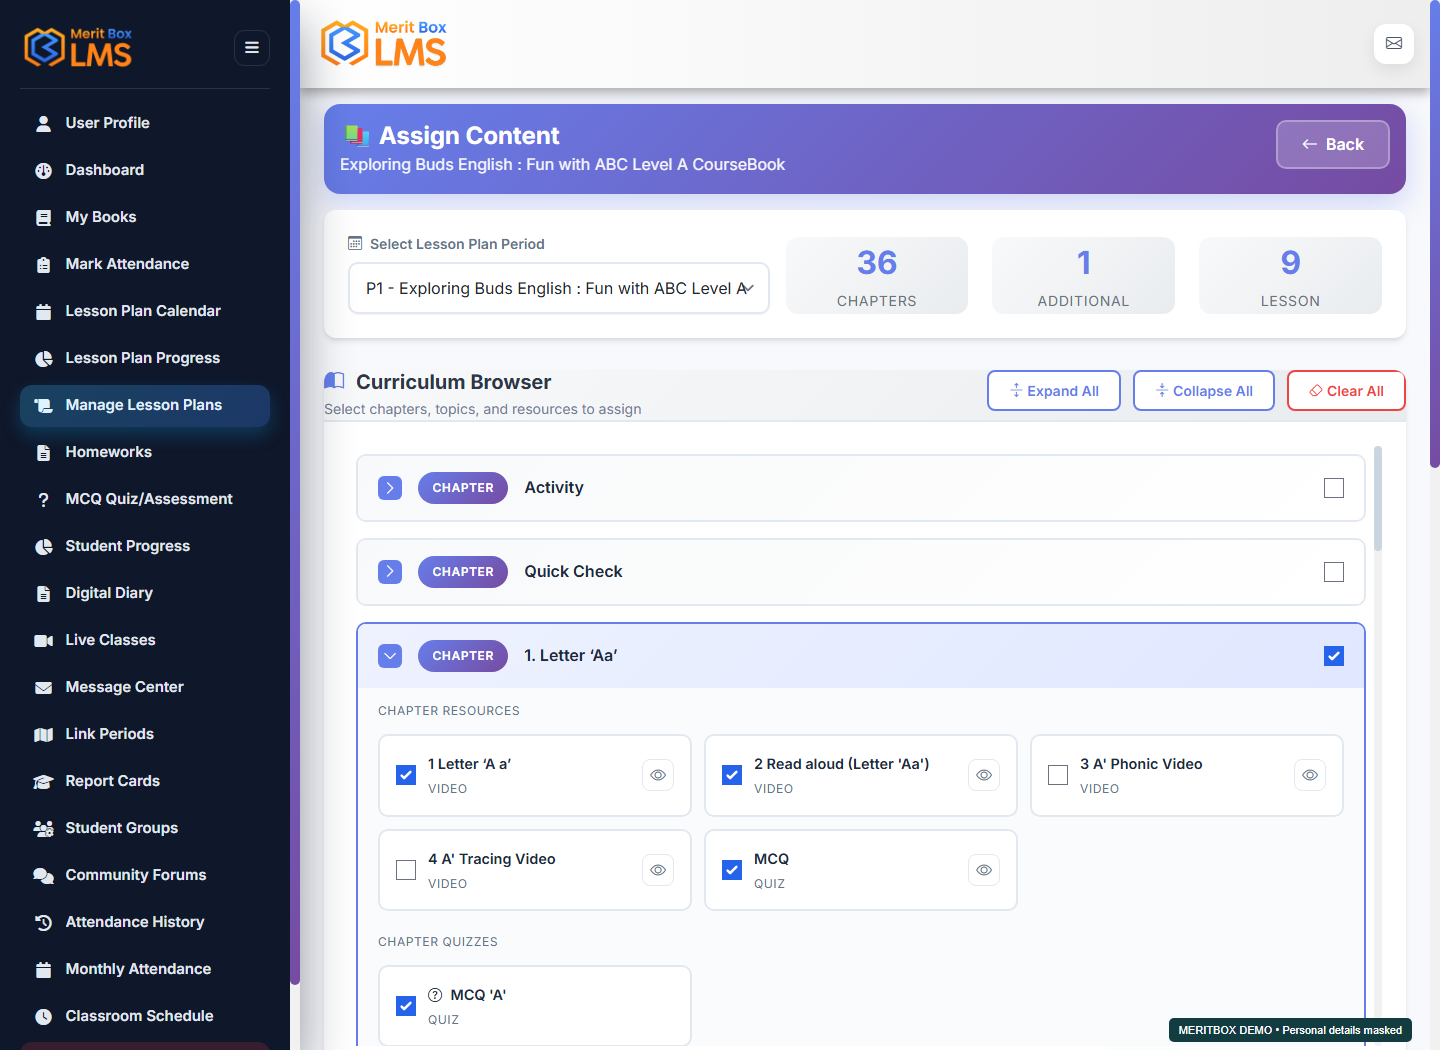
  1. Open Assign Content for the plan and use the available plan selector to choose the correct plan or period.
  2. Expand the chapter and topic tree. Select the checkboxes for the relevant chapters, topics, digital resources, and quizzes. Review your choices because Clear all can remove the selections.
  3. Select Assign Content or the save action. If a shared or global plan displays a local-copy confirmation, read the message and verify the teaching copy you are selecting.
  4. Use the add actions in Additional Resources and Lesson Plan resources. Enter the title, resource details, and file or link in the available form. Preview after saving and use Edit to make corrections.
  5. To make the material available to students, also select the correct content items and audience in Share Plan.
Assign Content: resources, quizzes, and additional material — MeritBox LMS screen View full-size screenshot
Demo screen · Personal details are masked where needed.
Expected result

The selected resources and quizzes are linked to the plan, and supplementary material is saved.

Troubleshooting

If content is missing from the tree, check the book, chapter, plan, and filters. Adding a resource does not automatically share it with every student.

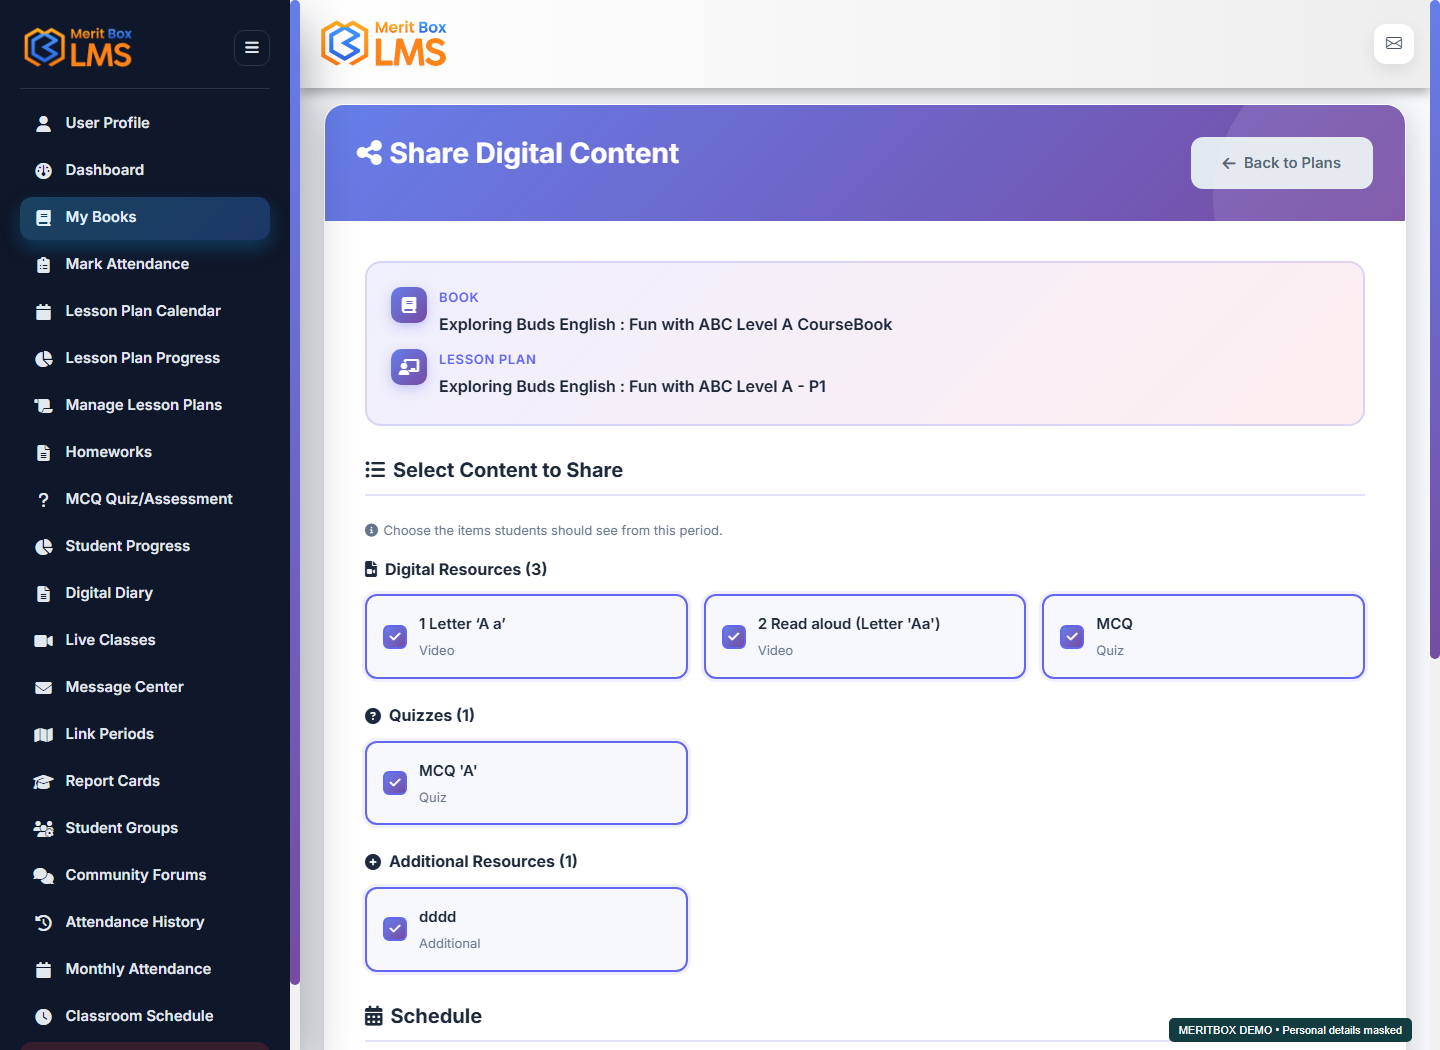
Share a lesson plan with students

Where to go: My Books → Book → Plans → Share Plan

Before you start: The plan should be ready, and the intended students, classes, or groups should be assigned correctly.

Follow these steps

  1. In My Books, open the plans for the book and chapter. Select Share for the correct plan.
  2. Under Select Content to Share, select only the Digital Resources, Quizzes, and Additional Resources that students should see.
  3. Set availability with StartOn and the optional EndOn. Choose an available audience mode such as All, Groups, Classes, or Students, and select the recipients.
  4. Save the sharing settings. Verify the selected items, audience, and dates. For plans shared with a class or individual students, ask them to open Books and Topics → Lesson Plans; group shares may also be listed in Shared Content.
Share a lesson plan with students — MeritBox LMS screen View full-size screenshot
Demo screen · Personal details are masked where needed.
Expected result

The selected audience can see the plan according to its availability and access settings.

Troubleshooting

If students cannot find the plan, check sharing, audience, and availability. Shared Content lists group shares, so it does not include every class or individual share. If a plan link in the group list does not open, use Books and Topics → Lesson Plans and report the problem to the teacher.

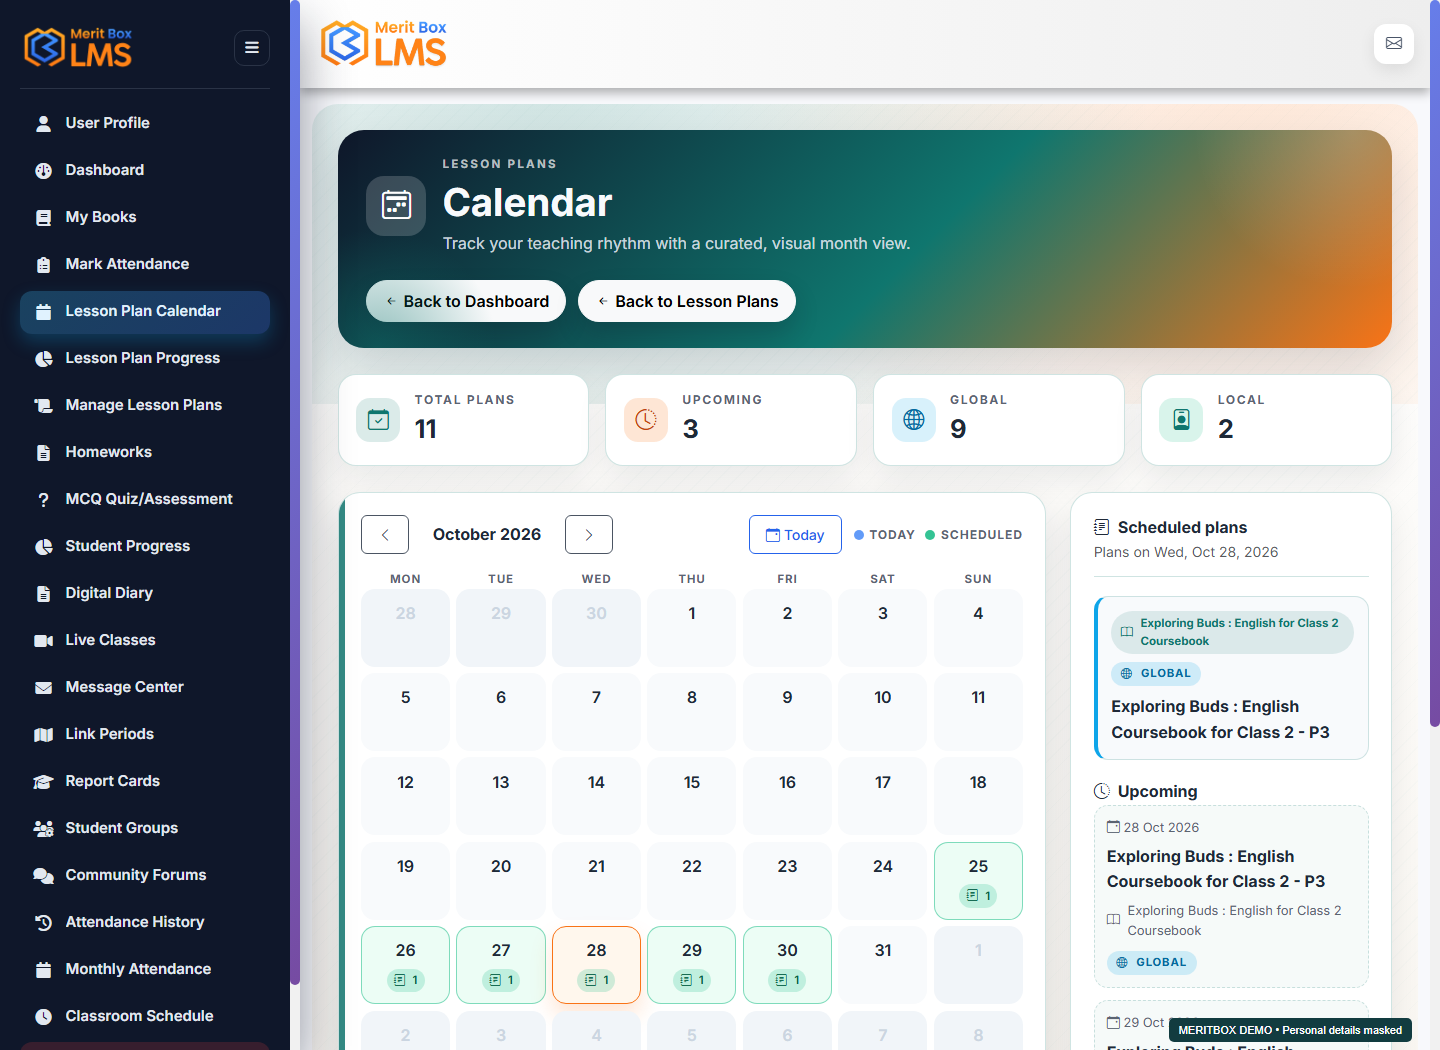
Lesson Plan Calendar

Where to go: Lesson Plan Calendar

Before you start: Plans, teaching dates, and period assignments should be available.

Follow these steps

  1. Open Lesson Plan Calendar and choose the available month, date, or class filters.
  2. Select a day or entry to view the lesson information.
  3. Where scheduling or edit controls are available, adjust the plan's date or period and save.
  4. After changing a date, review the calendar entry and its related period assignment.
Lesson Plan Calendar — MeritBox LMS screen View full-size screenshot
Demo screen · Personal details are masked where needed.
Expected result

Teaching plans appear in the calendar.

Troubleshooting

If an entry is missing, check the selected date range, plan, and period assignment.

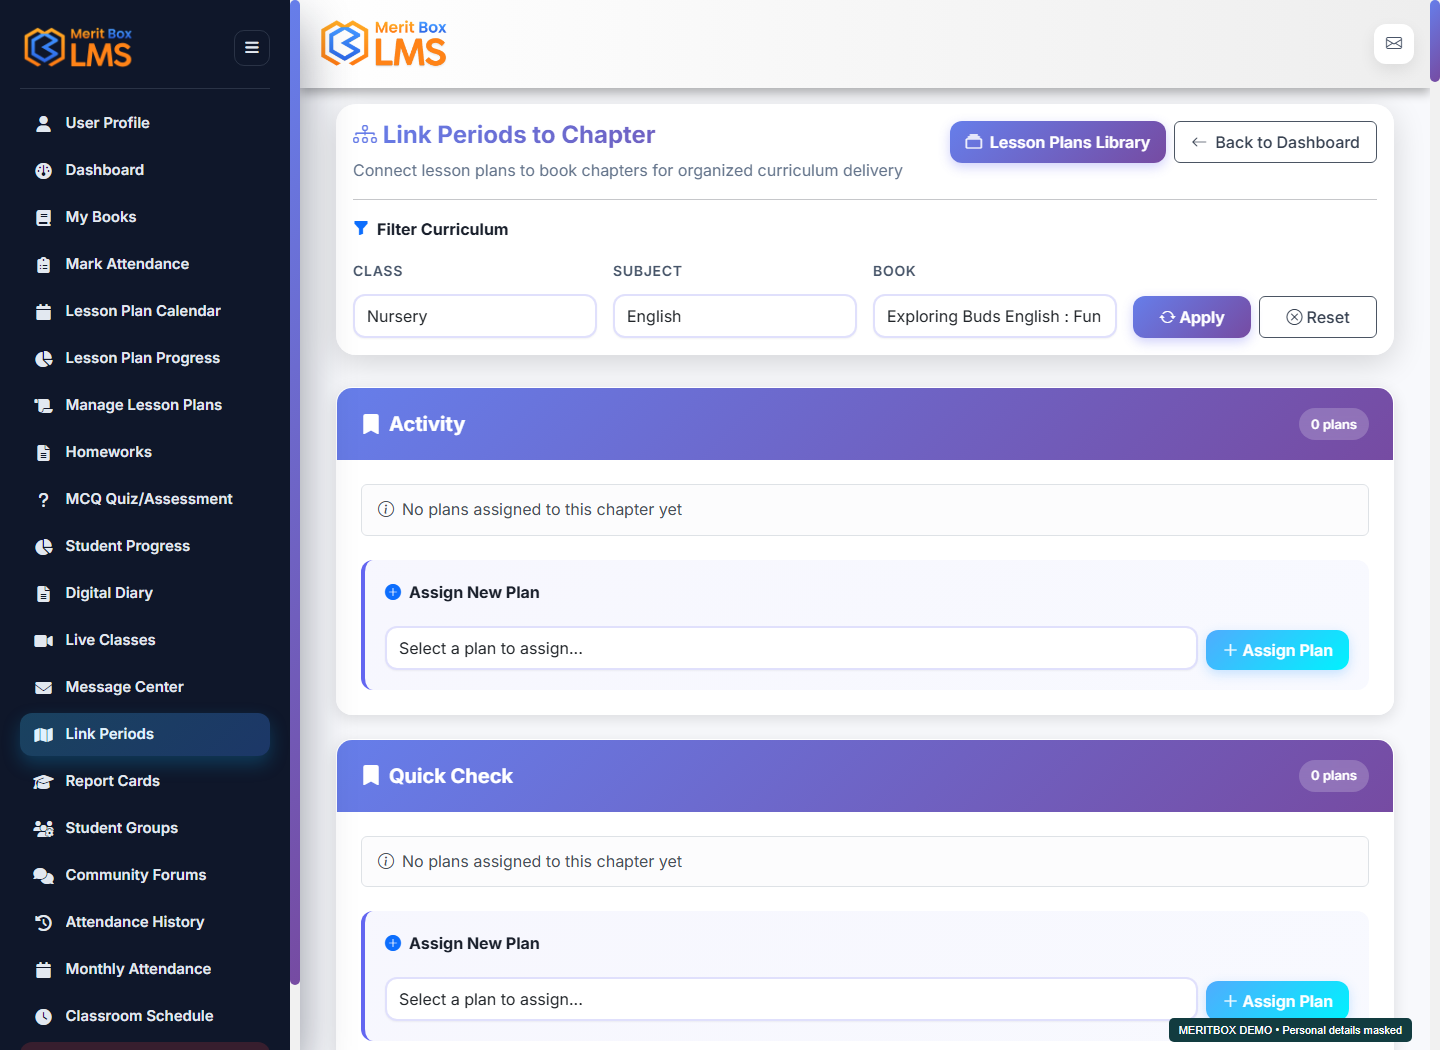
Link Periods: connect a lesson plan to a chapter

Where to go: Link Periods

Before you start: The book should contain chapters and the relevant lesson plans or periods.

Follow these steps

  1. Open Link Periods and use the Class, Subject, and Book filters to select the curriculum.
  2. Under Assign New Plan for the correct chapter, choose a lesson plan or period and assign it.
  3. Verify the assigned plans under the chapter. Use the available Unassign action to correct an incorrect link.
Link Periods: connect a lesson plan to a chapter — MeritBox LMS screen View full-size screenshot
Demo screen · Personal details are masked where needed.
Expected result

The plan or period is linked to the selected chapter.

Troubleshooting

This screen links curriculum chapters and plans. The School Admin manages the classroom timetable through Classroom Schedule.

Classroom Schedule and period completion

Where to go: Classroom Schedule

Before you start: The admin should have assigned an active timetable.

Follow these steps

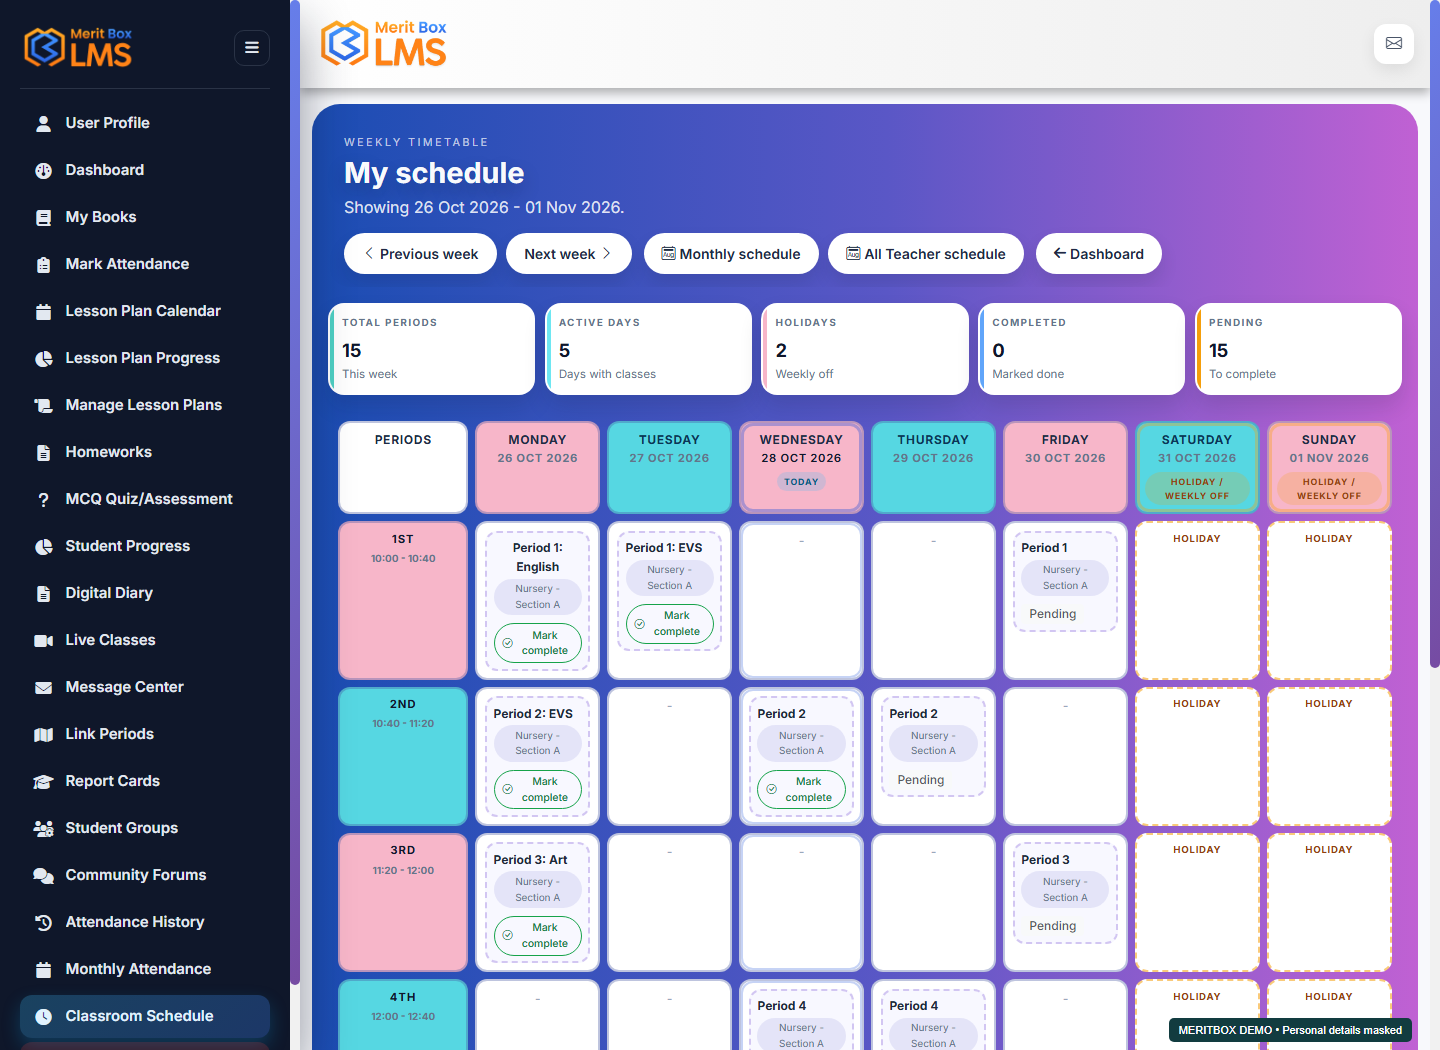
  1. Review your weekly periods and times in Classroom Schedule. Use Previous and Next week to change the dates.
  2. After teaching an eligible period, select Mark complete. First verify the date, class, and period.
  3. Check the Completed badge. Open Monthly schedule to view the report for the entire month.
Classroom Schedule and period completion — MeritBox LMS screen View full-size screenshot
Demo screen · Personal details are masked where needed.
Expected result

Your weekly timetable and recorded period completion are displayed.

Troubleshooting

Ask the School Admin who edits the timetable to correct an incorrect time or missing period.

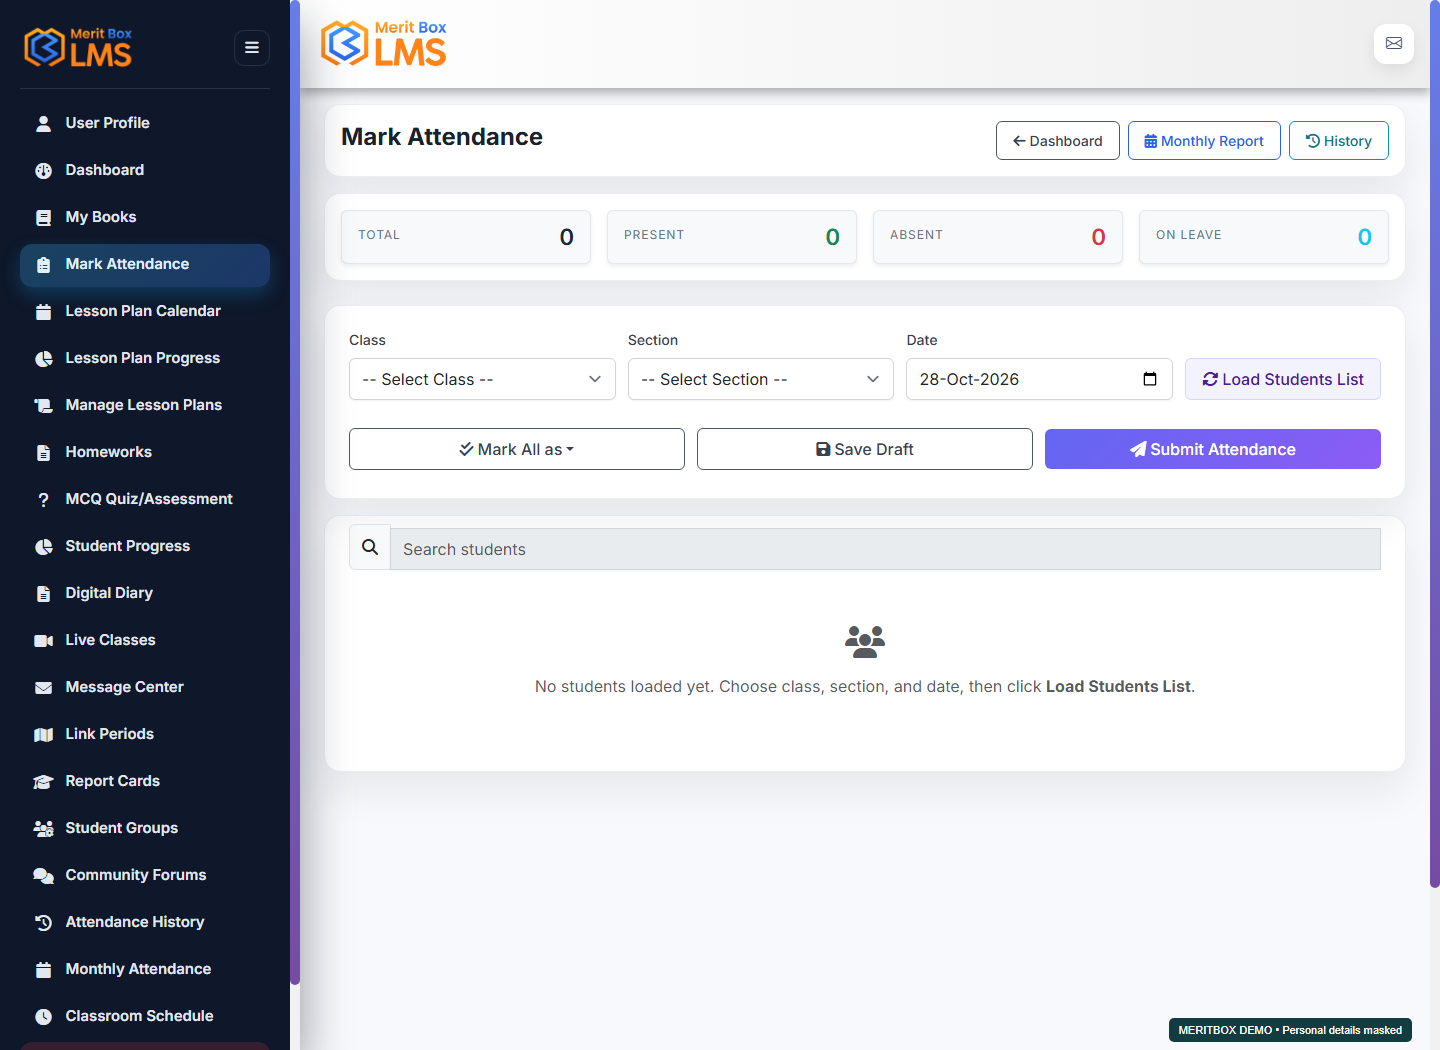
Mark attendance and save a session

Where to go: Mark Attendance

Before you start: The student list should belong to the correct class and section.

Follow these steps

  1. Open Mark Attendance. Select Class, Section, and Date, then load the student list. Attendance may be disabled on a school holiday or blocked date.
  2. Mark each student Present, Absent, or On Leave, and enter Remarks if needed. Review individual exceptions after using the Mark All controls.
  3. Select Save Draft if the attendance still needs review. You can reopen a draft to change statuses and remarks.
  4. Select Submit Attendance only after confirming every student, the date, and all selections. Submission locks the session and disables editing. Verify the submitted record in Attendance History.
Mark attendance and save a session — MeritBox LMS screen View full-size screenshot
Demo screen · Personal details are masked where needed.
Expected result

Save Draft creates an editable draft; Submit Attendance creates a locked submitted session.

Troubleshooting

If a student is missing, check the section and teacher-class assignment. This screen does not provide correction controls for a submitted session; ask the School Admin for help with an incorrect entry. Read the message if a holiday or blocked date prevents a new session.

Attendance History and Monthly Attendance

Where to go: Attendance History / Monthly Attendance

Before you start: Attendance sessions should have been saved.

Follow these steps

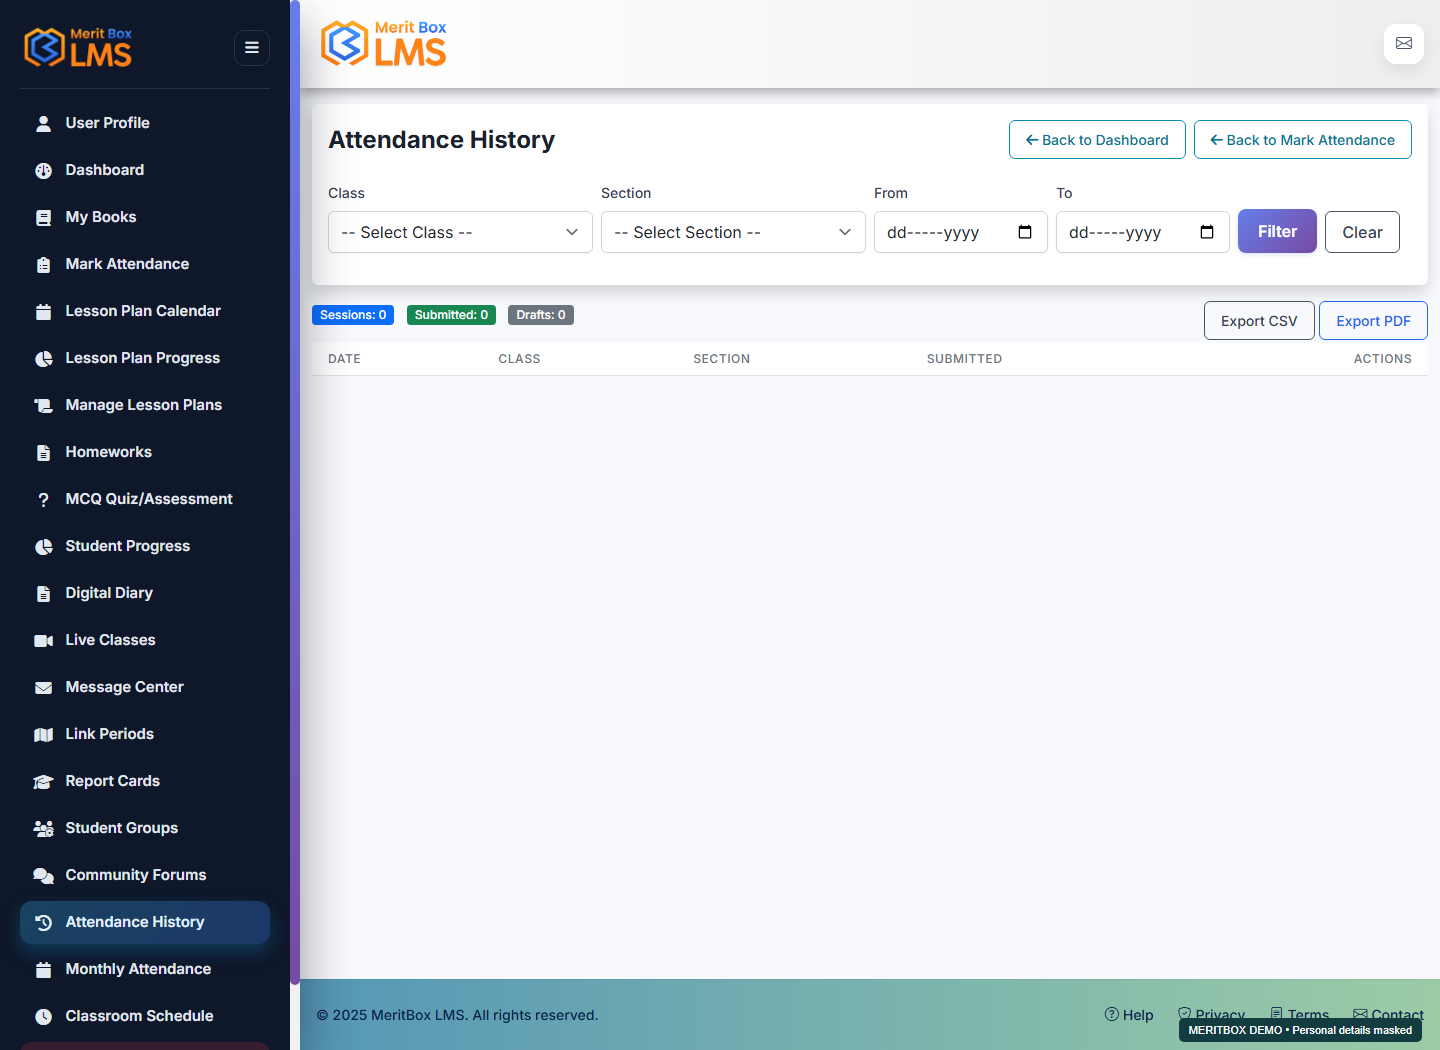
  1. In Attendance History, use the relevant session and date filters to find a record, then open Session Details.
  2. Open Monthly Attendance and select Class, Section, Student, Month, and Year.
  3. Select Load and review the monthly summary and daily statuses.
  4. For an incorrect entry, check the original session's date and status. You can correct a draft in Mark Attendance; ask the School Admin for help if the submitted session is locked.
Attendance History and Monthly Attendance — MeritBox LMS screen View full-size screenshot
Demo screen · Personal details are masked where needed.
Expected result

You can review attendance by session and month.

Troubleshooting

If the monthly report is empty, check Month and Year along with the class and section filters. There may be no sessions matching the current filters.

Create, share, and edit homework

Where to go: Homeworks → Create new homework

Before you start: Decide on the instructions and intended audience.

Follow these steps

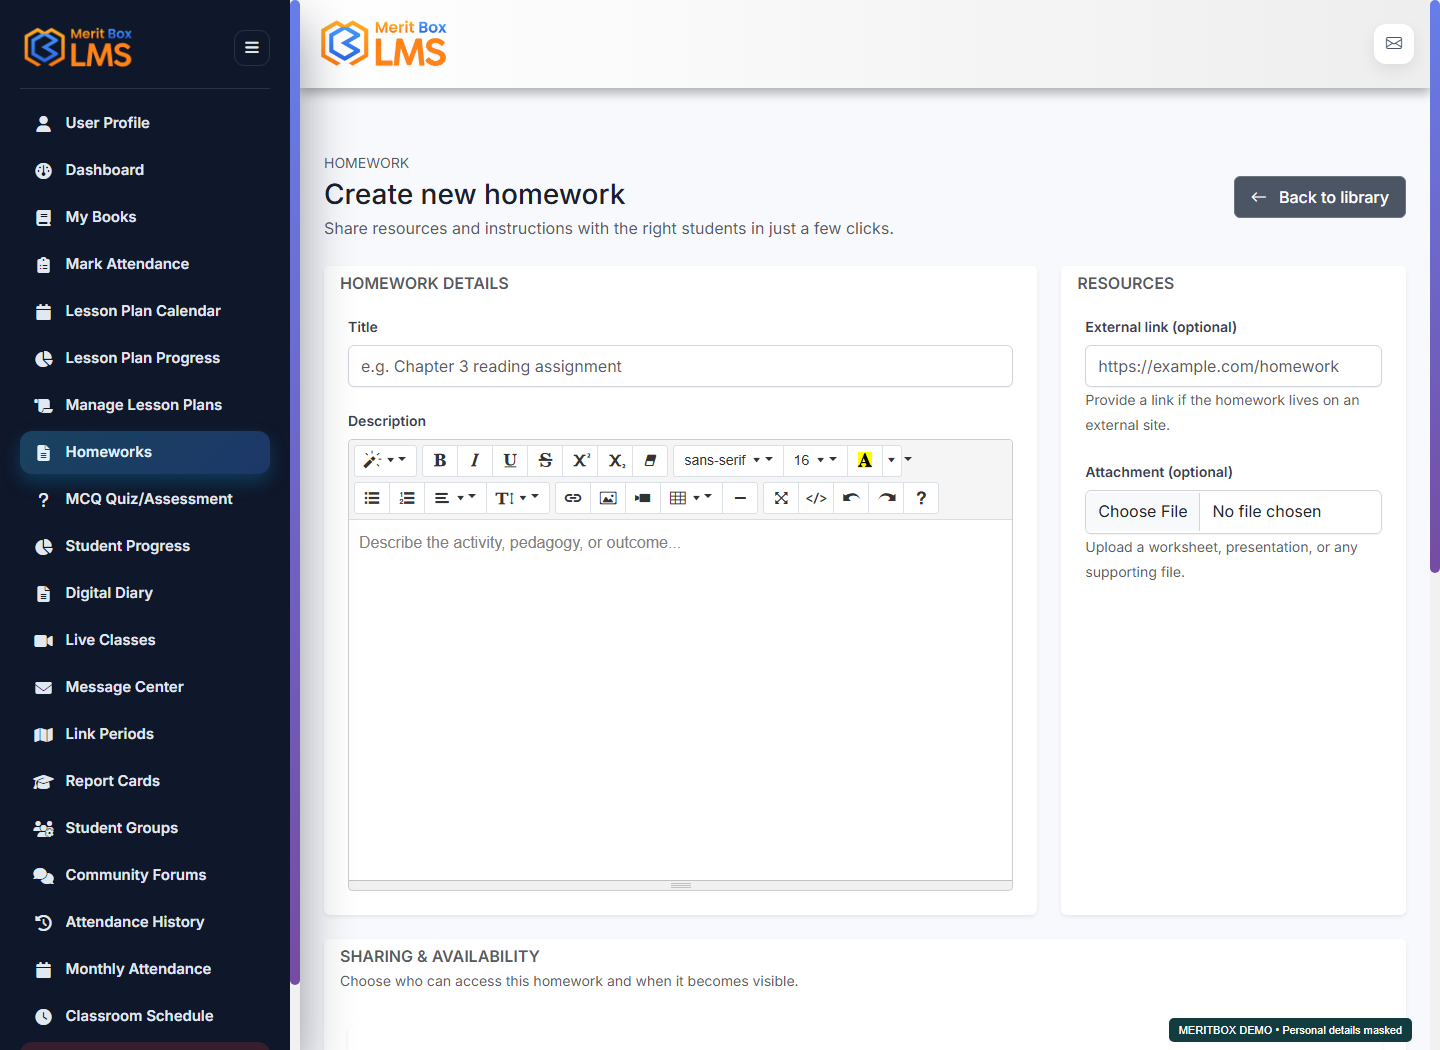
  1. Open a new homework form in Homeworks. Clearly describe the work in Title and Description.
  2. Add an optional External link or Attachment. Set availability with Starts and the optional Ends.
  3. Under Share with, choose an available Classes, Groups, All, or Students mode and select the intended audience.
  4. Create or save the homework. Verify it in the list. Use Edit to change the instructions, attachment, or sharing. Confirm the correct file when replacing or removing an attachment.
Create, share, and edit homework — MeritBox LMS screen View full-size screenshot
Demo screen · Personal details are masked where needed.
Expected result

The selected students can see the homework during its availability window.

Troubleshooting

For missing homework, check the start and end dates, sharing mode, selected recipients, and group membership. Do not save with an empty audience.

Create a quiz or assessment, configure settings, and publish

Where to go: MCQ Quiz/Assessment → Add Quiz

Before you start: Have the question set and correct answers ready.

Follow these steps

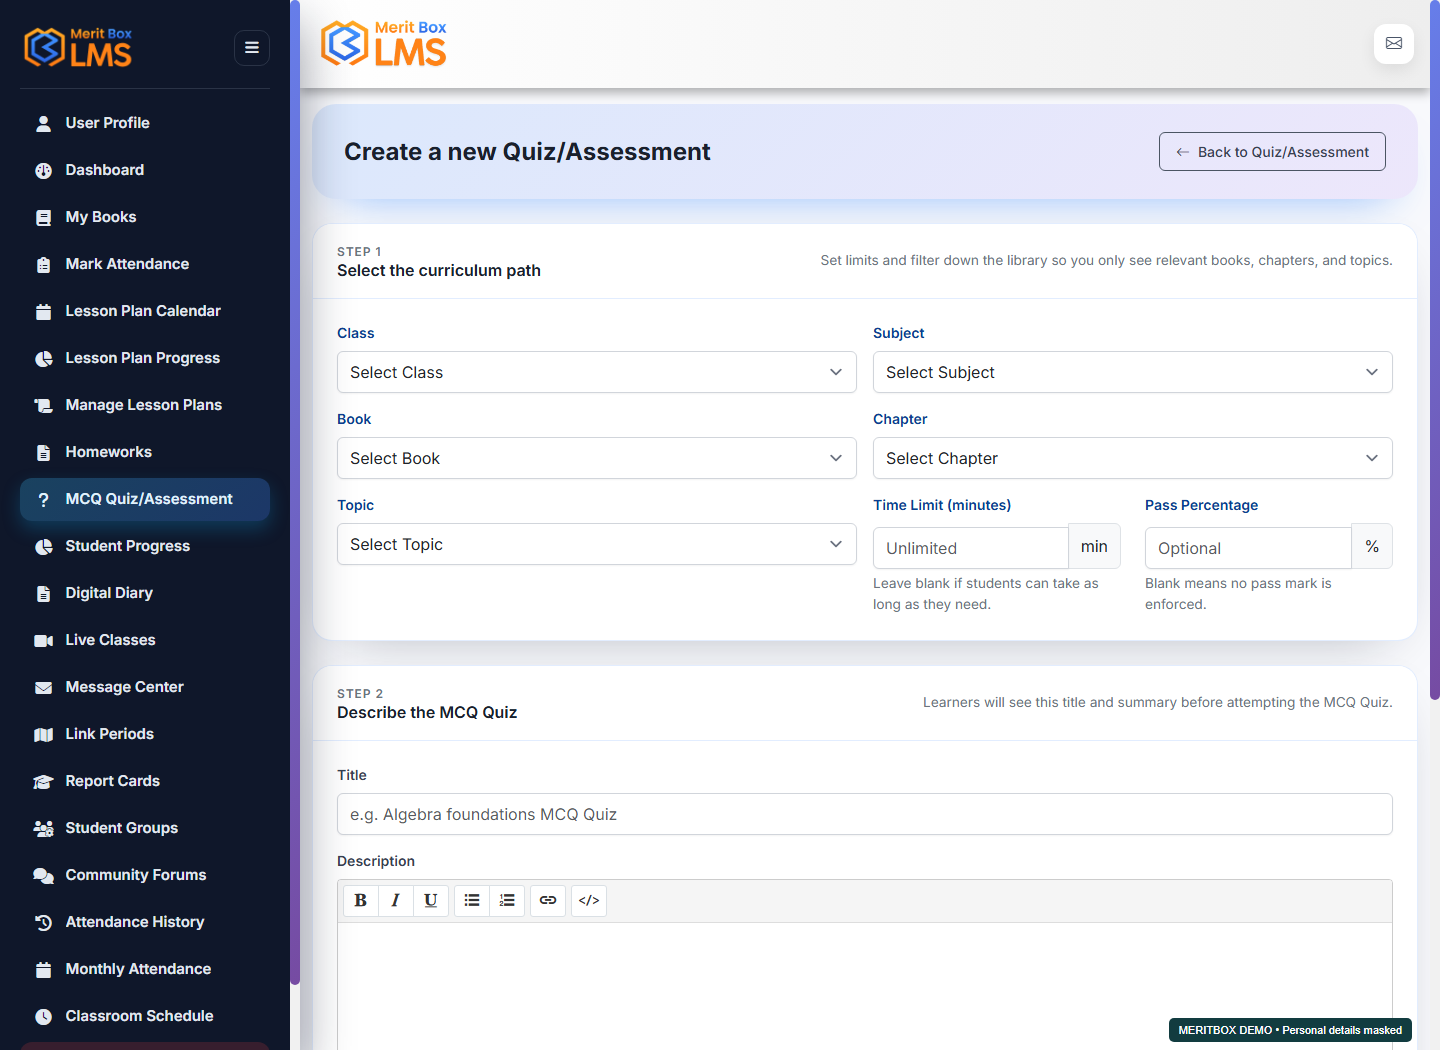
  1. Open MCQ Quiz/Assessment and select Add Quiz. Choose Class, Subject, Book, and Chapter or Topic as needed.
  2. Enter Title and Description. Review Time limit, Pass mark, and the Shuffle questions and options settings.
  3. After creating or saving the quiz, open Manage Questions. Add manual questions or use Import from library to select a question set.
  4. Review the questions, answers, and total points. Use Share to set the audience and Starts/Ends availability. Use Publish to make the quiz ready for students.
  5. Verify Published status, question count, and sharing in the quiz list. Use Edit, preview, and question management controls to make changes.
Create a quiz or assessment, configure settings, and publish — MeritBox LMS screen View full-size screenshot
Demo screen · Personal details are masked where needed.
Expected result

A saved, published, and shared quiz becomes available to eligible students.

Troubleshooting

If a quiz is missing, check its published status, audience, and availability dates. If its question list is empty, add questions through Manage Questions.

Quiz results and export

Where to go: MCQ Quiz/Assessment → Results

Before you start: Students should have submitted quiz attempts.

Follow these steps

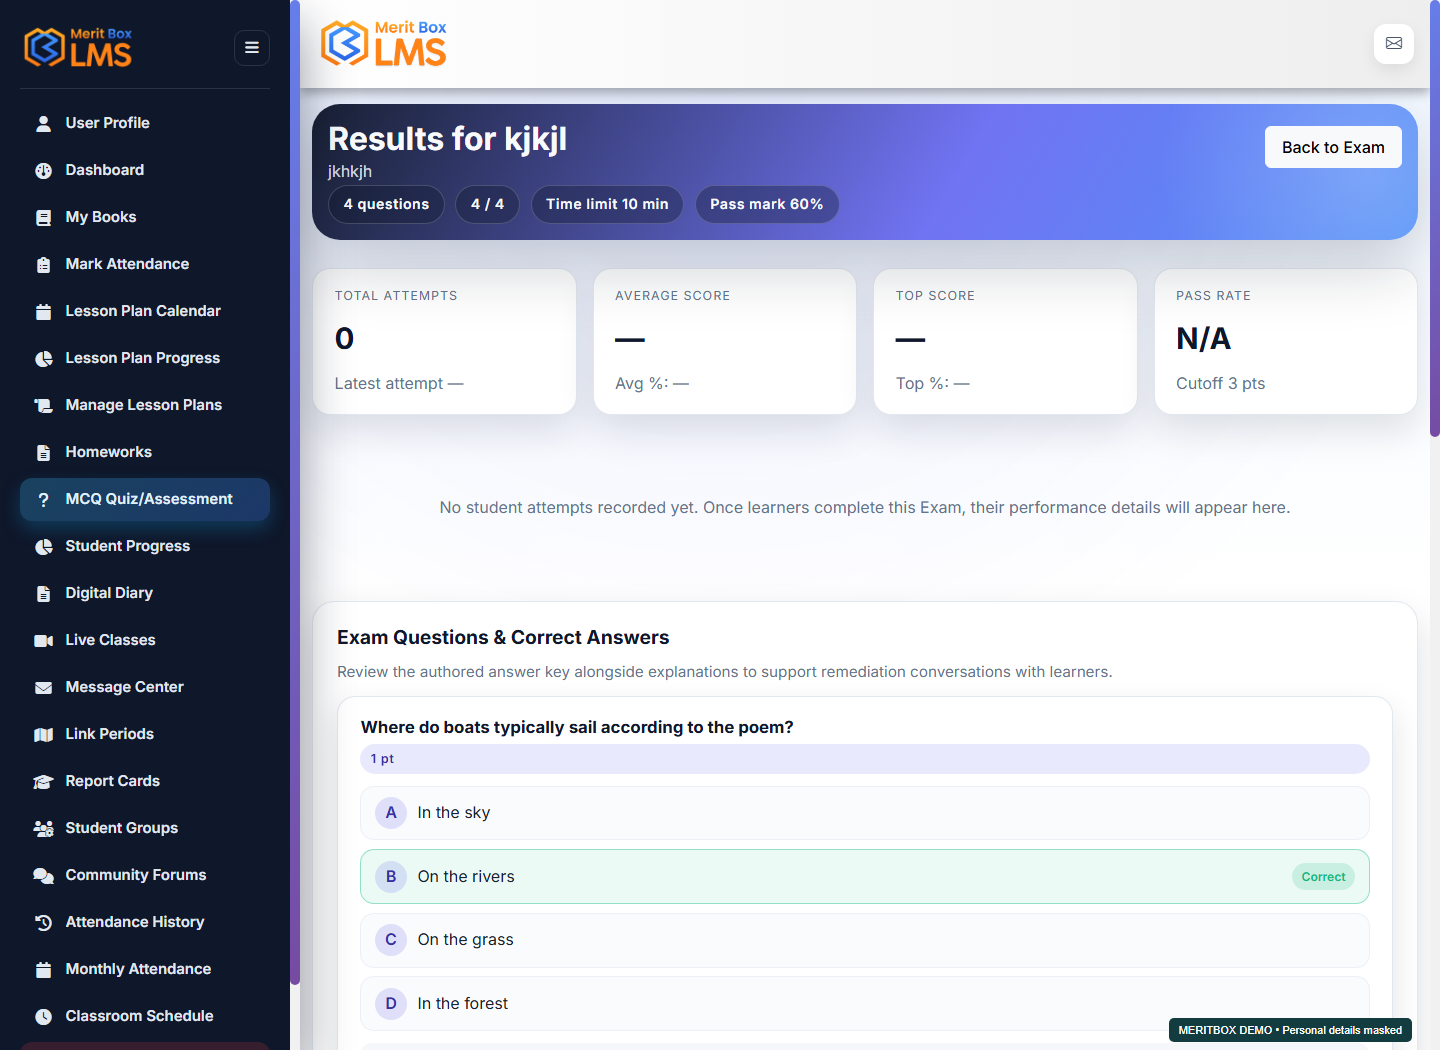
  1. Select the relevant quiz in the list and open its available results or report action.
  2. Set a date range if the results report provides one. Review student, score, and attempt details.
  3. Use the Export action to download an available results file, and verify that it contains students from the correct quiz.
Quiz results and export — MeritBox LMS screen View full-size screenshot
Demo screen · Personal details are masked where needed.
Expected result

The report shows submitted attempts and performance for the selected quiz.

Troubleshooting

If there are no results, verify the quiz ID, submission status, and dates. Opening an exam alone does not create a submitted attempt.

Review Student Progress

Where to go: Student Progress

Before you start: Plans or resources should have been shared with students.

Follow these steps

  1. Open Student Progress. Select the available Class, Subject, Book, and Lesson Plan filters, then select Apply or Load.
  2. Review the filtered student activity and available viewed and completed counts. Open a student's record if a detail action is available.
  3. Follow up on incomplete activities. Change the filters as needed to review another book or plan.
Review Student Progress — MeritBox LMS screen View full-size screenshot
Demo screen · Personal details are masked where needed.
Expected result

The progress of students' assigned learning activities is displayed.

Troubleshooting

Progress and marks are different indicators. For missing activity, check sharing, the correct student, and the reporting dates.

Lesson Plan Progress and completion

Where to go: Lesson Plan Progress / My Books → Plans

Before you start: Teaching plans and completion records should be available.

Follow these steps

  1. Apply the available filters in Lesson Plan Progress to review plan completion.
  2. Open a plan you have taught in My Books → Plans and record completion using the available teacher completion action.
  3. Refresh the report and verify the updated completion for the correct plan and class.
Lesson Plan Progress and completion — MeritBox LMS screen View full-size screenshot
Demo screen · Personal details are masked where needed.
Expected result

Teaching completion and the filtered plan progress are updated.

Troubleshooting

Teacher completion and student completion may differ. Check that you selected the correct completion control and plan.

Create and edit Digital Diary entries and review the class timeline

Where to go: Digital Diary

Before you start: Have the entry's class, section, date, and text ready.

Follow these steps

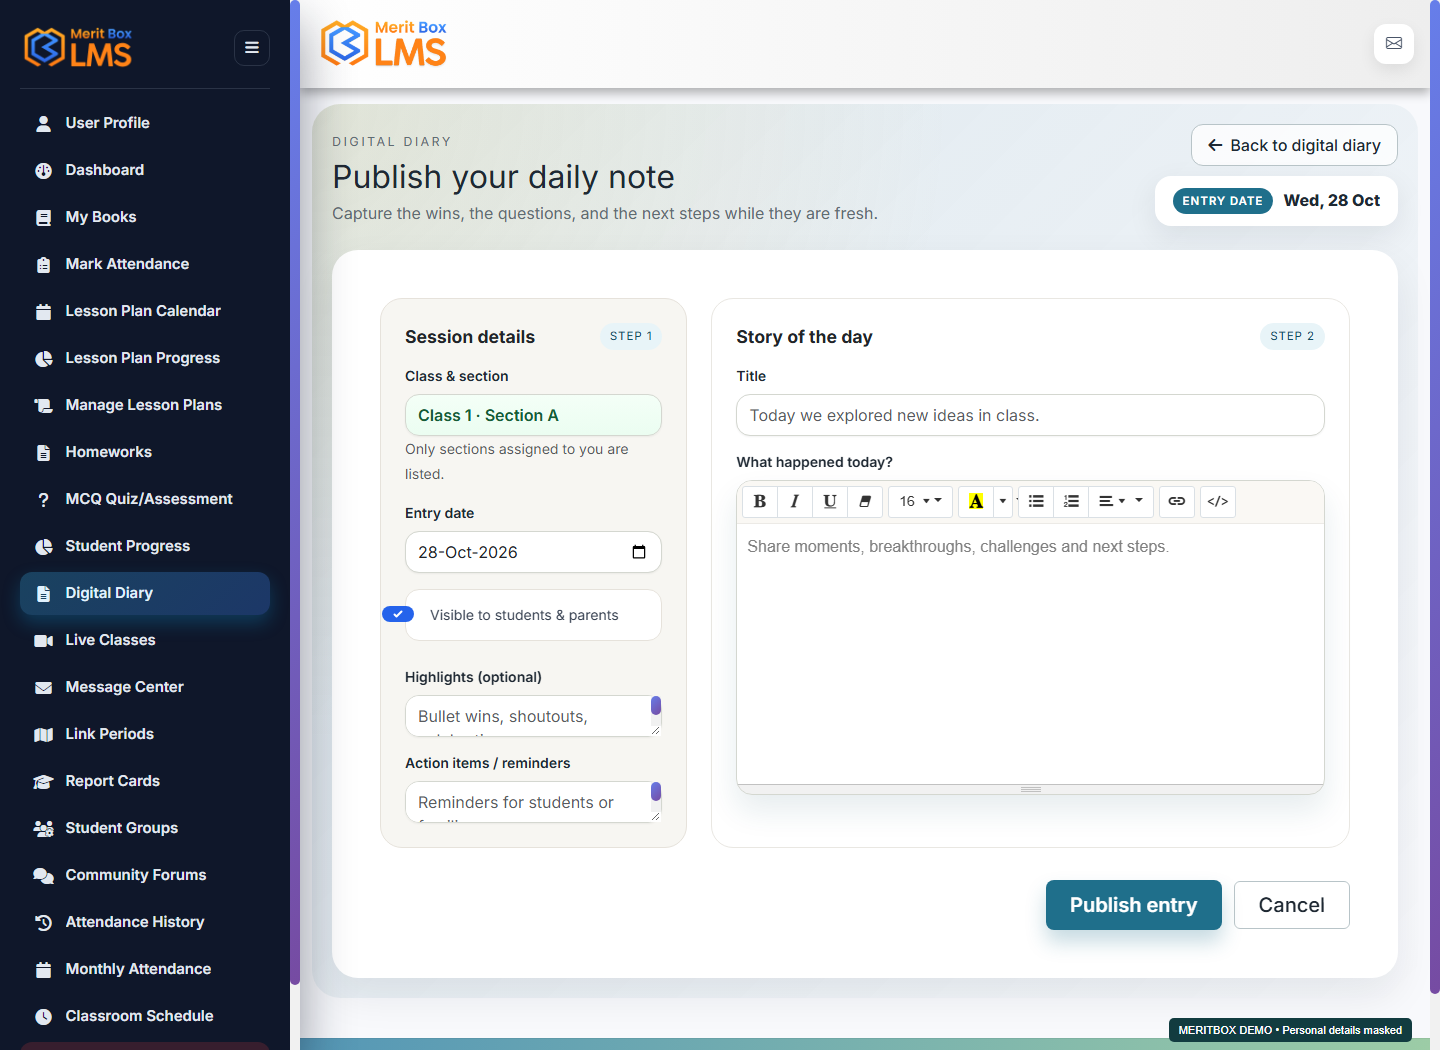
  1. Open a new entry in Digital Diary. Select Class & section and EntryDate.
  2. Enter Title and Narrative. Use Highlights for the main points and ActionItems for reminders to students and families.
  3. To show the entry to families, select Visible to students & parents (PublishToStudents). Save the entry.
  4. Use Edit to make corrections, then verify the entry in the correct month and year in Class Timeline.
Create and edit Digital Diary entries and review the class timeline — MeritBox LMS screen View full-size screenshot
Demo screen · Personal details are masked where needed.
Expected result

The saved diary entry appears in the relevant class timeline according to its settings.

Troubleshooting

If a student cannot see an entry, check the class, section, month, year, and sharing or visibility controls.

Schedule and join a live class and review attendance

Where to go: Live Classes

Before you start: Have the correct meeting join URL, date, time, and audience ready.

Follow these steps

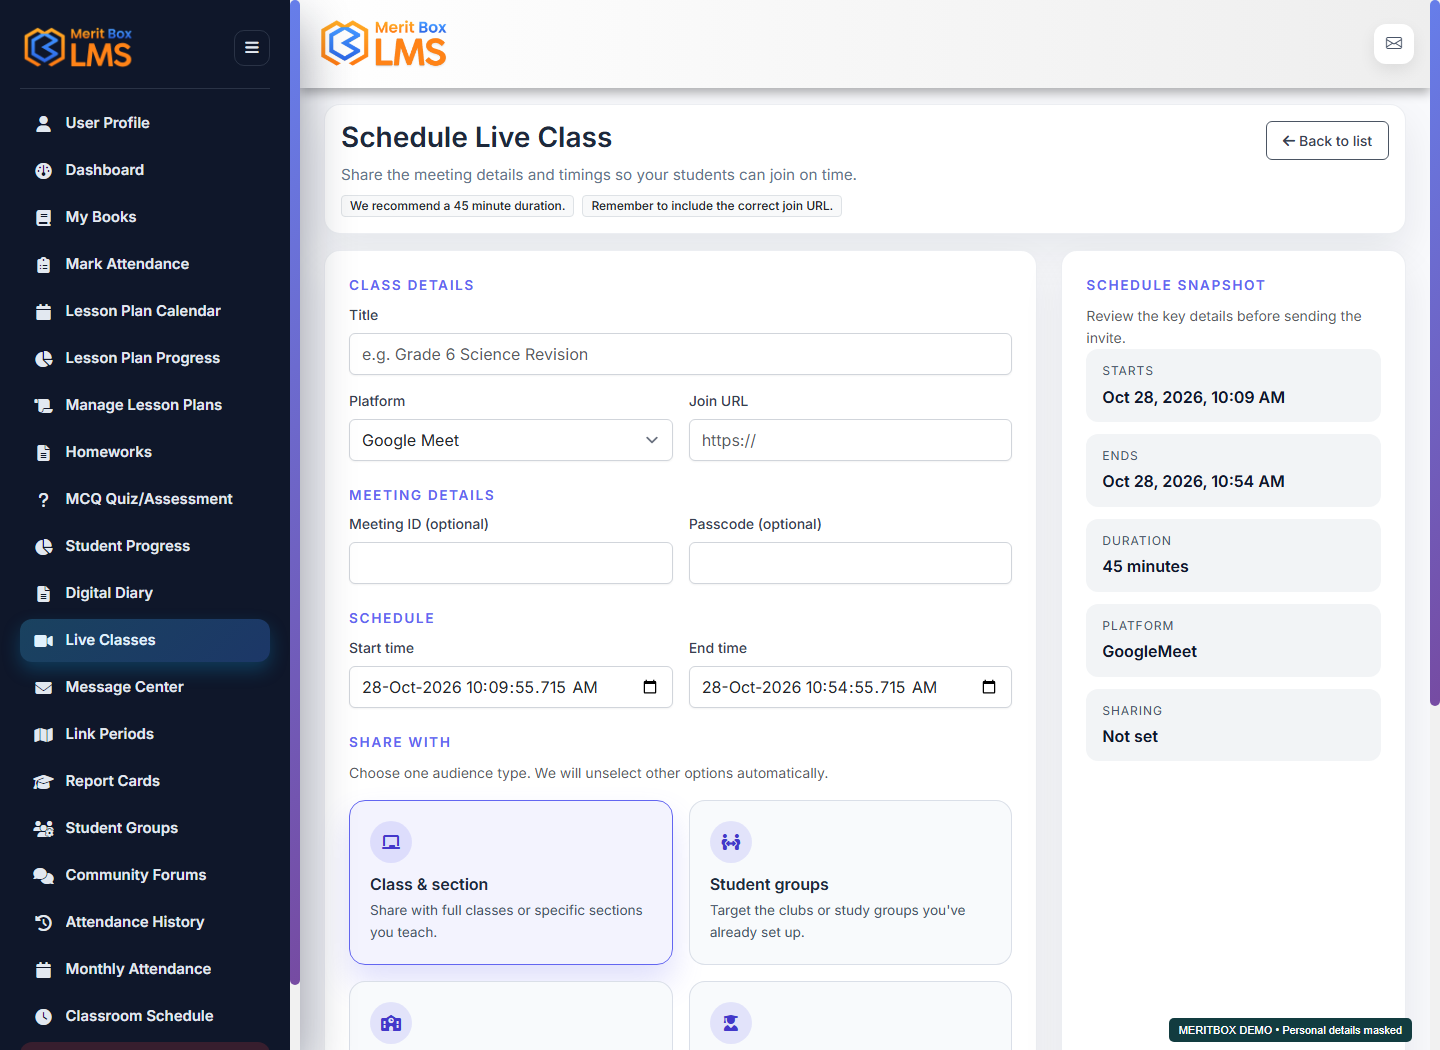
  1. Open Schedule Live Class in Live Classes. Enter the title, meeting or join URL, and available timing fields.
  2. Choose the intended classes, groups, or students in the audience and sharing selections, then select Schedule class.
  3. Use the available Join or Present controls in the list. To make changes, update the details in Edit and select Update class.
  4. Review the class records in Attendance. Use Export Attendance, where available, to download a report.
Schedule and join a live class and review attendance — MeritBox LMS screen View full-size screenshot
Demo screen · Personal details are masked where needed.
Expected result

The scheduled class is visible to the selected students, with meeting and attendance actions available.

Troubleshooting

Edit an incorrect join link. Controls and attendance behavior may differ depending on the external meeting provider.

Report Cards: marks, templates, and publication

Where to go: Report Cards

Before you start: The students in your class and their marks should be available.

Follow these steps

  1. Select the student and term in Report Cards, then open create or manage.
  2. Enter subject performance, maximum marks, remarks, and the other available fields.
  3. Choose a template, review the details or preview, and save.
  4. Publish the relevant term or stage, then have the Student or Parent verify its availability in their view.
Report Cards: marks, templates, and publication — MeritBox LMS screen View full-size screenshot
Demo screen · Personal details are masked where needed.
Expected result

The selected term of the published report becomes available to the Student and Parent.

Troubleshooting

Check that the correct student and term are selected. A saved draft is different from a published stage.

Manage Student Groups

Where to go: Student Groups

Before you start: Identify the assigned students and intended group.

Follow these steps

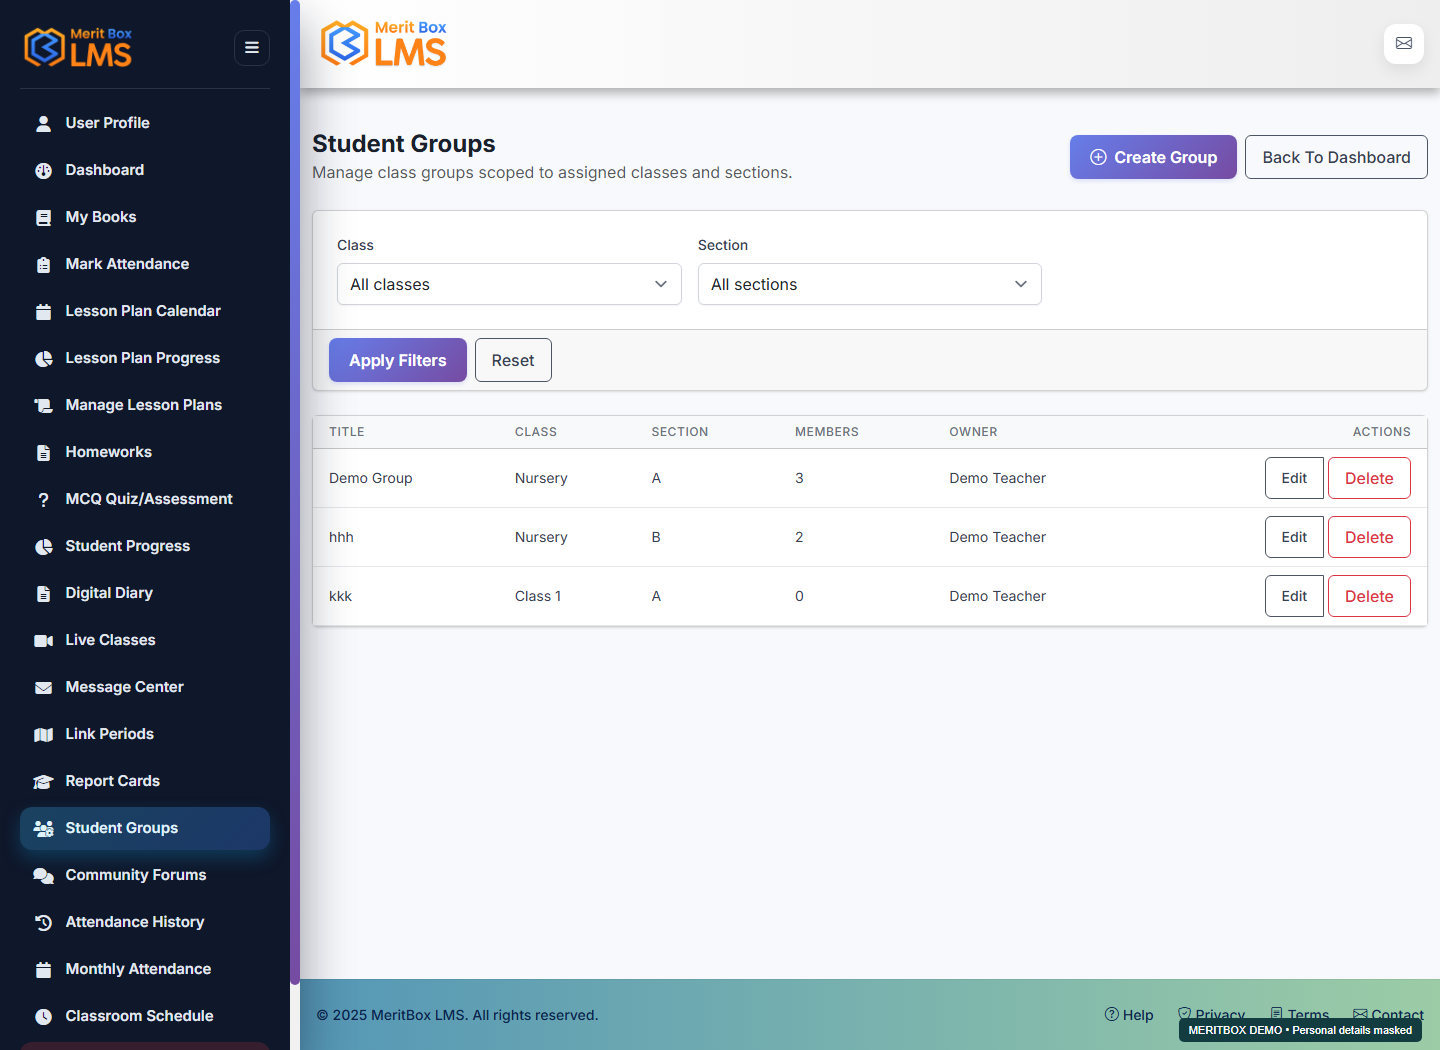
  1. Select the create or edit action in Student Groups.
  2. Enter a group name, select members using the available class and section filters, and save.
  3. Select the same group when sharing homework, a lesson plan, or a live class.
Manage Student Groups — MeritBox LMS screen View full-size screenshot
Demo screen · Personal details are masked where needed.
Expected result

A reusable sharing group is created with the selected members.

Troubleshooting

The student list may be restricted. Ask the admin to check the teacher-class assignment for a missing student.

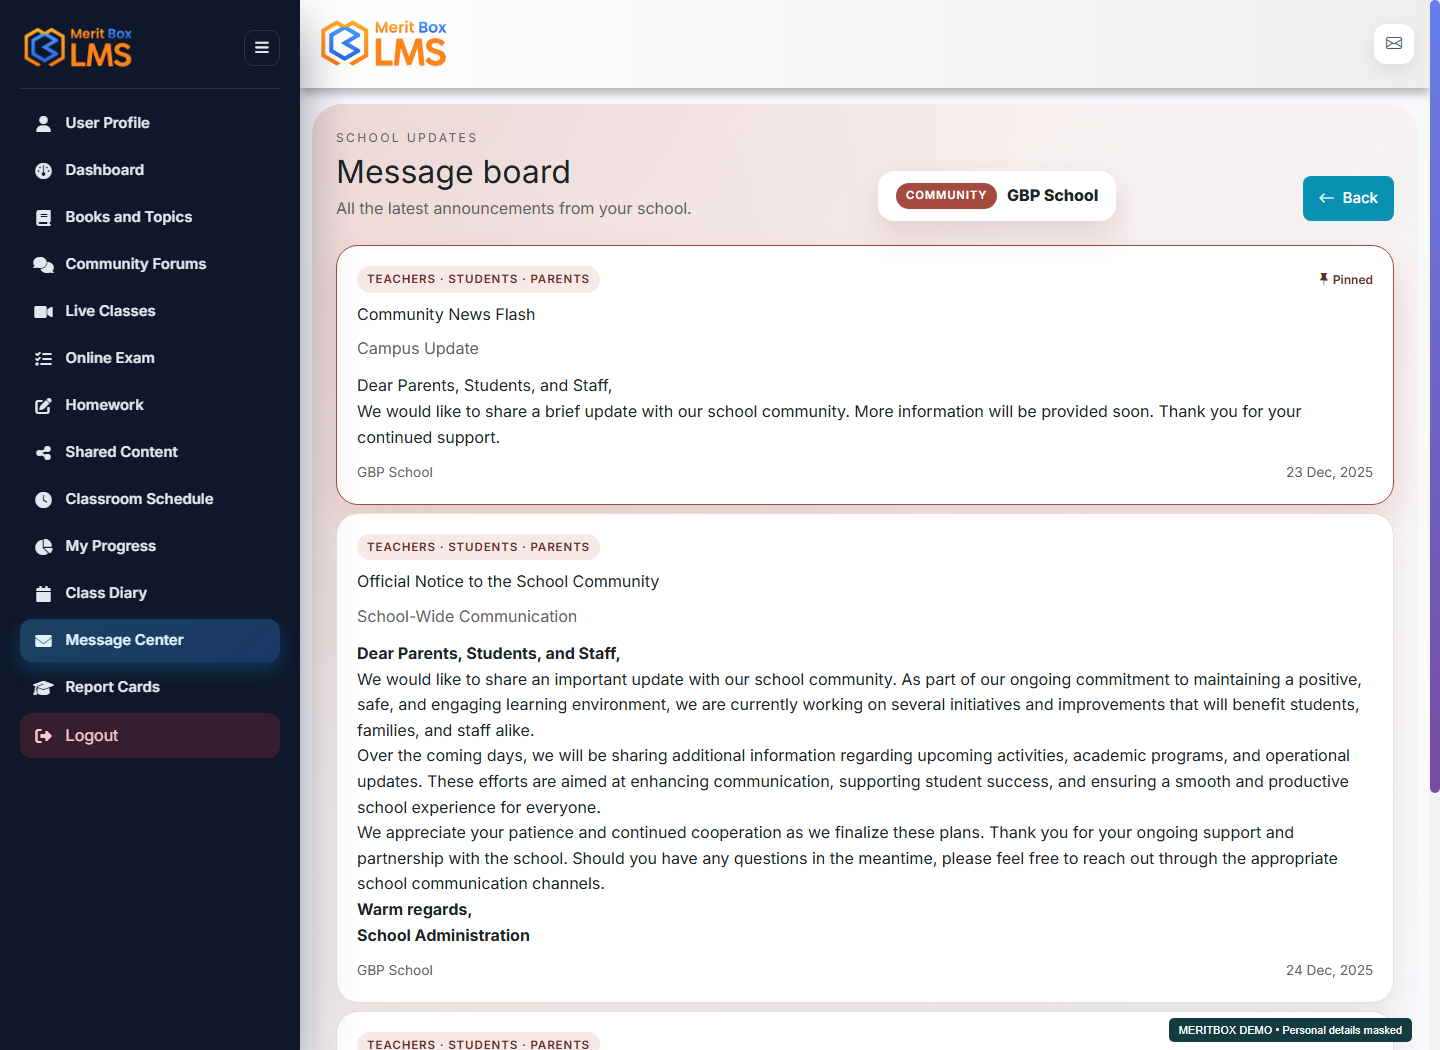
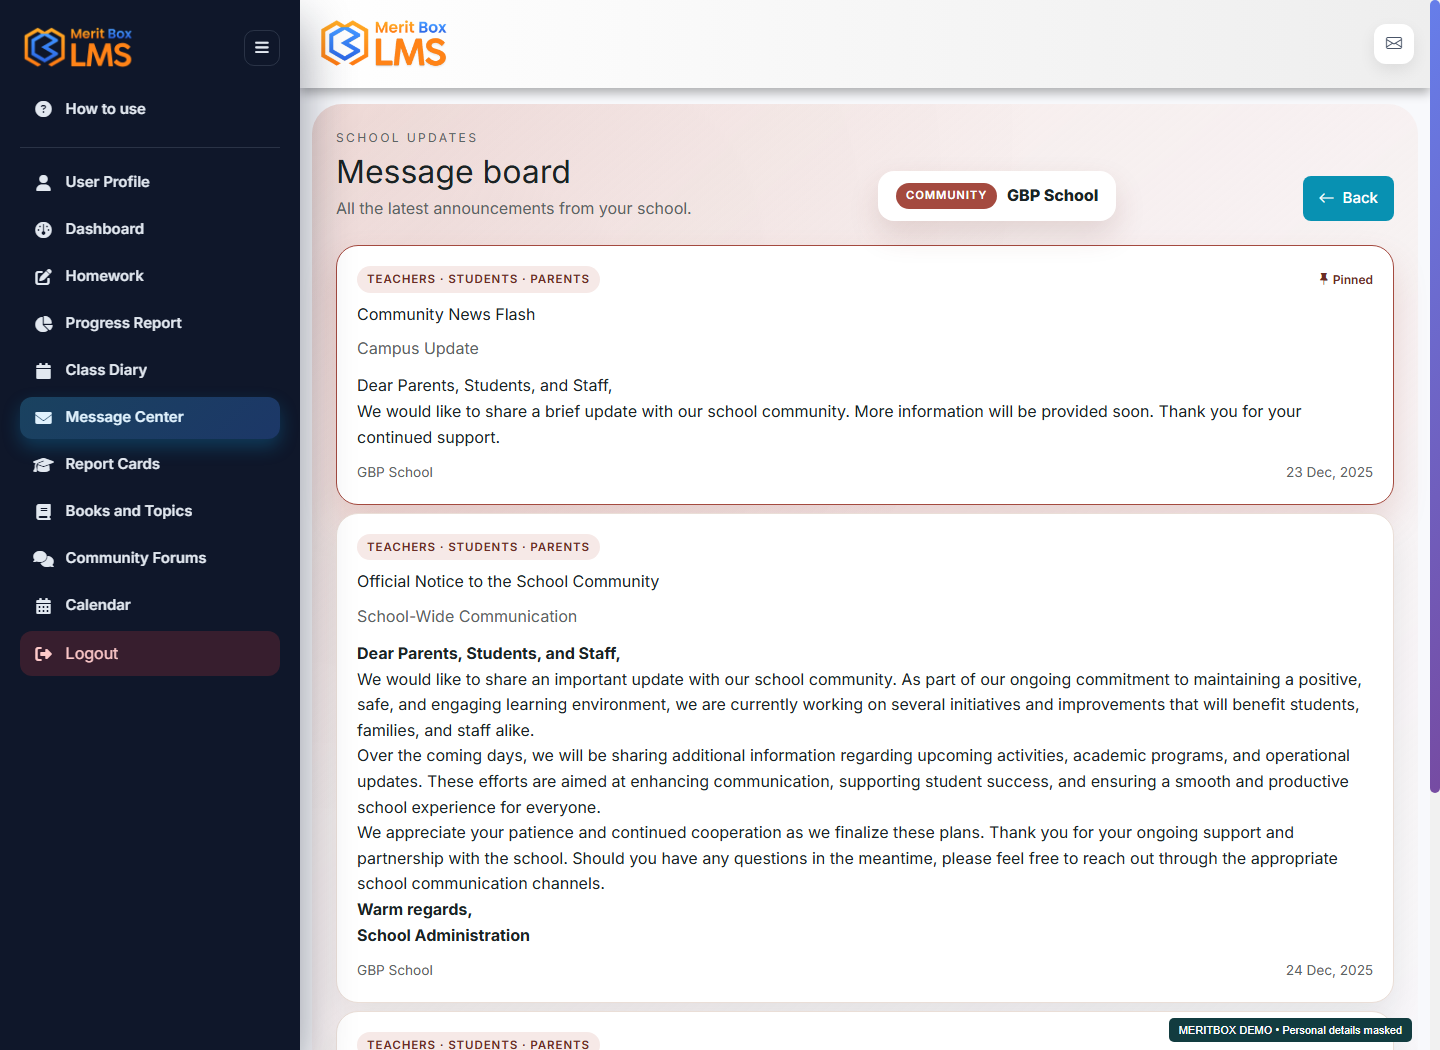
Read school messages

Where to go: Message Center / Header envelope

Before you start: The school should have published a message for the Teachers audience.

Follow these steps

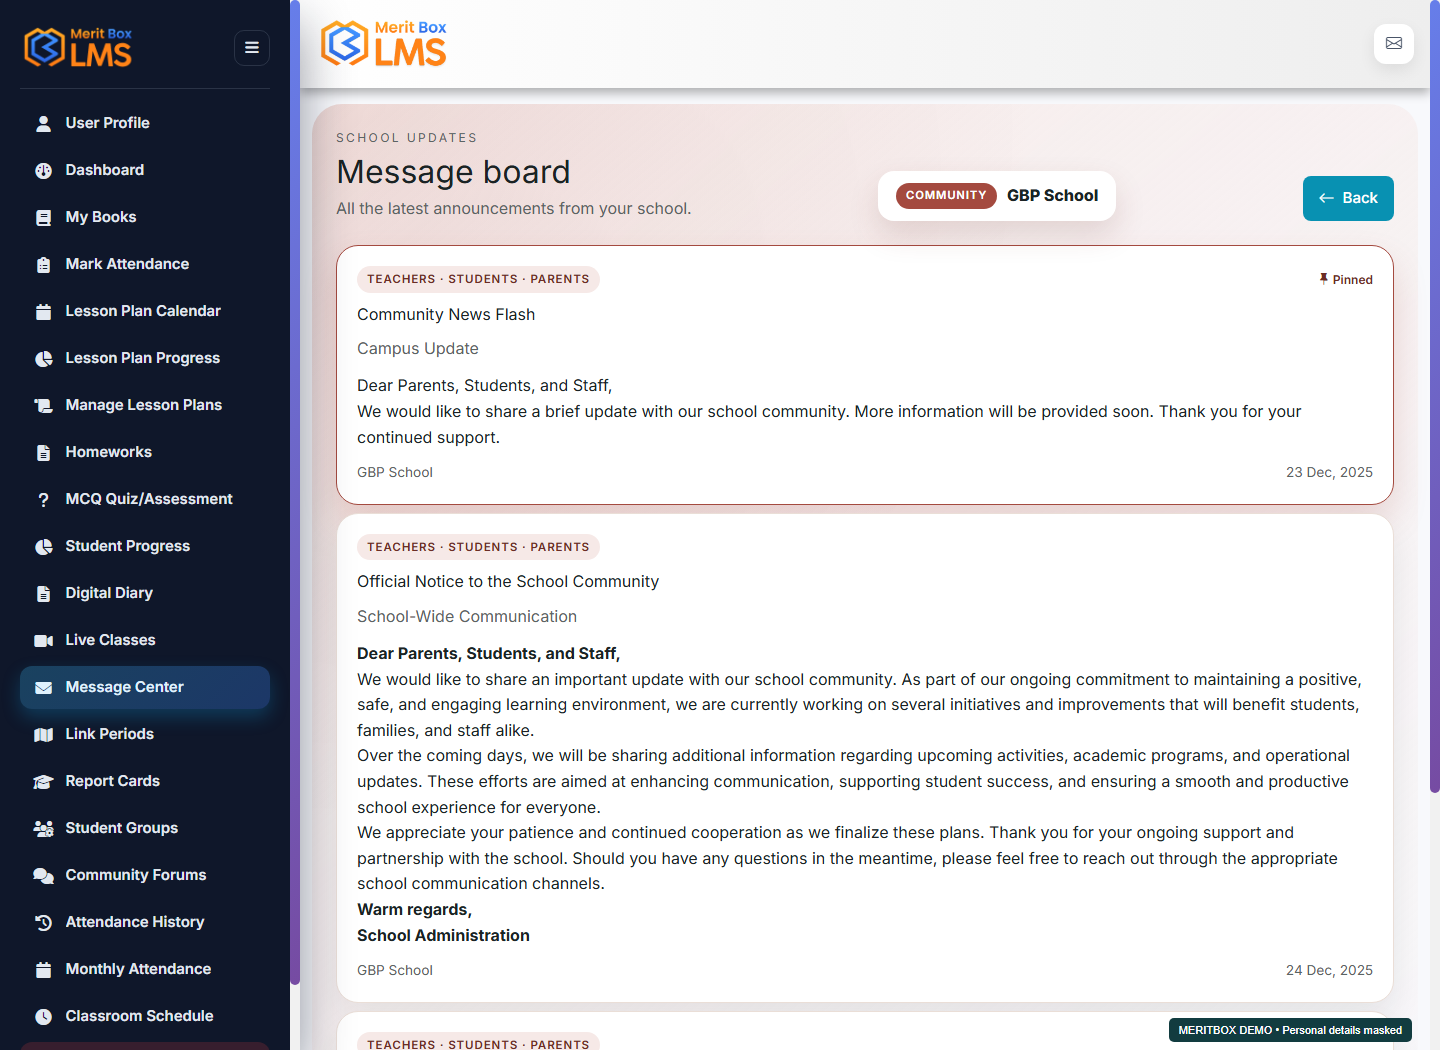
  1. Open the header envelope or Message Center. The unread badge indicates new messages.
  2. Open a message and read its title, summary, and full content. Review pinned messages first.
  3. Follow the required instructions and reopen the message later if needed.
Read school messages — MeritBox LMS screen View full-size screenshot
Demo screen · Personal details are masked where needed.
Expected result

Published messages for teachers are displayed.

Troubleshooting

Teachers may not have controls for writing school-wide broadcasts; the School Admin manages publication.

Discuss topics in Community Forums

Where to go: Community Forums

Before you start: Sign in to the LMS.

Follow these steps

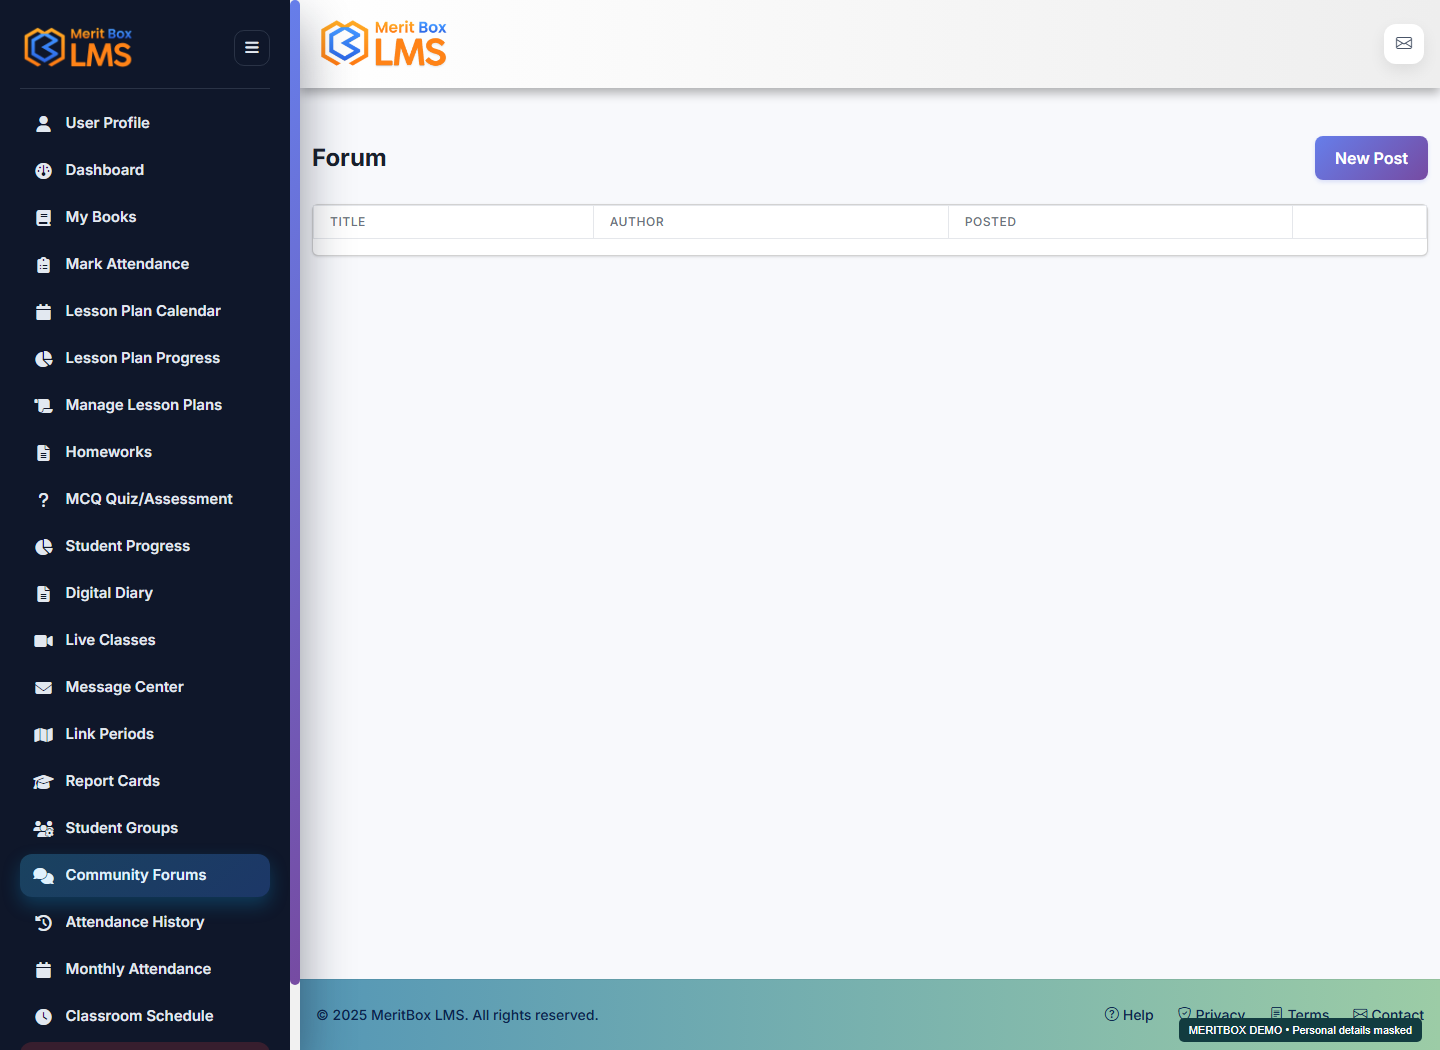
  1. Open existing topics and read the discussions.
  2. Select Create for a new post, or use the reply action in an existing thread.
  3. Enter the title, body, and optional media links. Review the content and submit.
Discuss topics in Community Forums — MeritBox LMS screen View full-size screenshot
Demo screen · Personal details are masked where needed.
Expected result

Your post or reply appears in the discussion thread.

Troubleshooting

Refresh and check the first submission before creating a duplicate post.

Quiz questions: manual entry, library, and question order

Where to go: MCQ Quiz/Assessment → Manage Questions

Before you start: The quiz should already be saved, and you must have permission to edit it.

Follow these steps

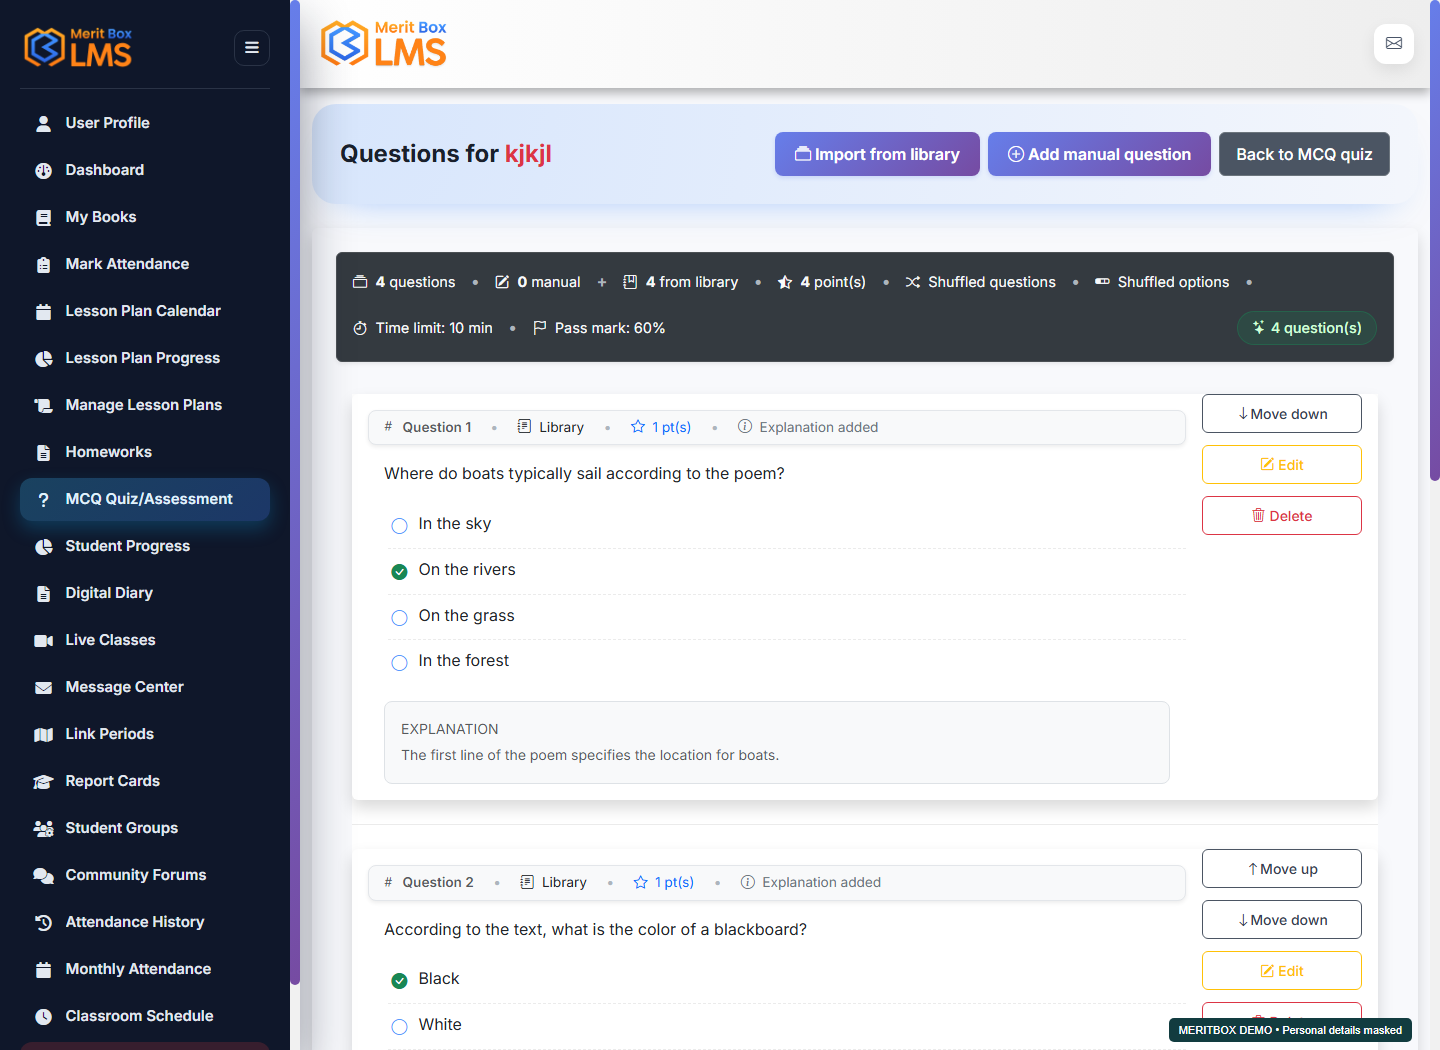
  1. Open Manage Questions from the quiz list. Use the manual question action to enter Question text, Explanation, and Points.
  2. Add answer options and select the correct answer. Verify the options and correct answer before selecting Save question.
  3. Open Import from library. Find questions using the available curriculum, difficulty, Bloom filters, and search, then import the selected questions.
  4. Use Edit in the question list to correct a question or its options. Use Move up and Move down to change the order. Confirm the correct question before using Remove or Delete.
  5. Use Preview to check how the questions and answers appear. If the quiz is published, also review sharing and live availability after making changes.
Quiz questions: manual entry, library, and question order — MeritBox LMS screen View full-size screenshot
Demo screen · Personal details are masked where needed.
Expected result

Questions, correct answers, and points are saved in the quiz.

Troubleshooting

Very restrictive library filters may return no results. Add at least one relevant question with a valid correct answer.

Set the quiz audience and availability

Where to go: MCQ Quiz/Assessment → Share

Before you start: The quiz and its questions should be ready. The intended class, section, group, or student must be assigned correctly.

Follow these steps

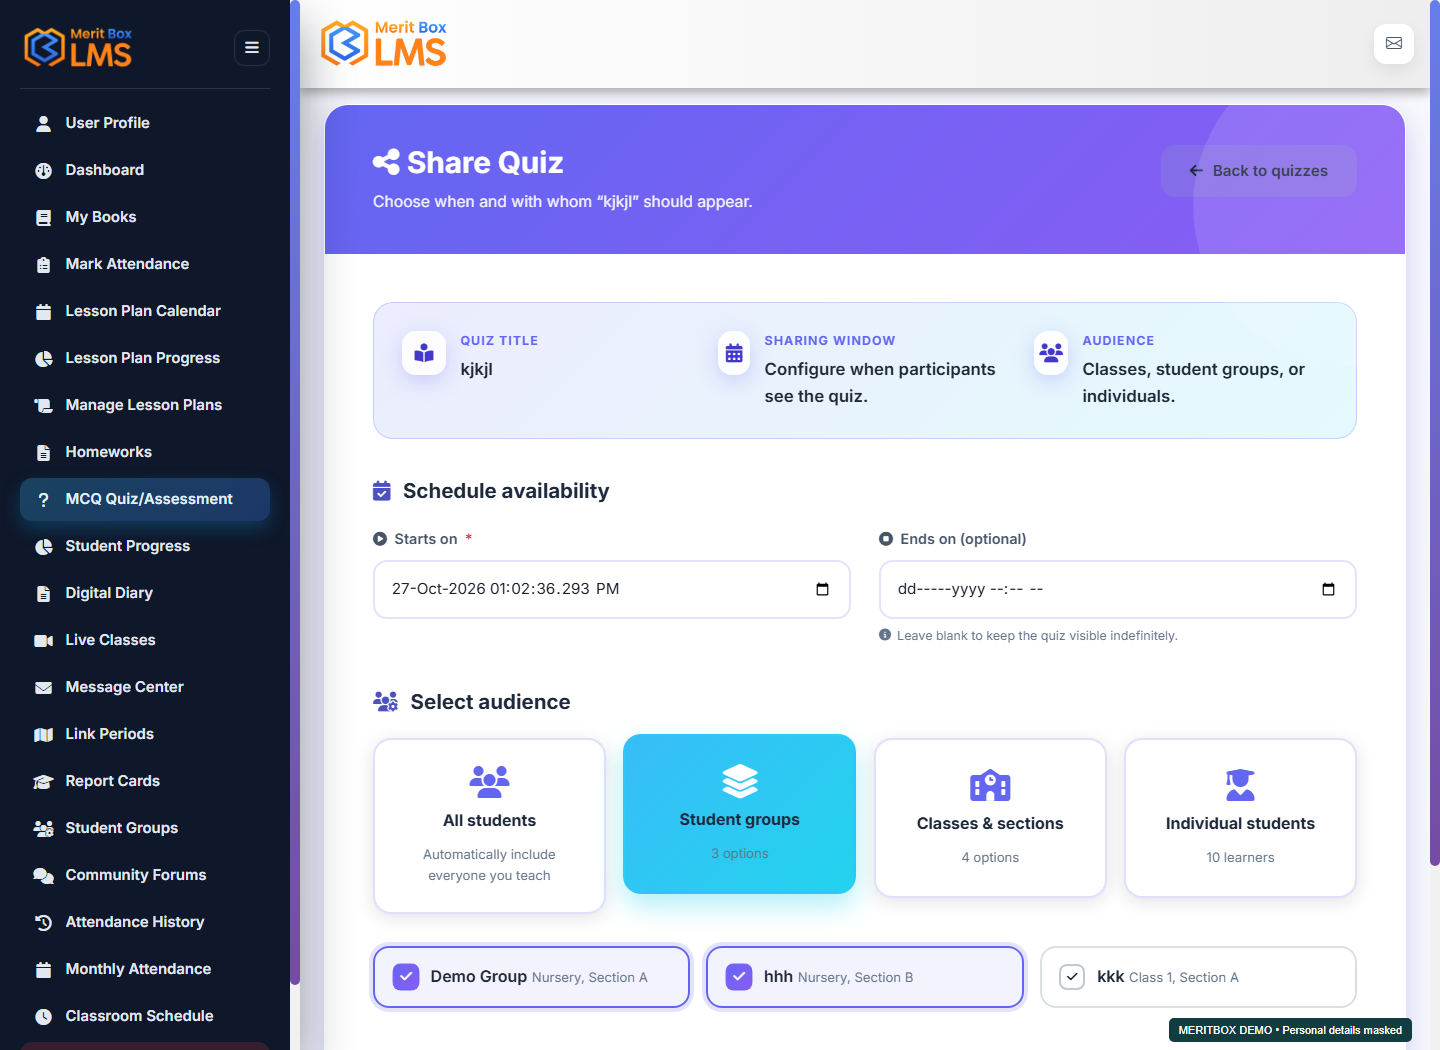
  1. Open Share for the correct quiz and verify the quiz title.
  2. Set the availability window using StartOn or Starts and the optional EndOn or Ends. The end time must be later than the start time.
  3. Choose an available All Students, Groups, Classes, or Students audience mode and select the intended recipients.
  4. Select Save sharing. Also verify that the quiz is Published; saving sharing settings alone does not publish a draft quiz.
Set the quiz audience and availability — MeritBox LMS screen View full-size screenshot
Demo screen · Personal details are masked where needed.
Expected result

The published quiz is available to the selected recipients during the specified window.

Troubleshooting

If the quiz is missing, separately check its publish setting, start and end times, selected recipients, and student group or class membership.

YOUR WORKSPACE

Student

13 guides

Study with books and shared content, complete homework, and take part in live classes and online exams.

Your quick-start path

Sign in with your Student ID → Dashboard → Classroom Schedule → Books/Shared Content → Homework → Online Exam → My Progress and Report Cards.

My Assignments and assignment quizzes

Where to go: My Assignments (direct screen)

Before you start: Your teacher must have assigned work through the Assignments module.

Follow these steps

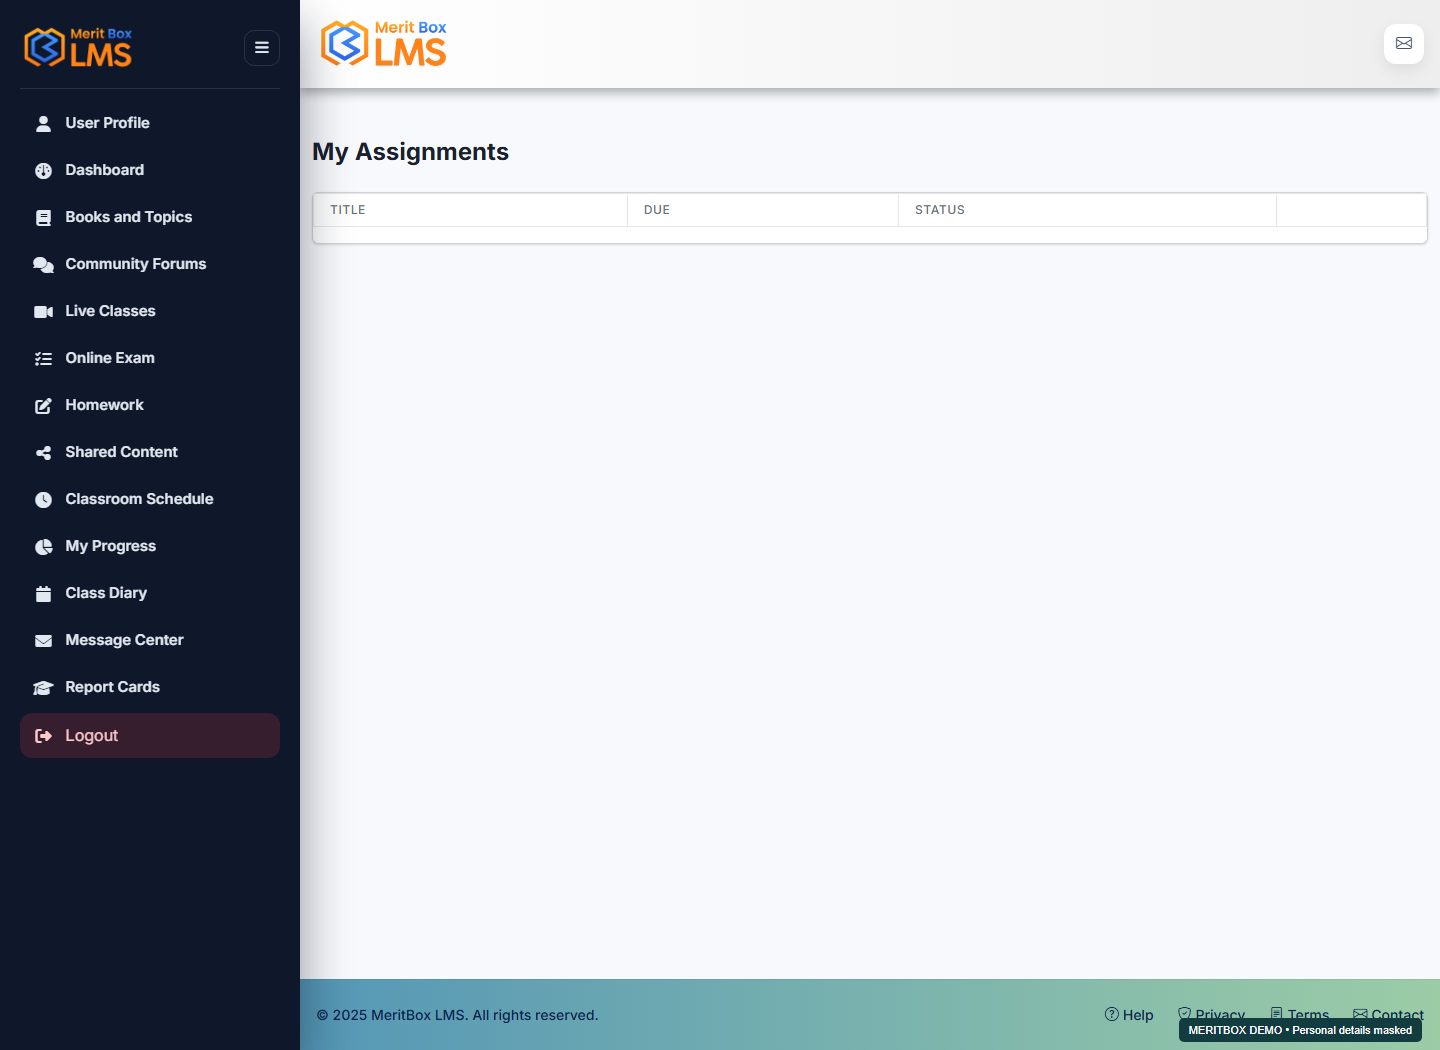
  1. Use Open this screen to go to My Assignments. Select Open or the details action for the correct assignment.
  2. Read the instructions and any linked content, then complete the work.
  3. If a quiz is attached, select Take Quiz, choose your answers, and select Submit.
  4. When the work is finished, use the available assignment completion action and check its status.
My Assignments and assignment quizzes — MeritBox LMS screen View full-size screenshot
Demo screen · Personal details are masked where needed.
Expected result

Your assignment completion and attached quiz submission are saved.

Troubleshooting

This module is separate from Homework and Online Exam. Use this direct link if you cannot find a sidebar shortcut.

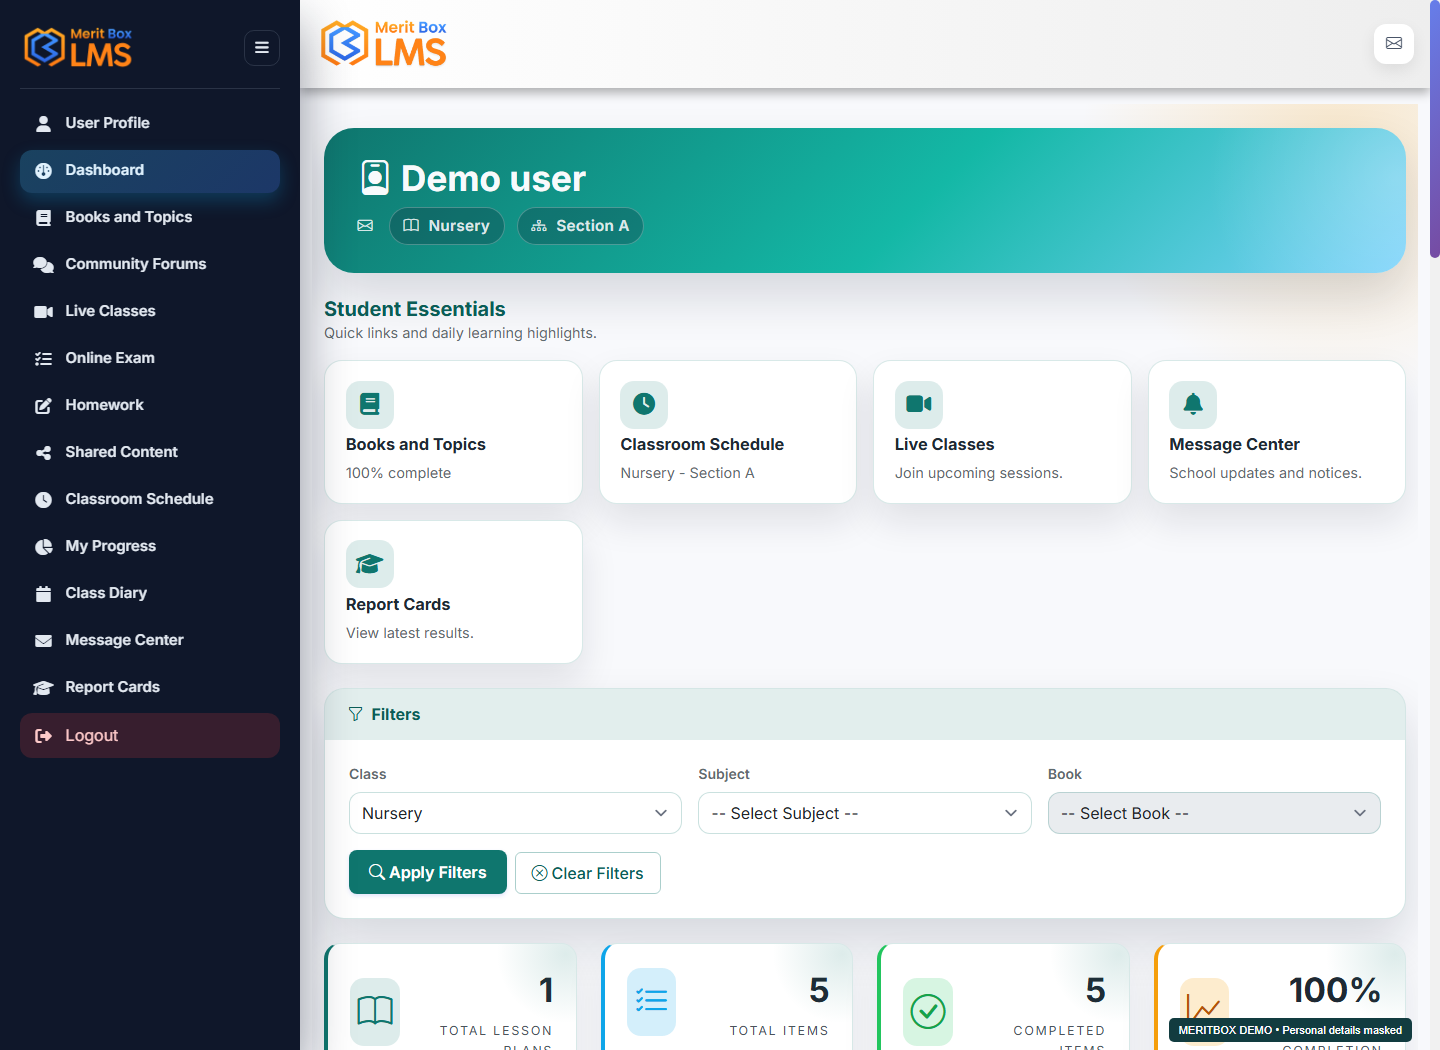
Student Dashboard and daily routine

Where to go: Dashboard

Before you start: Have the Student ID and password provided by your school.

Follow these steps

  1. Review the learning overview and available shortcuts on your Dashboard.
  2. Check your schedule and school messages.
  3. Then work through your assigned books or content, homework, and online exams.
Student Dashboard and daily routine — MeritBox LMS screen View full-size screenshot
Demo screen · Personal details are masked where needed.
Expected result

You can access your learning tasks for the day.

Troubleshooting

If you see content for the wrong class, ask your teacher to verify your name, Student ID, and class assignment.

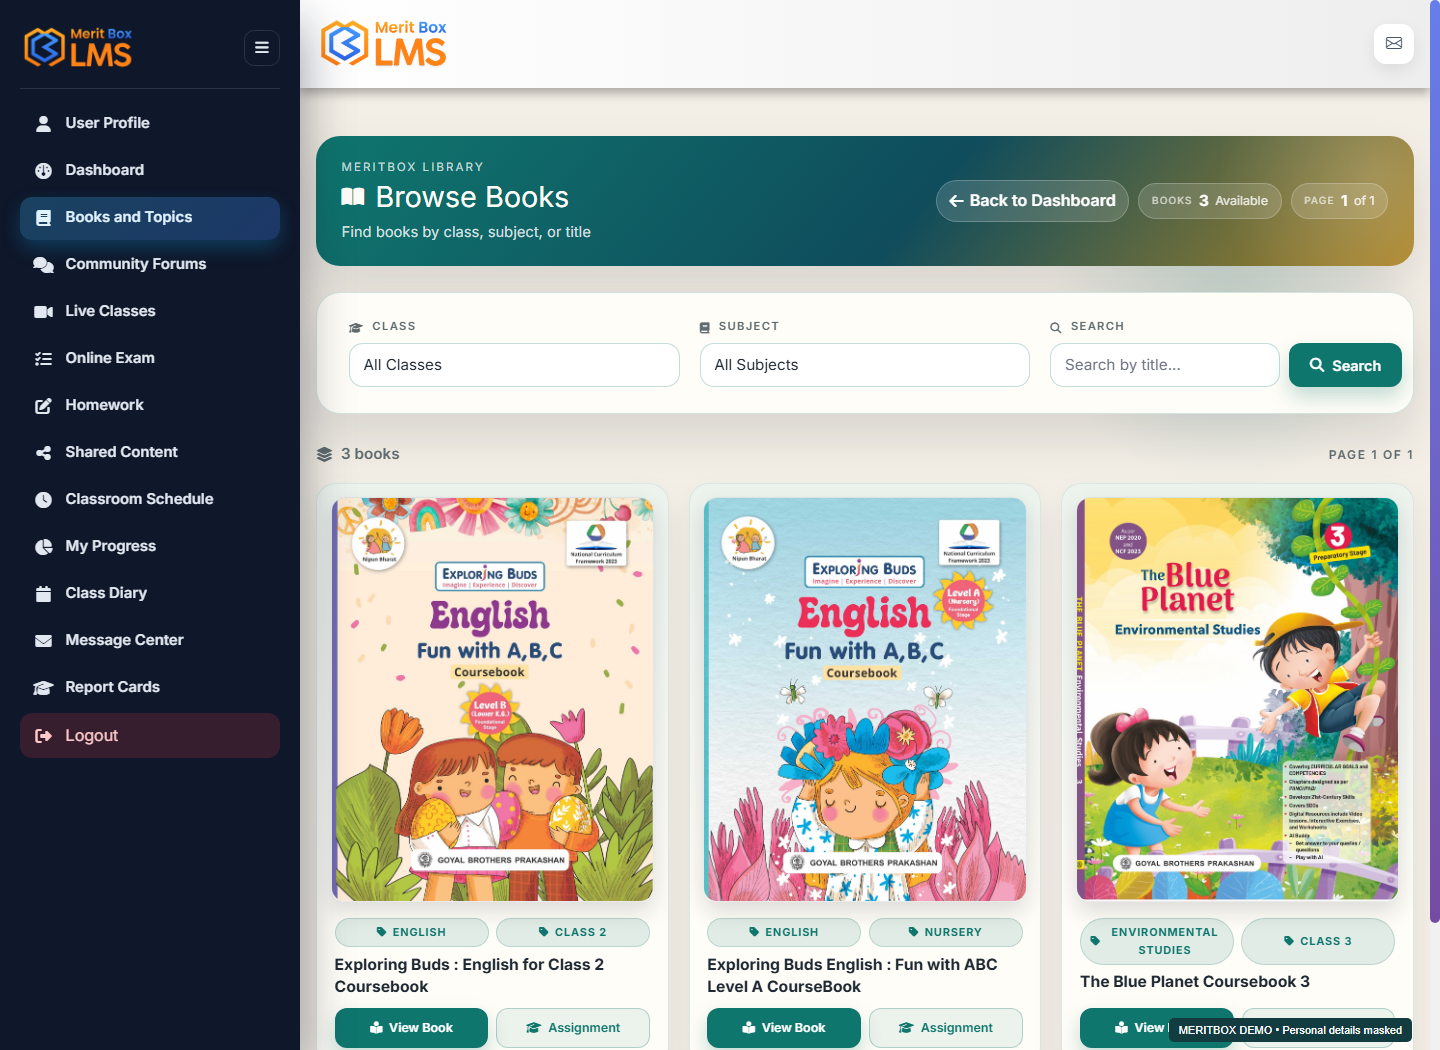
Study with Books and Topics

Where to go: Books and Topics

Before you start: Your school or teacher must have made the relevant book or content available.

Follow these steps

  1. Find and open a book in Books and Topics. Select the correct class and subject filters where available.
  2. Choose a chapter and topic. Open the available plans, videos, PDFs, and activities.
  3. Read or watch the content in full. When finished, use the available item or plan completion control.
  4. Check the current activity's status before moving to the next topic.
Study with Books and Topics — MeritBox LMS screen View full-size screenshot
Demo screen · Personal details are masked where needed.
Expected result

The learning content opens, and recorded activity may appear in your progress.

Troubleshooting

Tell your teacher the title of any missing book. School activation, teacher assignment, and student access may each need to be checked.

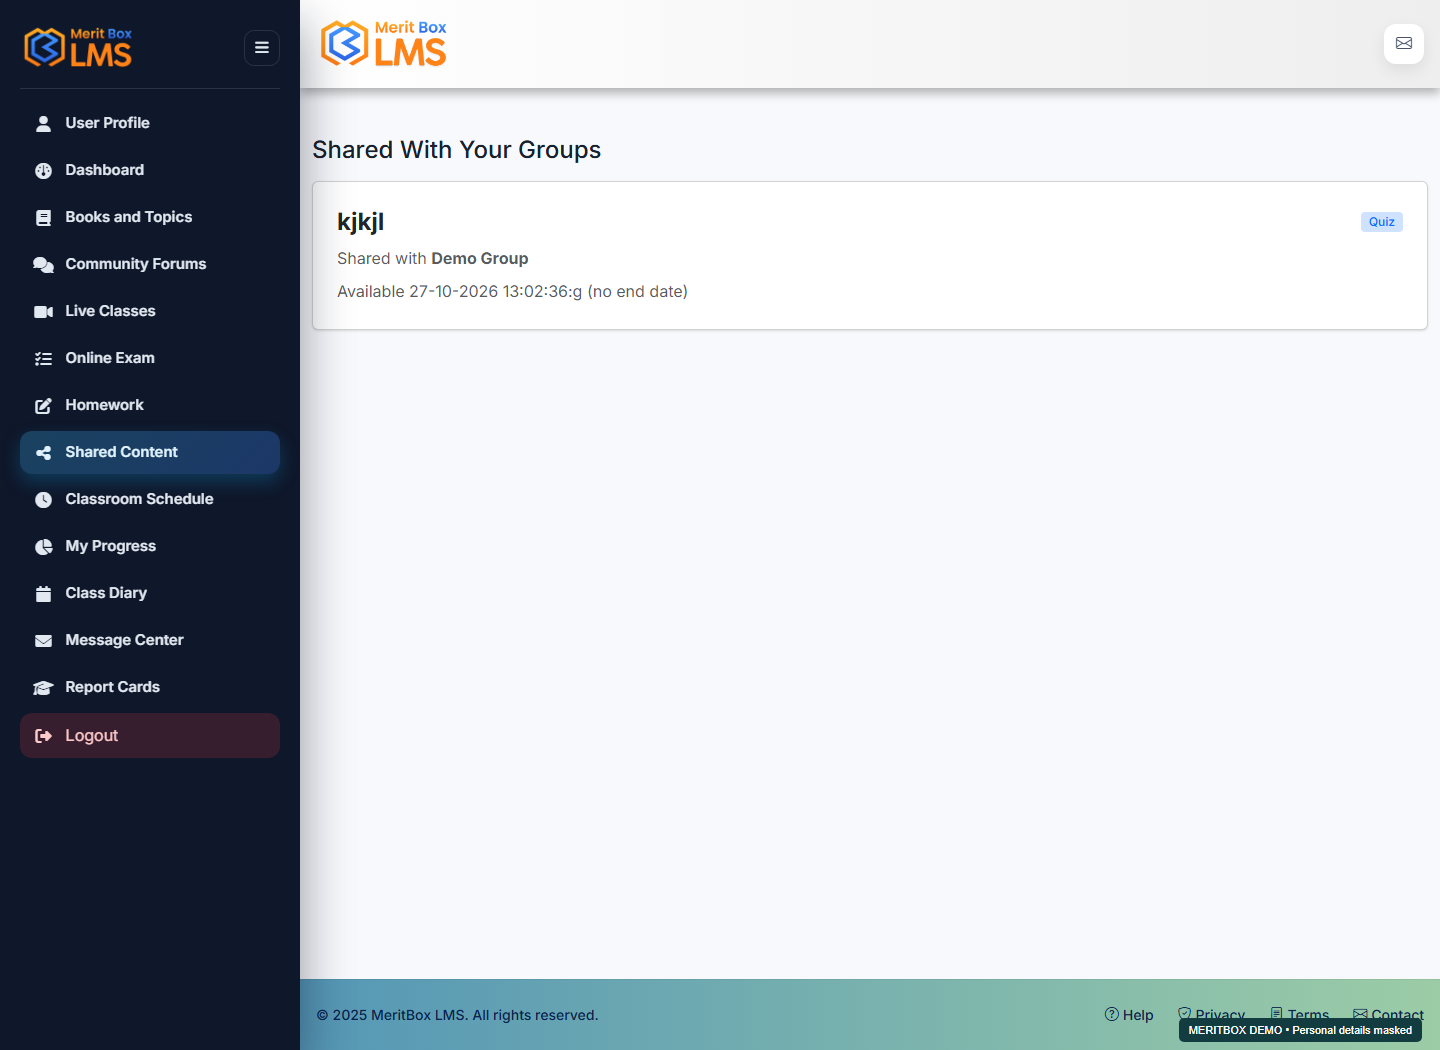
Shared Content: view content shared with your groups

Where to go: Shared Content

Before you start: You must belong to a Student Group, and your teacher must have shared content with that group.

Follow these steps

  1. Open Shared Content. In Shared With Your Groups, review each item's content type, group name, and availability dates.
  2. Open an item if it has an Open link. Read the instructions and complete the work. Some items do not have a direct Open link.
  3. If a lesson plan's Open link does not work, open the same plan through Books and Topics → Lesson Plans. Also check the book's Lesson Plans for content shared with your class or with you individually; those shares may not appear in this group-only list.
Shared Content: view content shared with your groups — MeritBox LMS screen View full-size screenshot
Demo screen · Personal details are masked where needed.
Expected result

You see a list of shared items that are currently available to your groups.

Troubleshooting

If no content appears, ask your teacher to check your group membership and the availability dates. Report broken plan links to your teacher and use Lesson Plans under Books and Topics instead.

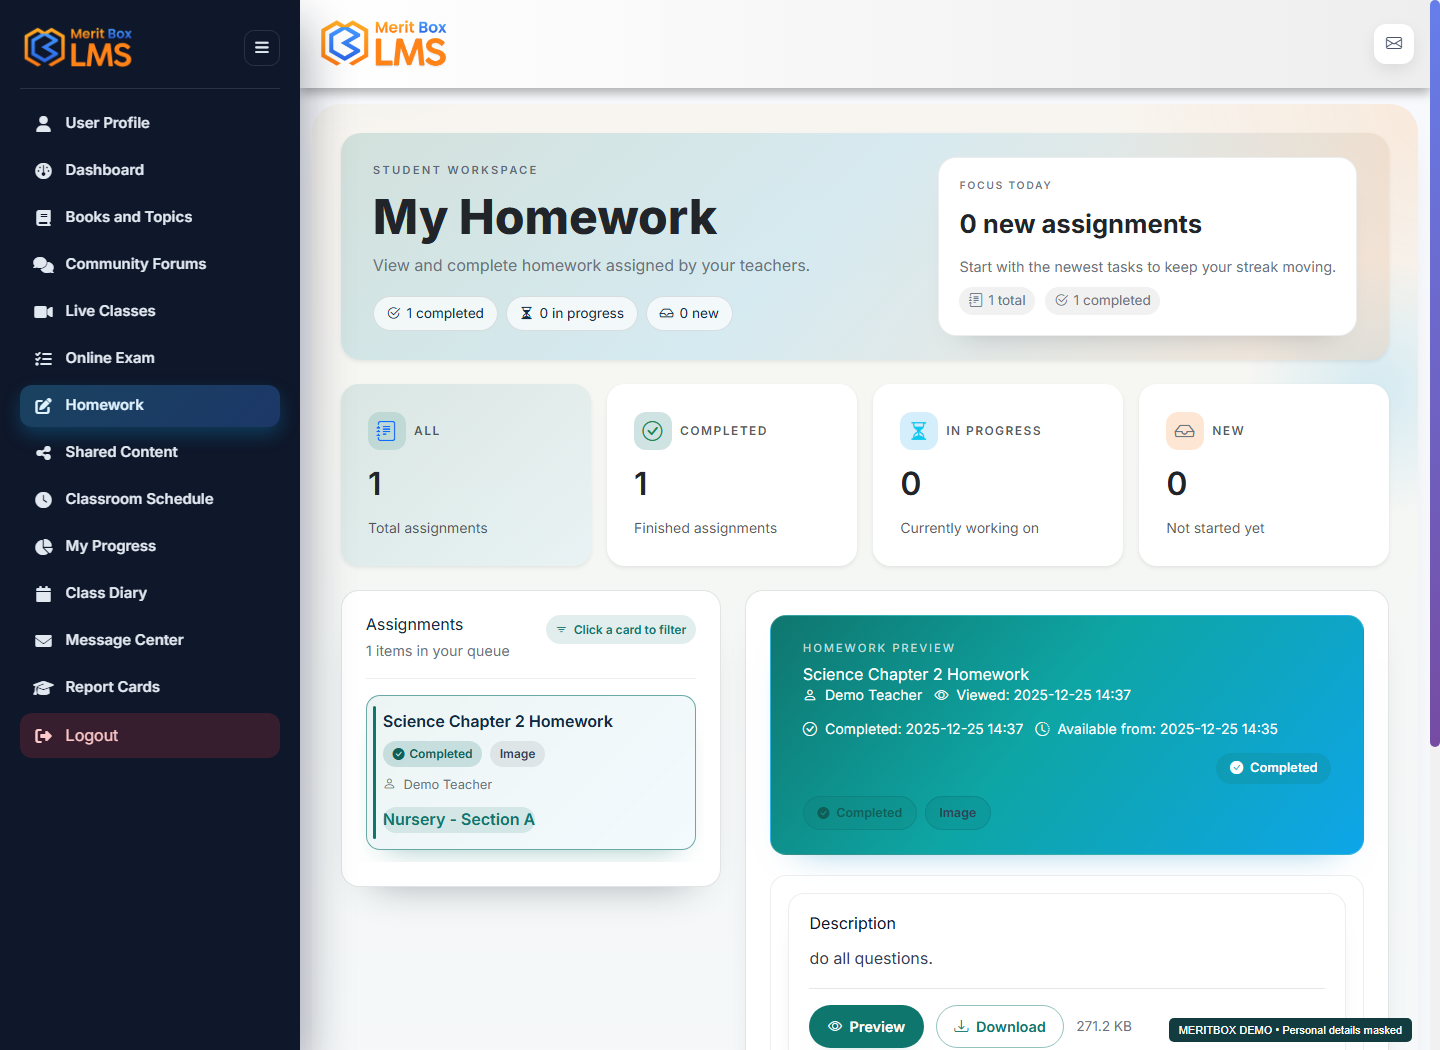
Read homework and mark it complete

Where to go: Homework

Before you start: Your teacher must have assigned the homework, and its start date must have arrived.

Follow these steps

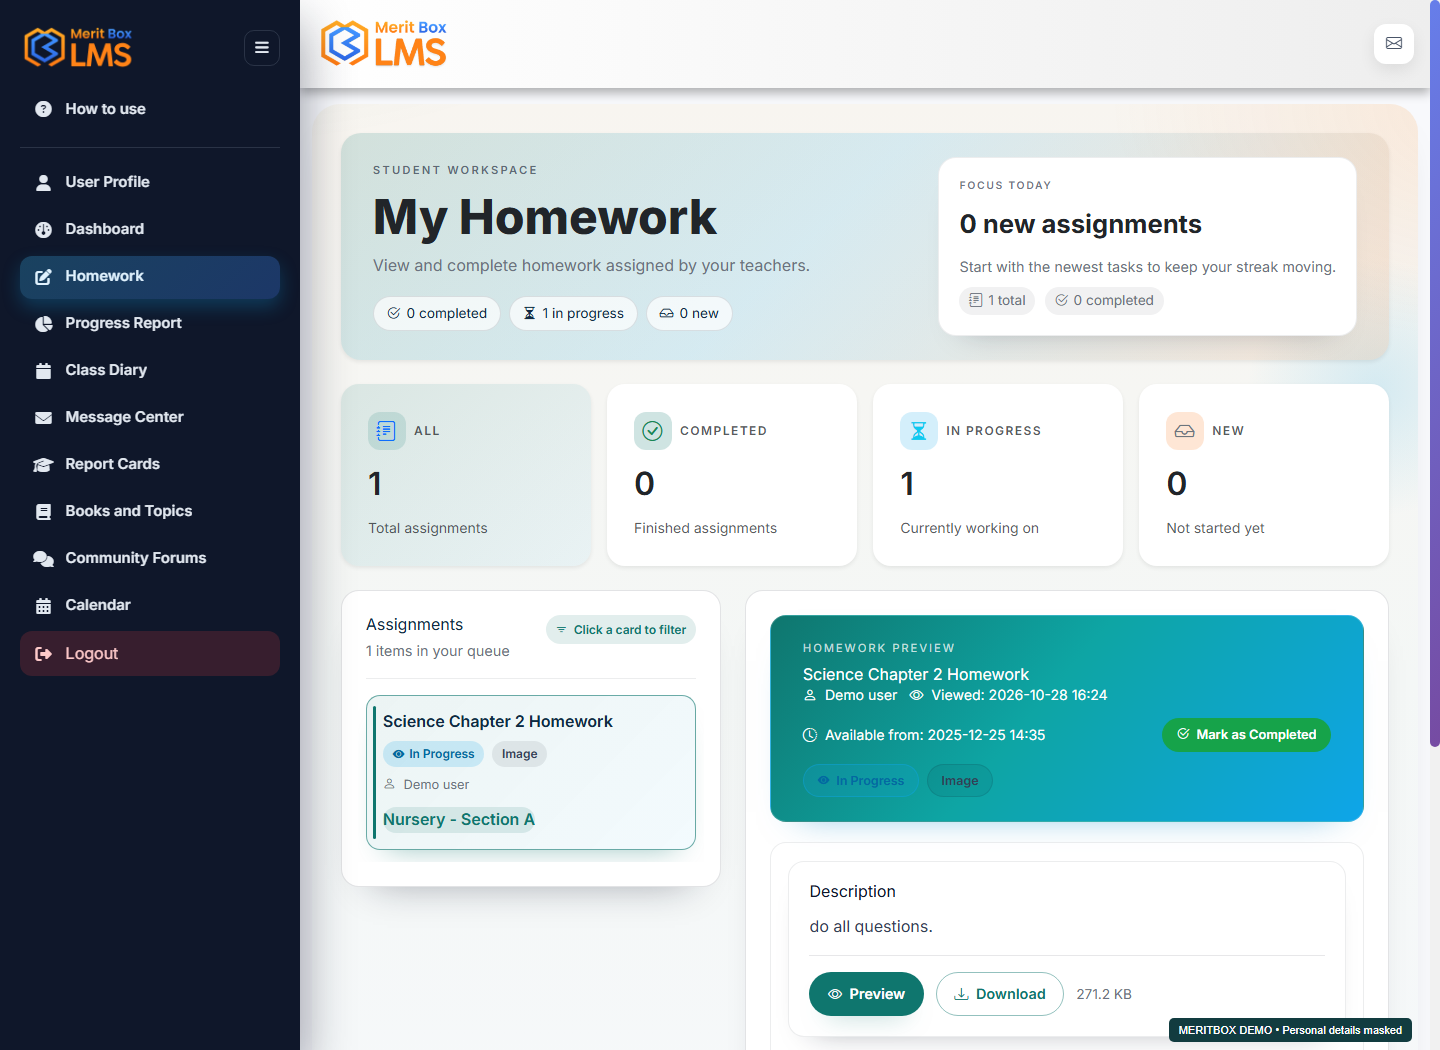
  1. Open Homework. Use the All, New, In Progress, or Completed summary filters to find a task.
  2. Read the homework instructions and open its attachment or external link.
  3. Complete the assigned work. Select the screen's completion action and check the confirmation.
  4. Verify the task under the Completed filter. Opening a file alone does not necessarily mark the homework complete.
Read homework and mark it complete — MeritBox LMS screen View full-size screenshot
Demo screen · Personal details are masked where needed.
Expected result

The homework status changes to Completed.

Troubleshooting

Do not assume that an attachment upload is required or available. Follow your teacher's instructions and the controls shown on the screen. For missing homework, ask your teacher to check sharing and availability.

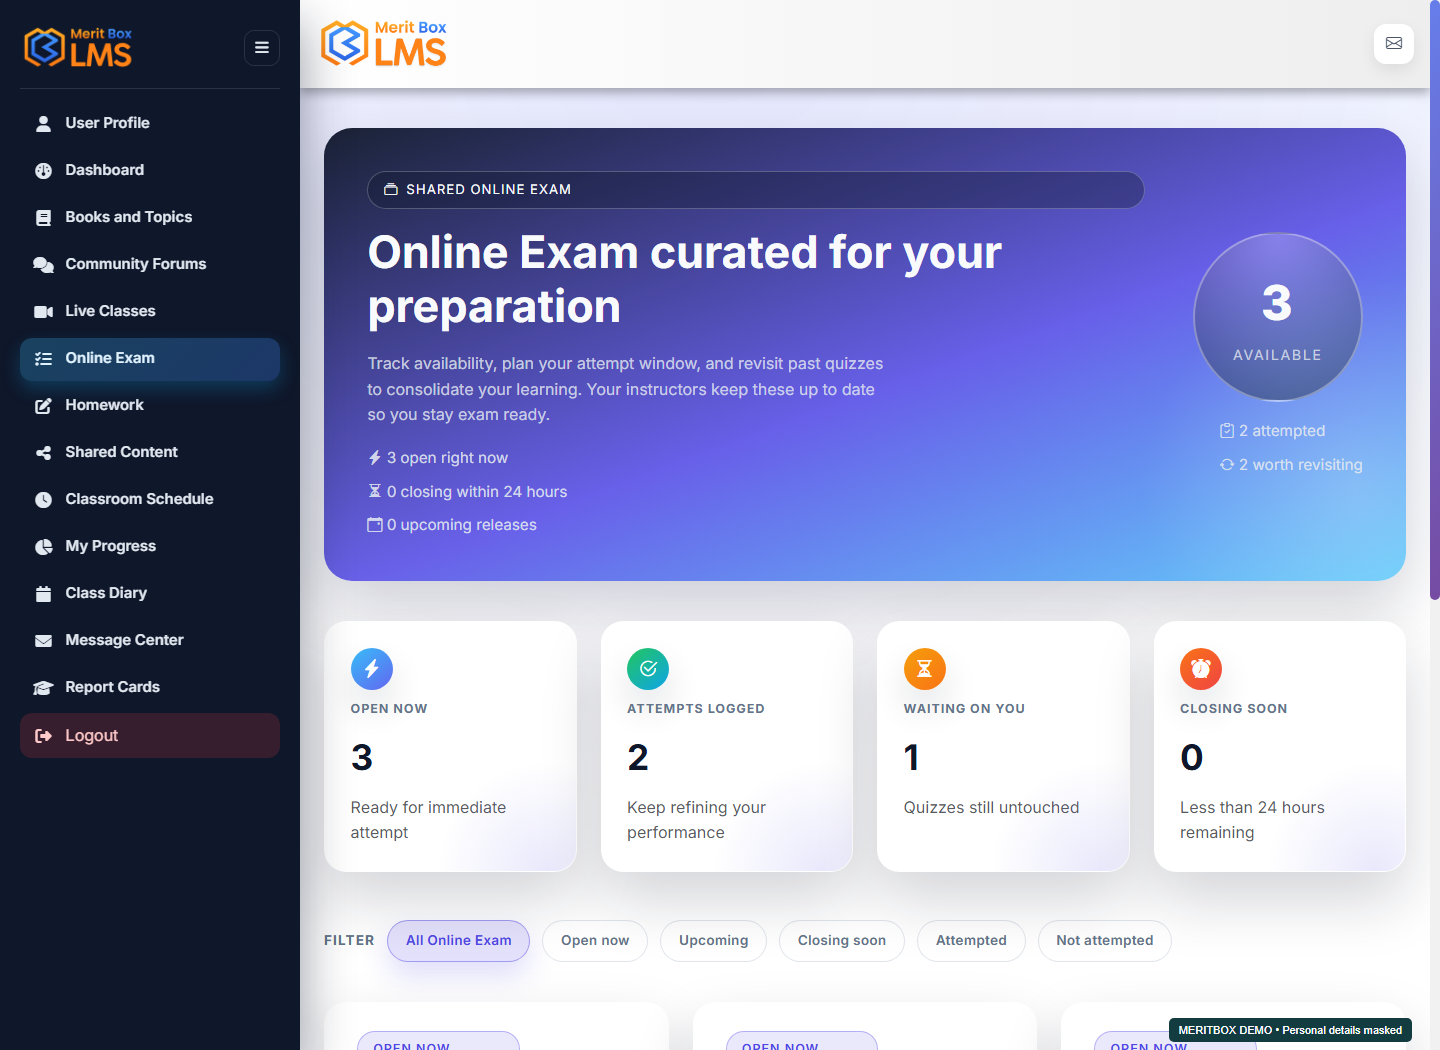
Take and submit an Online Exam

Where to go: Online Exam

Before you start: Use a stable internet connection and allow time to read the quiz instructions and time limit.

Follow these steps

  1. Select an assigned quiz in Online Exam and read its details and instructions.
  2. When you are ready, select the available start or attempt action. Watch the timer if a time limit applies.
  3. Read each question and choose an answer. Review your answers before submitting.
  4. Select Submit and wait for the submission or result confirmation. Keep the tab open until the confirmation appears.
Take and submit an Online Exam — MeritBox LMS screen View full-size screenshot
Demo screen · Personal details are masked where needed.
Expected result

Your quiz attempt is submitted, and any available result or score is displayed.

Troubleshooting

If the connection fails, tell your teacher the error message and when it happened. Retake a quiz only when the LMS provides the permission or action, and avoid repeated submissions.

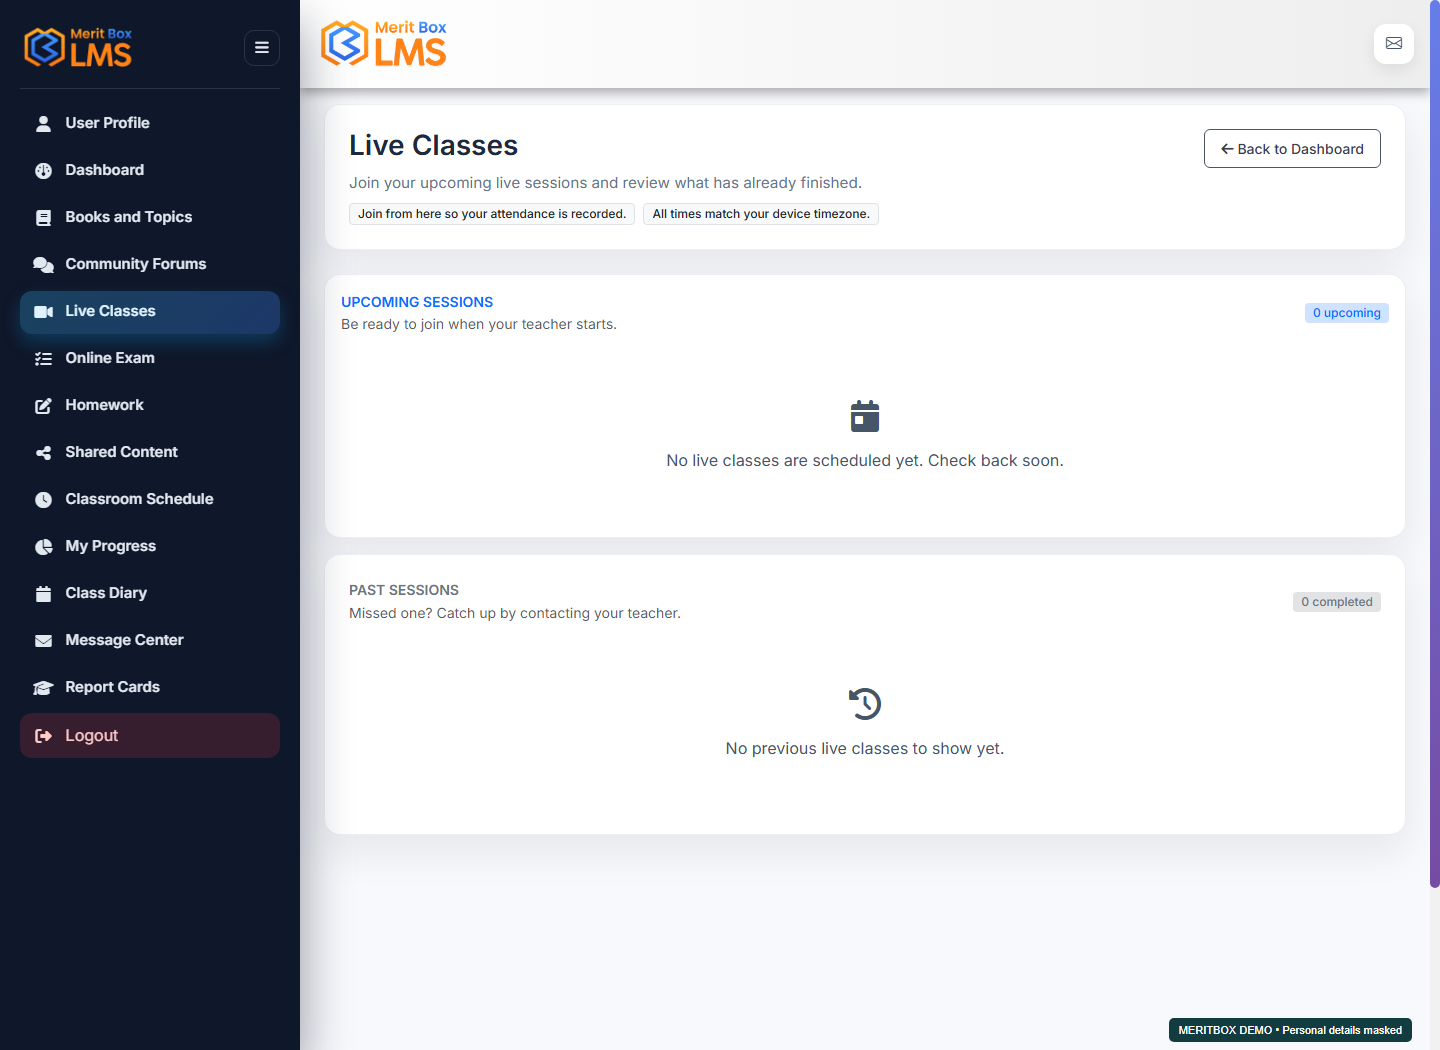
Join a Live Class

Where to go: Live Classes

Before you start: Your teacher must have shared the meeting. Have the browser or app required for the meeting ready.

Follow these steps

  1. Open Live Classes and read the date, time, and instructions for the relevant class.
  2. At the scheduled time, select the available Join action.
  3. Follow the meeting provider's microphone and camera instructions, and join using your correct identity.
  4. Leave the meeting when the class ends. Report any attendance issue to your teacher.
Join a Live Class — MeritBox LMS screen View full-size screenshot
Demo screen · Personal details are masked where needed.
Expected result

The shared meeting's join page opens.

Troubleshooting

If no class appears or the URL is invalid, ask your teacher to verify the audience and meeting link. Joining a meeting and recording attendance in the LMS may be separate actions.

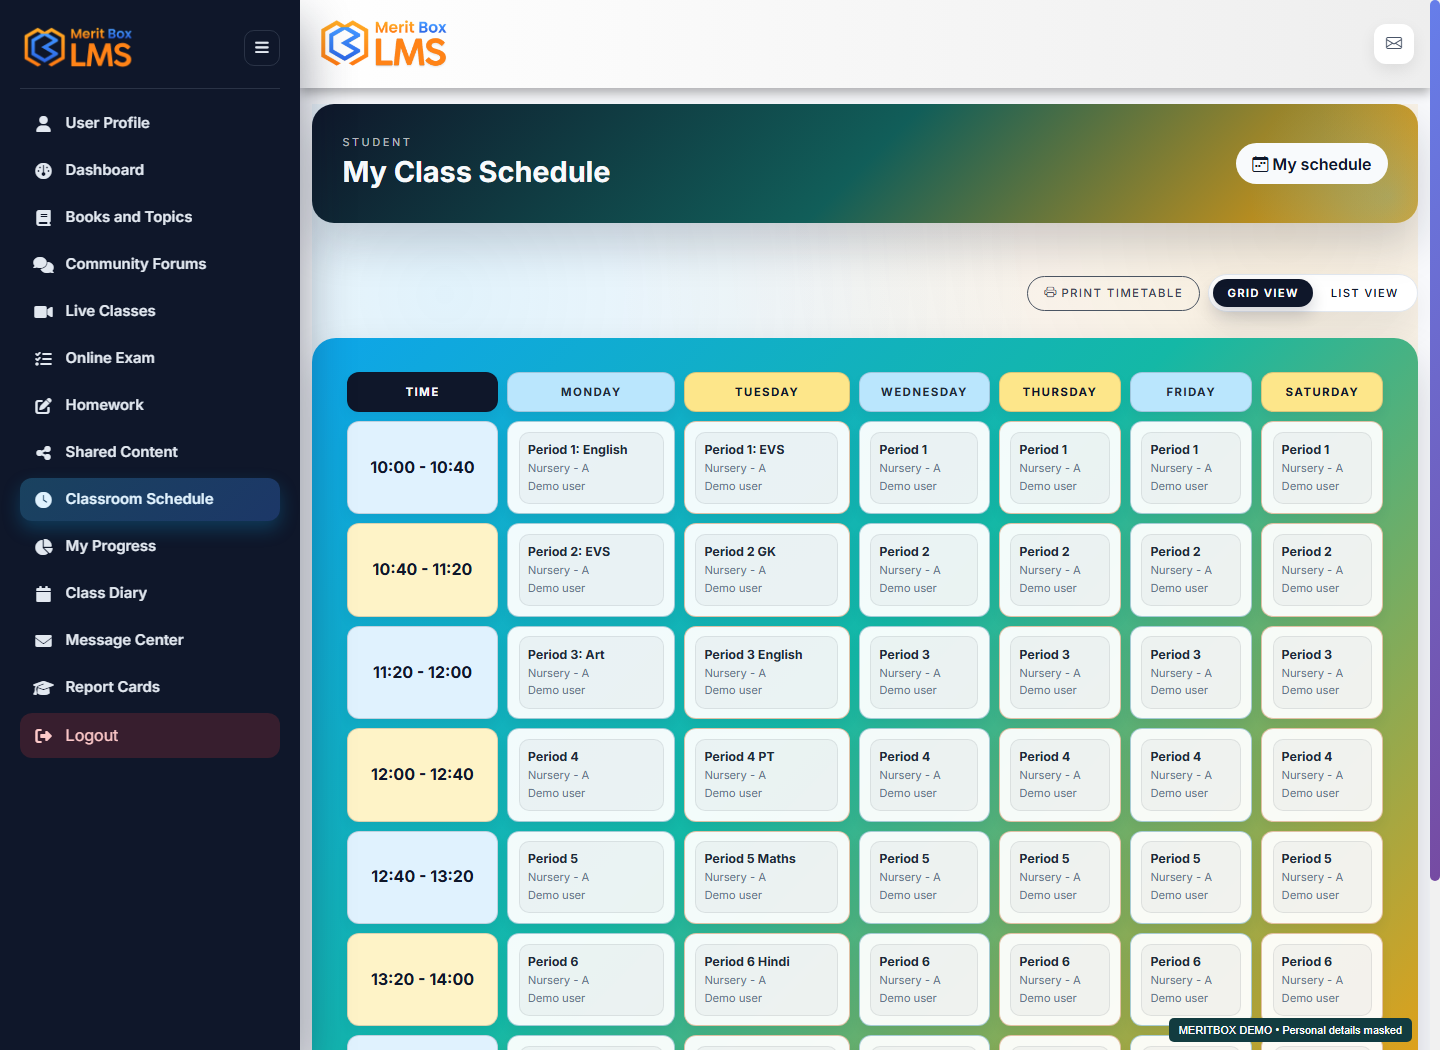
View your Classroom Schedule

Where to go: Classroom Schedule

Before you start: Your student account must be assigned to the correct class and section.

Follow these steps

  1. In Classroom Schedule, review the active days, periods, teachers, and times for your class and section.
  2. Switch between Grid view and List view to change the timetable layout. Use Print to make a copy of the visible timetable.
  3. Open My Schedule to see the weekly schedule, and use Previous or Next week to change the dates. To join an online meeting, use the separate Live Classes feature.
View your Classroom Schedule — MeritBox LMS screen View full-size screenshot
Demo screen · Personal details are masked where needed.
Expected result

Your class's active periods are displayed.

Troubleshooting

If the schedule is missing, ask your teacher or School Admin to check your class and section assignment and the active timetable.

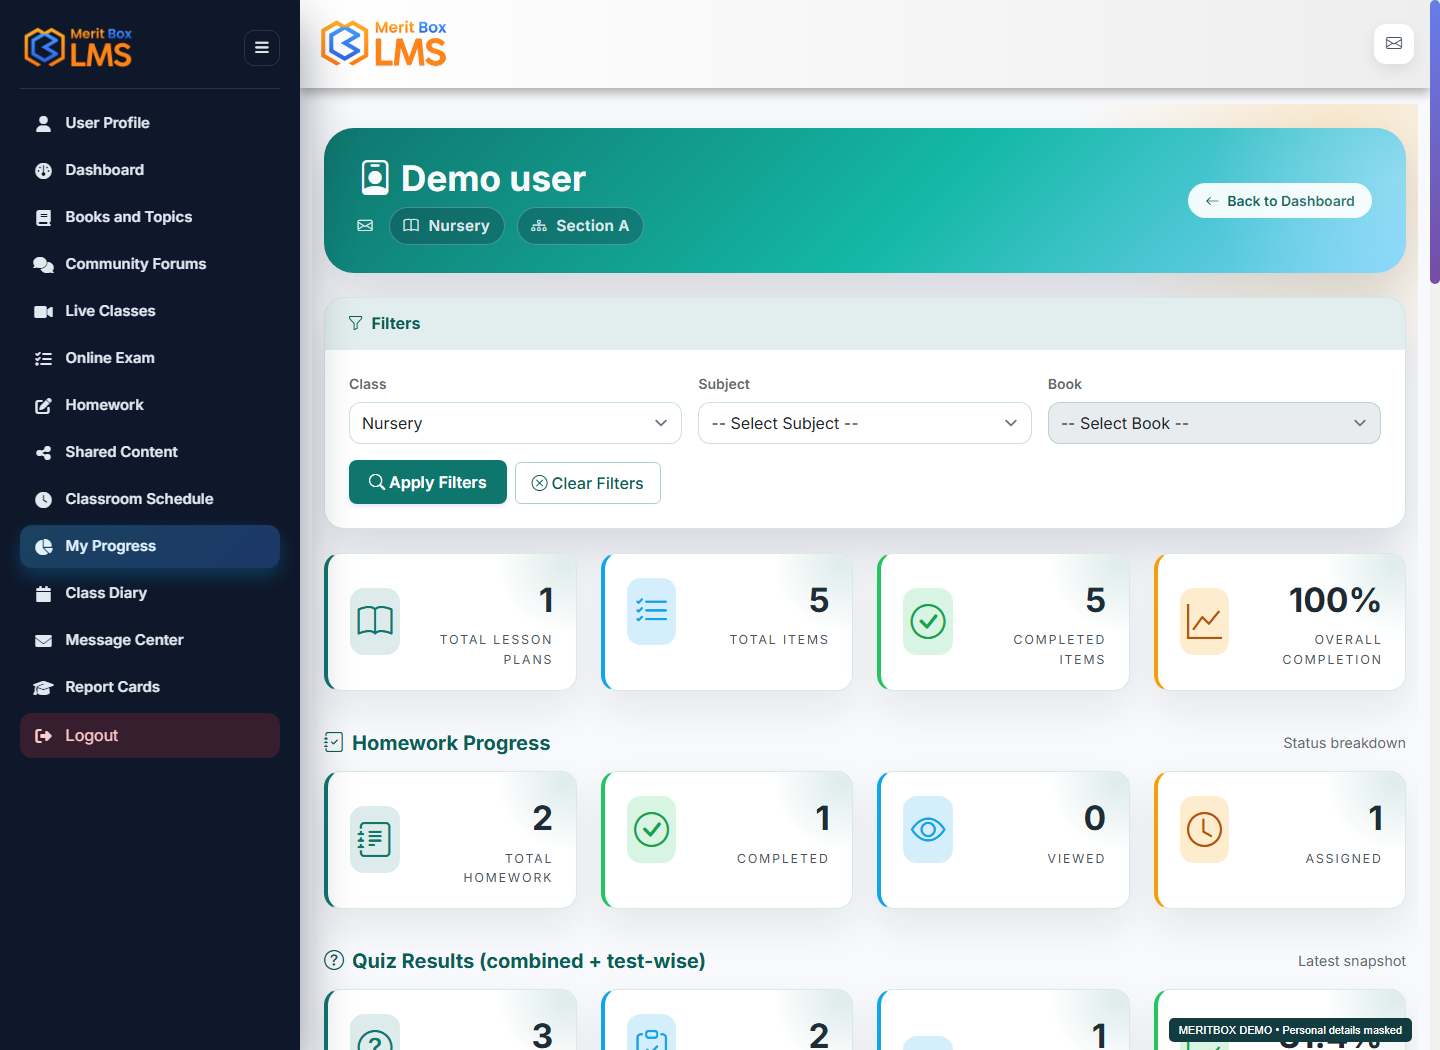
Review your learning in My Progress

Where to go: My Progress

Before you start: You must have completed learning activities for progress to be recorded.

Follow these steps

  1. Open My Progress and use the available filters to select the period or content you want to review.
  2. Review viewed and completed activity, along with any available quiz performance details.
  3. Identify incomplete items and return to the relevant book or Shared Content to finish the work.
Review your learning in My Progress — MeritBox LMS screen View full-size screenshot
Demo screen · Personal details are masked where needed.
Expected result

You see an overview of your recorded learning progress.

Troubleshooting

If progress does not update immediately, refresh the page and check that the activity's completion action was saved.

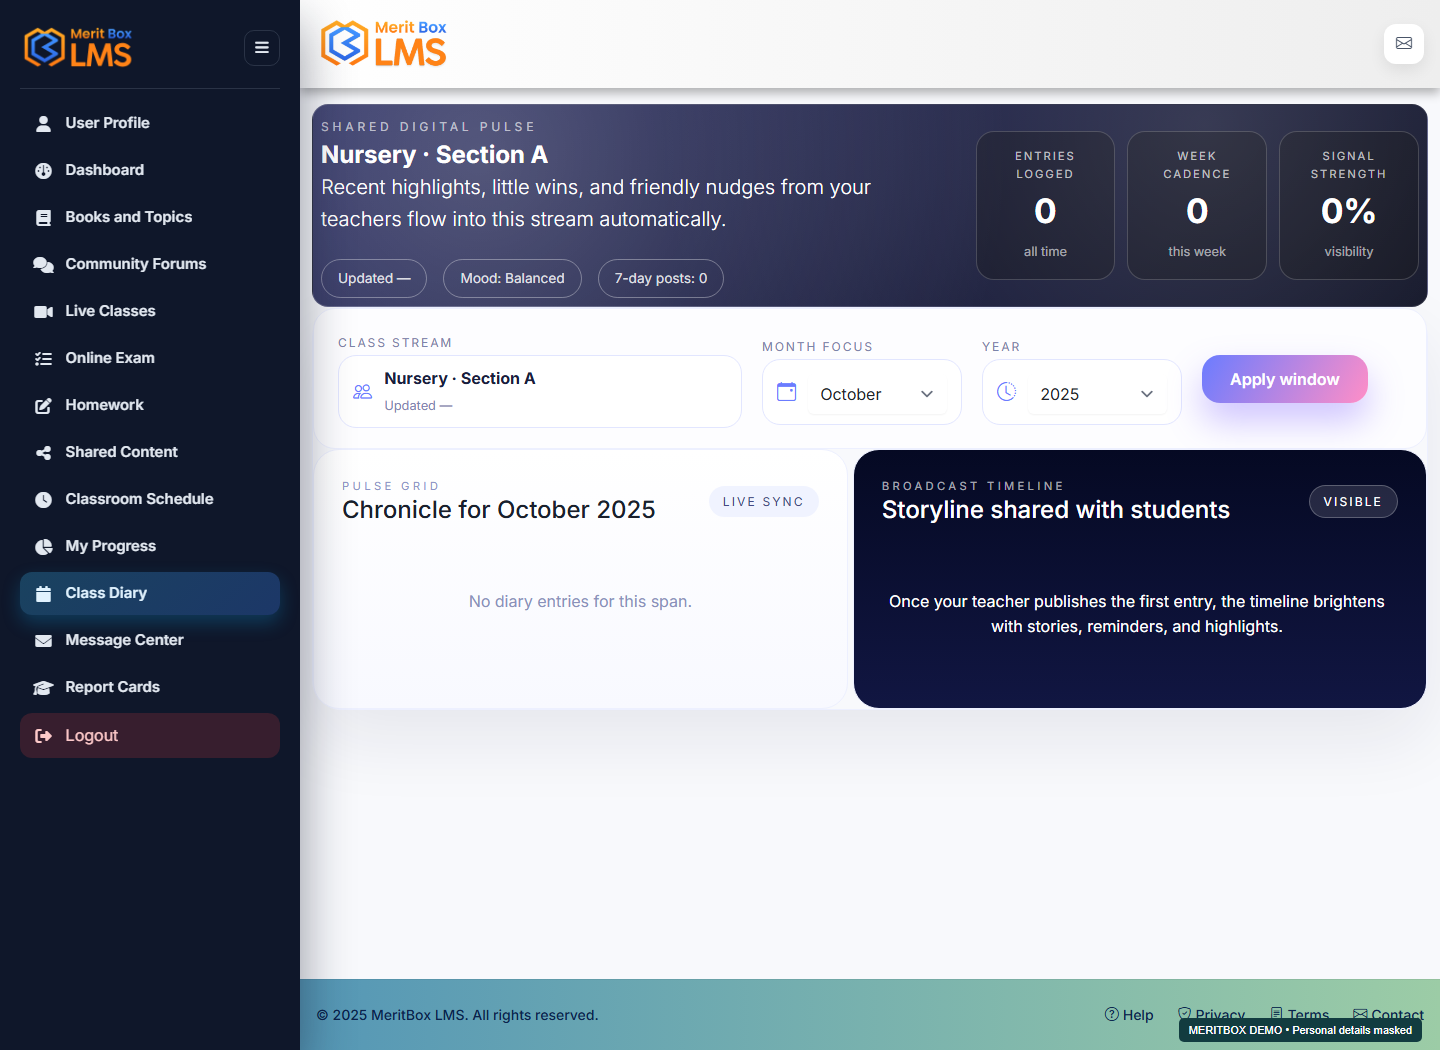
Read the Class Diary

Where to go: Class Diary

Before you start: Your teacher must have saved diary entries that are visible to your class.

Follow these steps

  1. Open Class Diary. Select the available month, year, and class stream filters.
  2. Select Apply window and read the entries for the selected month.
  3. Follow the lesson notes and instructions.
Read the Class Diary — MeritBox LMS screen View full-size screenshot
Demo screen · Personal details are masked where needed.
Expected result

The class diary timeline for the selected period is displayed.

Troubleshooting

If the timeline is empty, check the month and year first. Then ask your teacher to verify the class, section, and entry visibility.

Message Center and school announcements

Where to go: Message Center / Header envelope

Before you start: Your school must have published a message for the Students audience.

Follow these steps

  1. Open the envelope badge or Message Center.
  2. Read pinned and new messages first. Open the full message to review its details and instructions.
  3. Compare important dates with your schedule.
Message Center and school announcements — MeritBox LMS screen View full-size screenshot
Demo screen · Personal details are masked where needed.
Expected result

Published school messages for the Student audience are displayed.

Troubleshooting

If a message is missing, ask your School Admin to verify its audience and publication time.

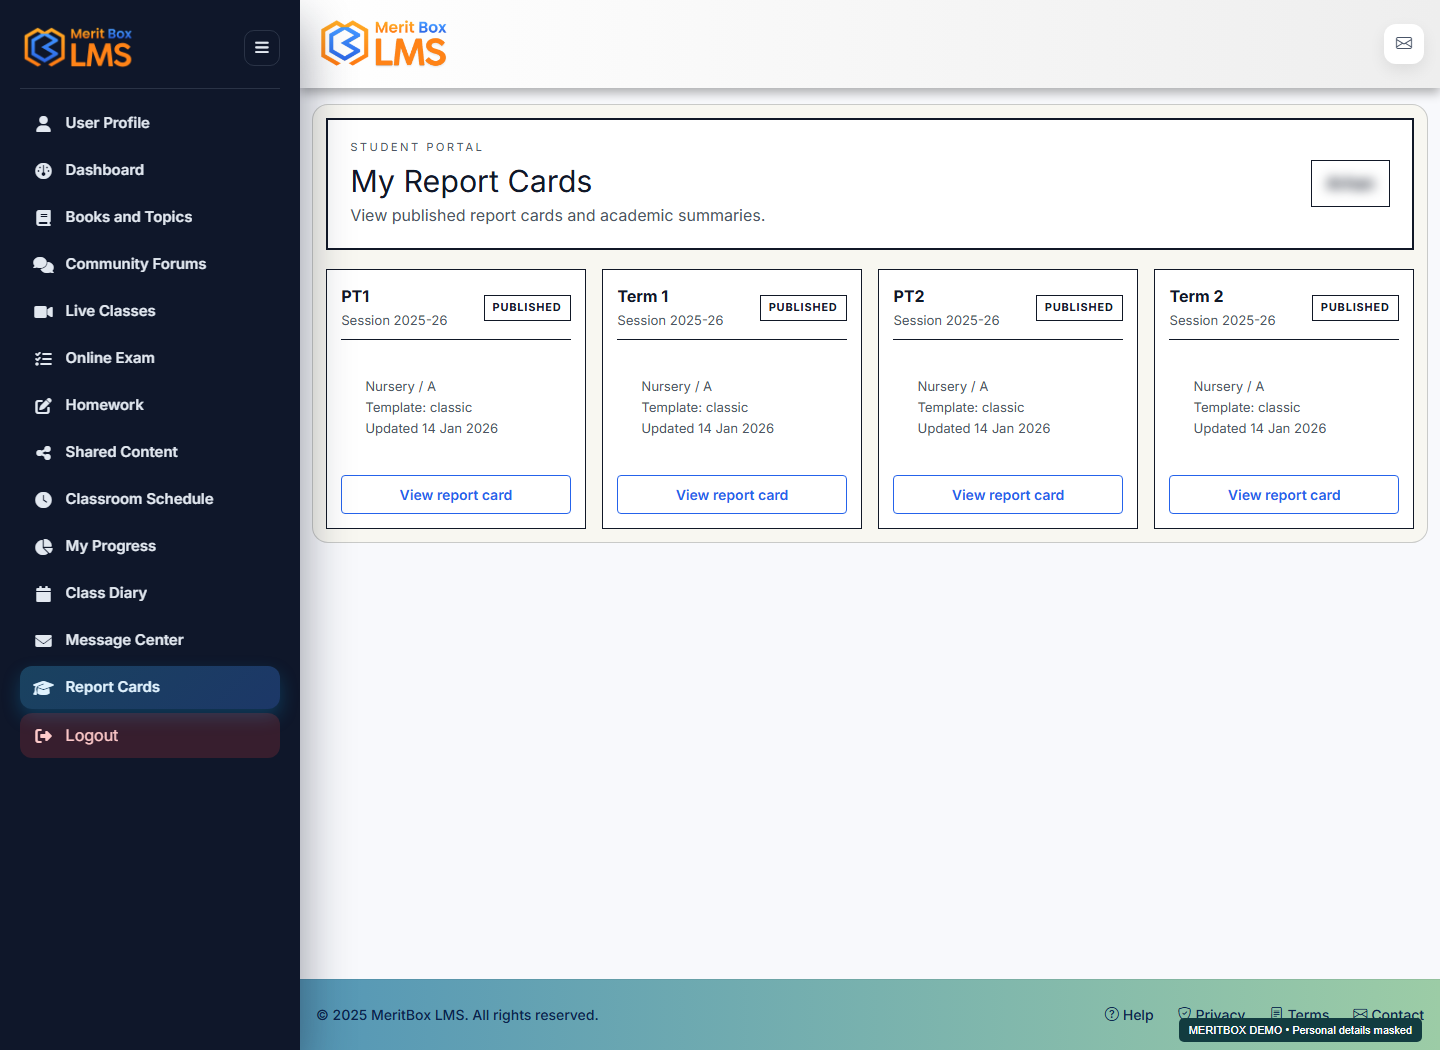
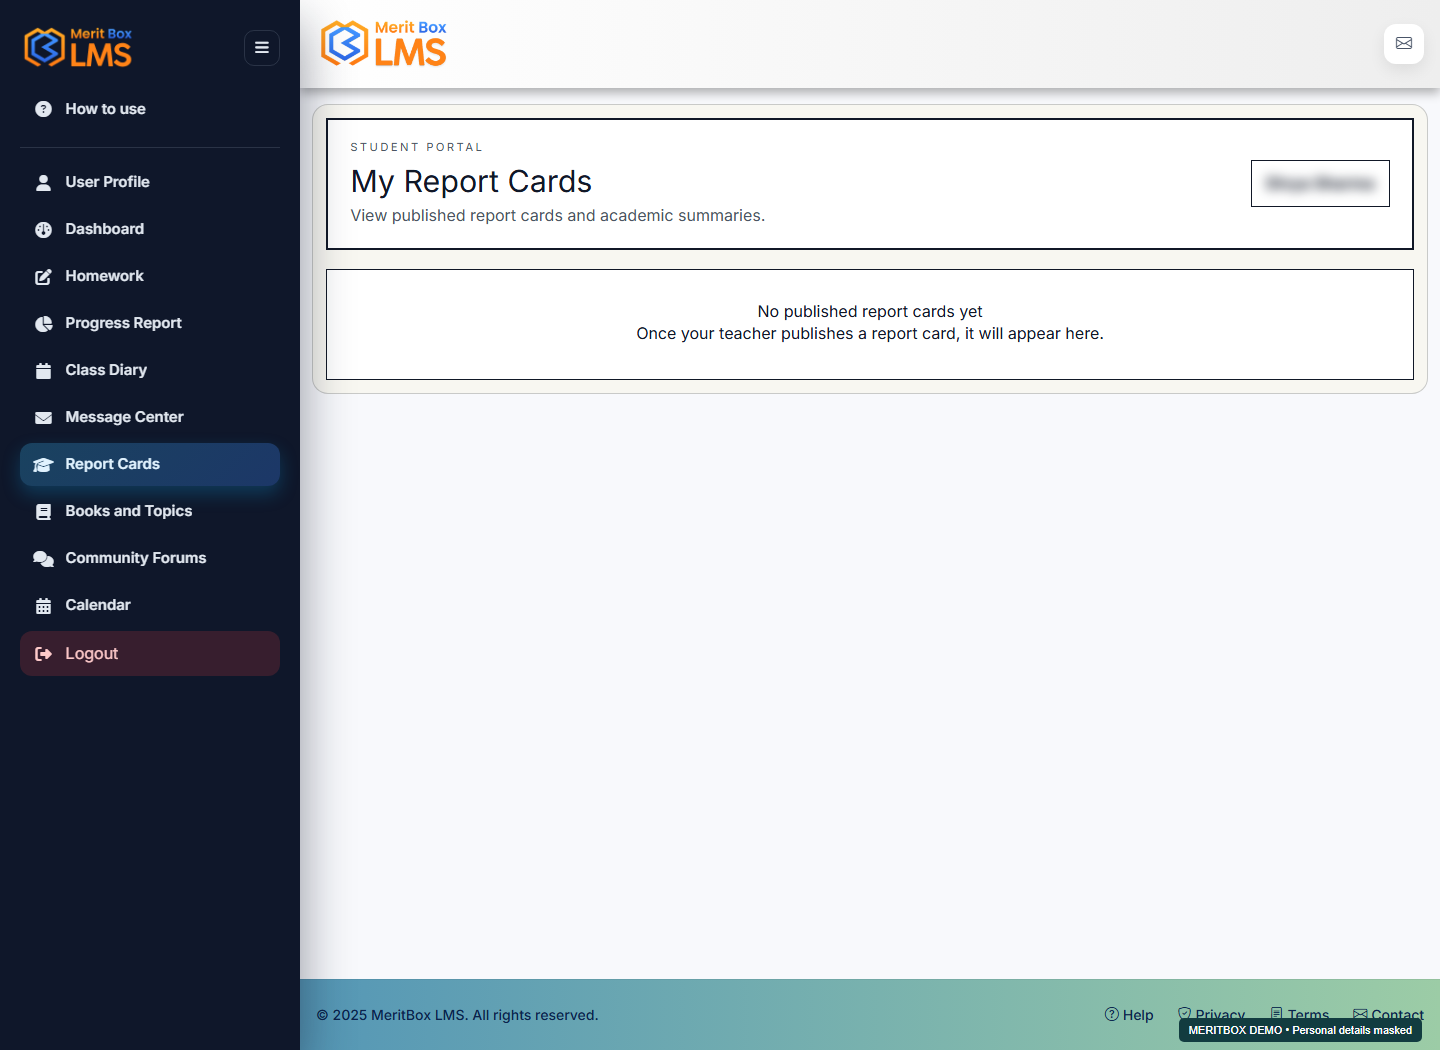
View published Report Cards

Where to go: Report Cards

Before you start: Your school or teacher must have published the relevant term or stage for your report card.

Follow these steps

  1. Open Report Cards and select an available card or term.
  2. Open Details to review the student name, term, subject marks or grades, and remarks.
  3. Save a PDF using the available print control or your browser's Print option.
View published Report Cards — MeritBox LMS screen View full-size screenshot
Demo screen · Personal details are masked where needed.
Expected result

The published report card details open.

Troubleshooting

If no published report cards appear, ask your teacher whether the correct student and term or stage have been published.

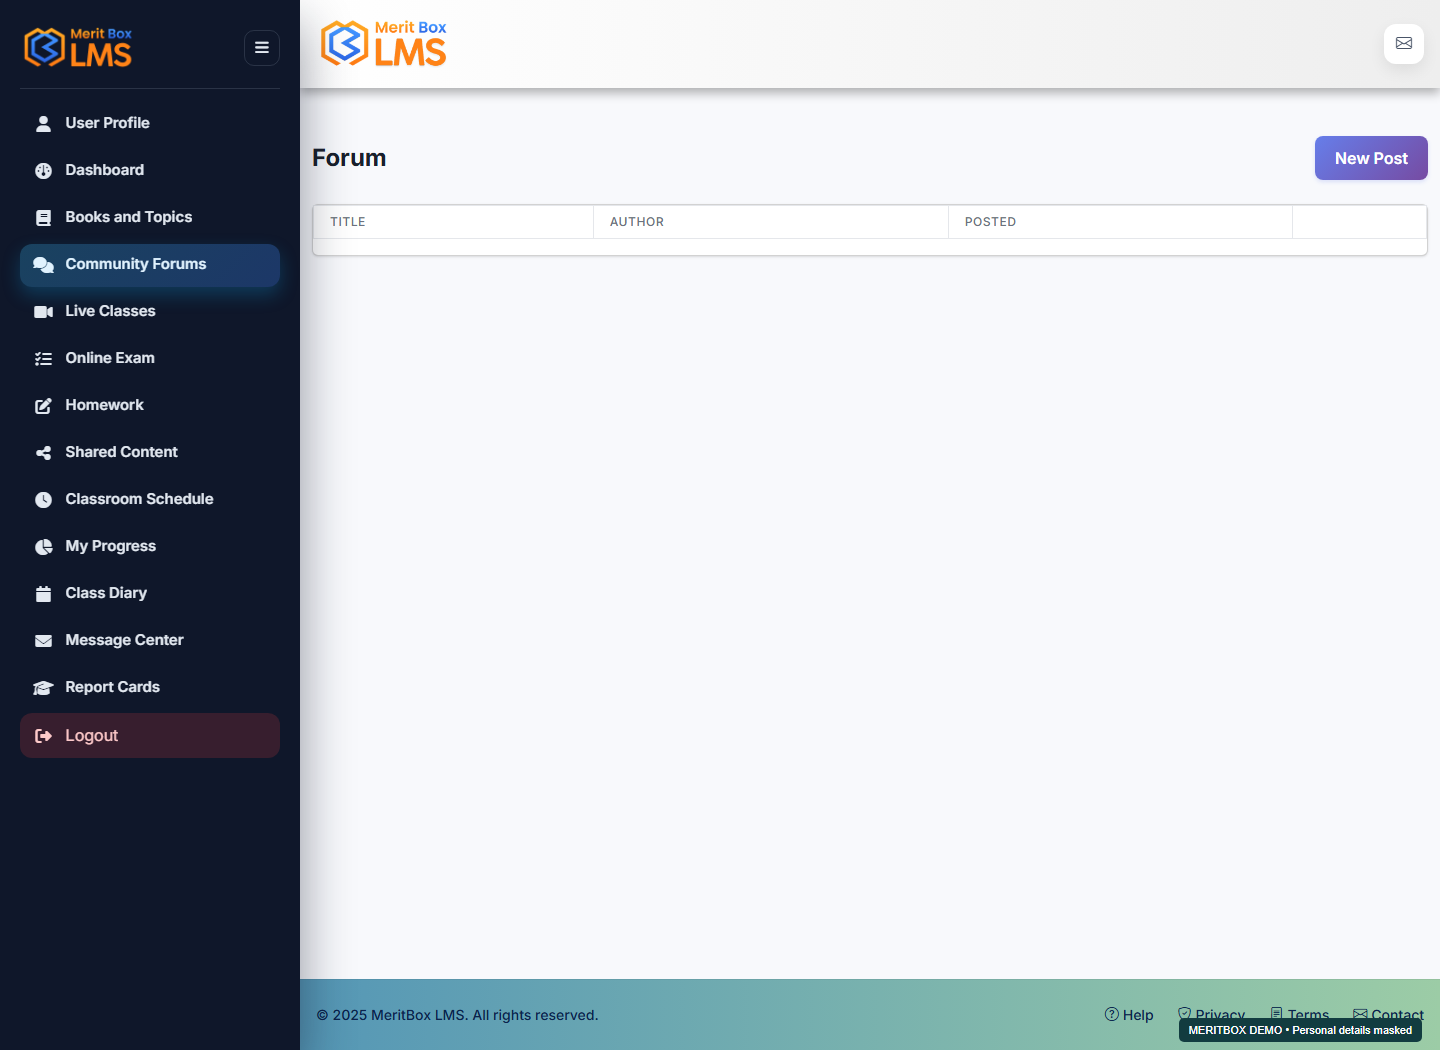
Ask questions in Community Forums

Where to go: Community Forums

Before you start: Prepare your question and choose a relevant topic.

Follow these steps

  1. Read existing discussions. Reply in an existing thread if it covers the same topic.
  2. For a new discussion, select the create action and write a clear title and question.
  3. Review and submit your post. Reopen the thread later to read replies.
Ask questions in Community Forums — MeritBox LMS screen View full-size screenshot
Demo screen · Personal details are masked where needed.
Expected result

Your question appears in the forum thread.

Troubleshooting

Do not post personal phone numbers, login passwords, or information about another student.

YOUR WORKSPACE

Parent

9 guides

Follow your linked child's homework, learning progress, class diary, school messages and published report cards.

Your quick-start path

Sign in → Verify the linked child → Homework and Class Diary → School messages → Progress Report → Published Report Cards.

Open the Parent Dashboard and verify your linked child

Where to go: Dashboard

Before you start: The school must link your Parent account to the correct Related Student.

Follow these steps

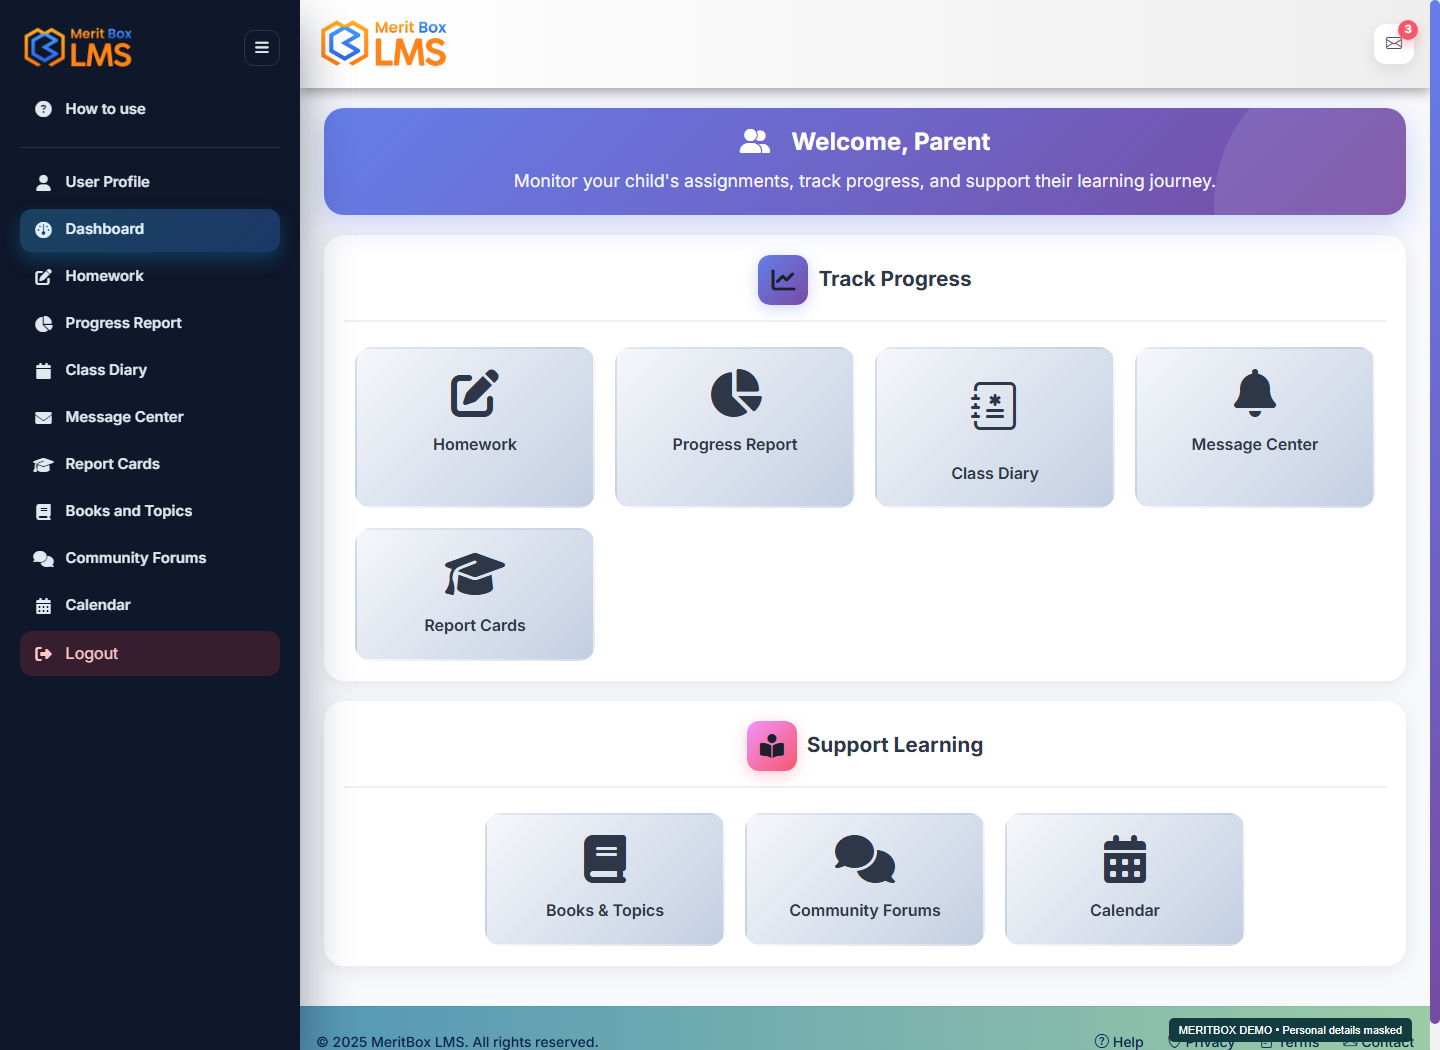
  1. Sign in with your Parent account and open Dashboard.
  2. Check the student's name or ID wherever it is displayed. Confirm that Homework and Progress Report show information for your child.
  3. If the child is missing or incorrect, ask your School Admin to correct the Related Student assignment.
Open the Parent Dashboard and verify your linked child — MeritBox LMS screen View full-size screenshot
Demo screen · Personal details are masked where needed.
Expected result

The available Parent modules show information for your linked child.

Troubleshooting

The account uses the Related Student link maintained by the school. If there is no option to switch between children, ask the school which account or student link to use.

Review your child's homework and completion status

Where to go: Homework

Before you start: Your account must be linked to the correct student.

Follow these steps

  1. Open Homework and review the All, New, In Progress and Completed categories.
  2. Open a task and read its instructions, links and attachments.
  3. Help your child finish the work. Confirm it is complete before using a completion action, because actions in the Parent view may update the linked student's progress.
  4. Check the saved Completed status.
Review your child's homework and completion status — MeritBox LMS screen View full-size screenshot
Demo screen · Personal details are masked where needed.
Expected result

You can see your child's assigned homework and recorded completion status.

Troubleshooting

If the list is empty, ask the school or teacher to check the linked student, task availability and sharing settings.

Understand the Progress Report

Where to go: Progress Report

Before you start: Your linked child must have recorded learning activity in the LMS.

Follow these steps

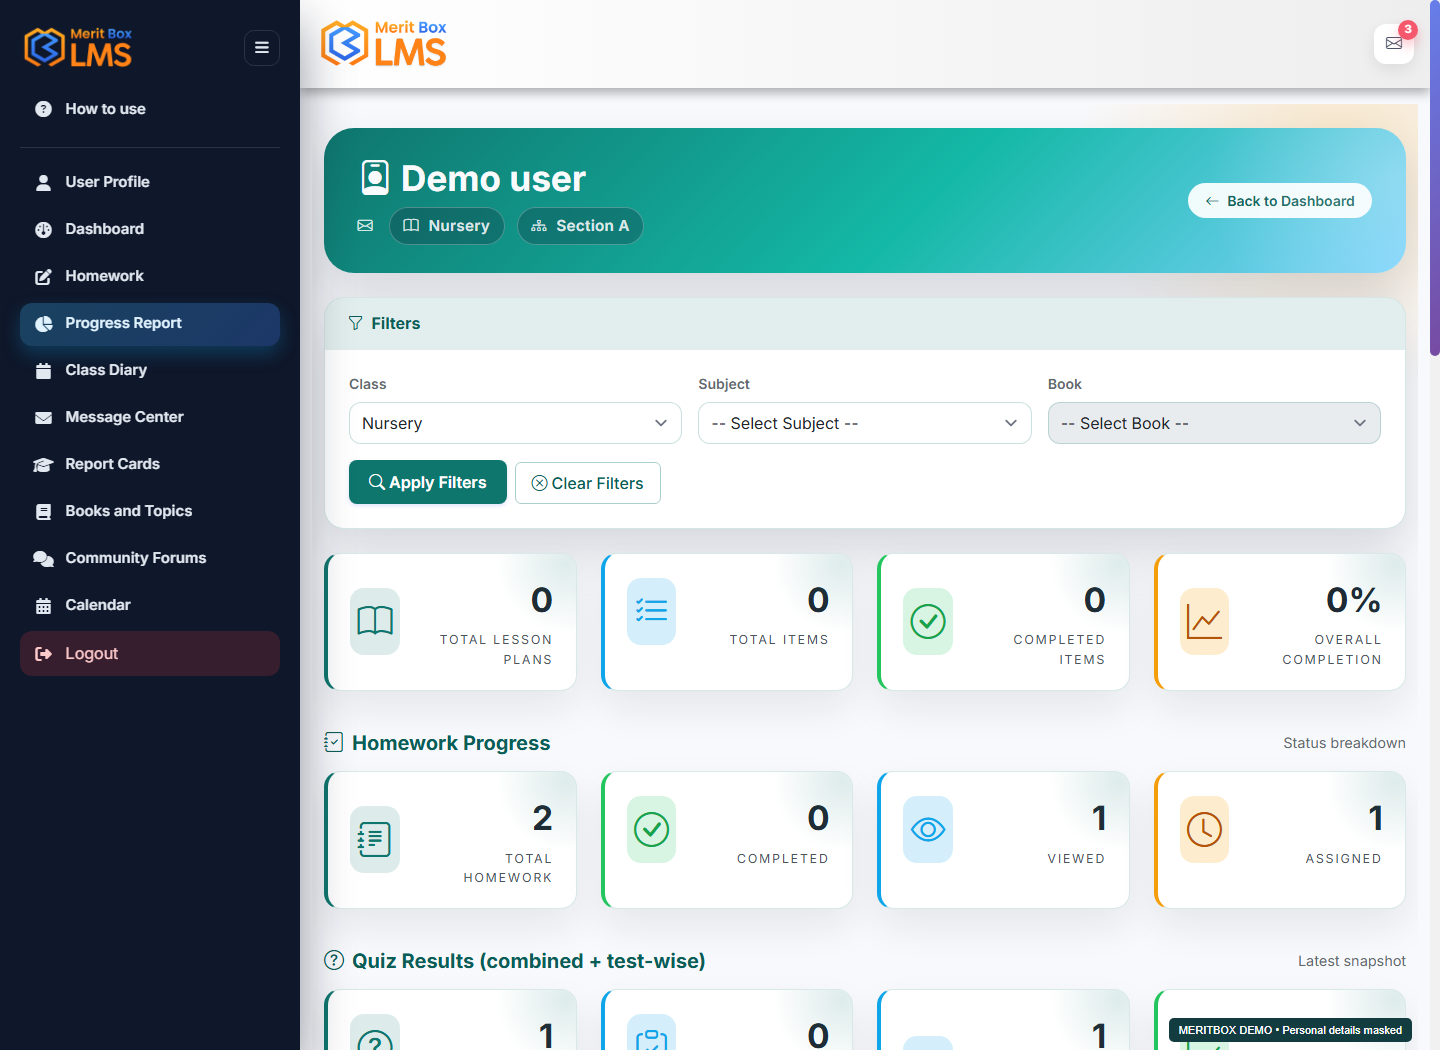
  1. Open Progress Report and choose the available period or content filters.
  2. Review viewed and completed activities, along with any available quiz performance information.
  3. Discuss incomplete learning with your child and the teacher. Help your child return to the relevant content.
Understand the Progress Report — MeritBox LMS screen View full-size screenshot
Demo screen · Personal details are masked where needed.
Expected result

You can review an overview of your linked child's recorded learning activity.

Troubleshooting

Learning completion, quiz scores and report-card marks measure different things. If information is missing, check the linked student and selected filters.

Read the Class Diary and teacher notes

Where to go: Class Diary

Before you start: The teacher must make diary entries available for your child's class.

Follow these steps

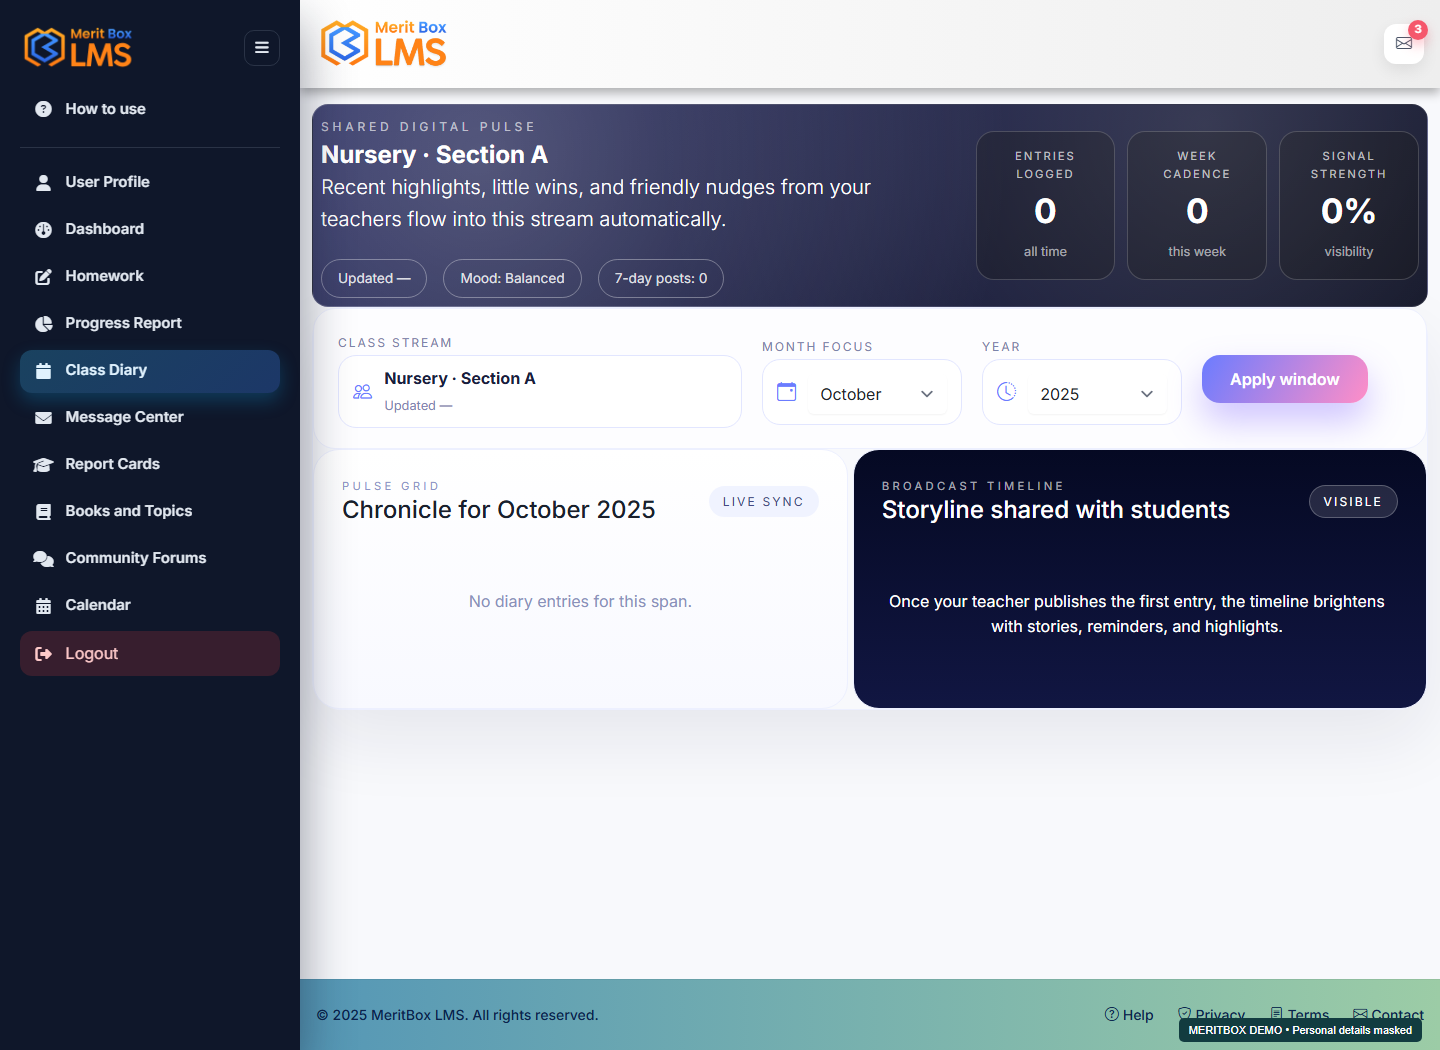
  1. Open Class Diary and choose a month and year.
  2. Click Apply window to view the timeline.
  3. Read the entry dates, lesson notes and teacher instructions, then help your child prepare accordingly.
Read the Class Diary and teacher notes — MeritBox LMS screen View full-size screenshot
Demo screen · Personal details are masked where needed.
Expected result

The class diary shows entries for the selected period.

Troubleshooting

If the diary is empty or shows the wrong class, ask the school to verify the class, section and Related Student link.

Read school messages

Where to go: Message Center / Header envelope

Before you start: The school must publish a message for the Parents audience.

Follow these steps

  1. Open Message Center or click the envelope icon in the header.
  2. Read unread and pinned messages, then open the full message content.
  3. Note the dates for meetings, holidays and other school instructions.
Read school messages — MeritBox LMS screen View full-size screenshot
Demo screen · Personal details are masked where needed.
Expected result

Published announcements intended for parents at your school appear.

Troubleshooting

A message visible to your child may target a different audience. Ask your School Admin to verify that Parents is selected.

View your child's published Report Cards

Where to go: Report Cards

Before you start: The school must publish the correct report-card term or stage for your child.

Follow these steps

  1. Open Report Cards and choose the available report and term for your child.
  2. Open Details to read the child's name, subject scores or grades, and remarks.
  3. Use the available print control or your browser's Print command to save a PDF.
View your child's published Report Cards — MeritBox LMS screen View full-size screenshot
Demo screen · Personal details are masked where needed.
Expected result

The report card opens for the published term or stage.

Troubleshooting

Parents cannot see draft cards. If a card is missing, ask the school to check the Related Student link and publication of the correct stage.

Check Books and Topics availability

Where to go: Books and Topics

Before you start: The Parent menu may show a Books and Topics link, but access to this screen is not currently available for Parent accounts.
Follow these steps

  1. If Books and Topics shows Access denied, tell your School Admin that the menu link does not open for your Parent account.
  2. Use Homework, Progress Report and Class Diary to follow your child's learning instructions and activity.
  3. Help your child use Books and Topics through their own Student account. Ask your School Admin about the availability of book access for parents.
Expected result

You can follow your child's learning through the available Parent modules while book access remains unavailable.

Troubleshooting

Ask your School Admin for help with Parent book access. Book-management screens intended for other roles are not a substitute for Parent access.
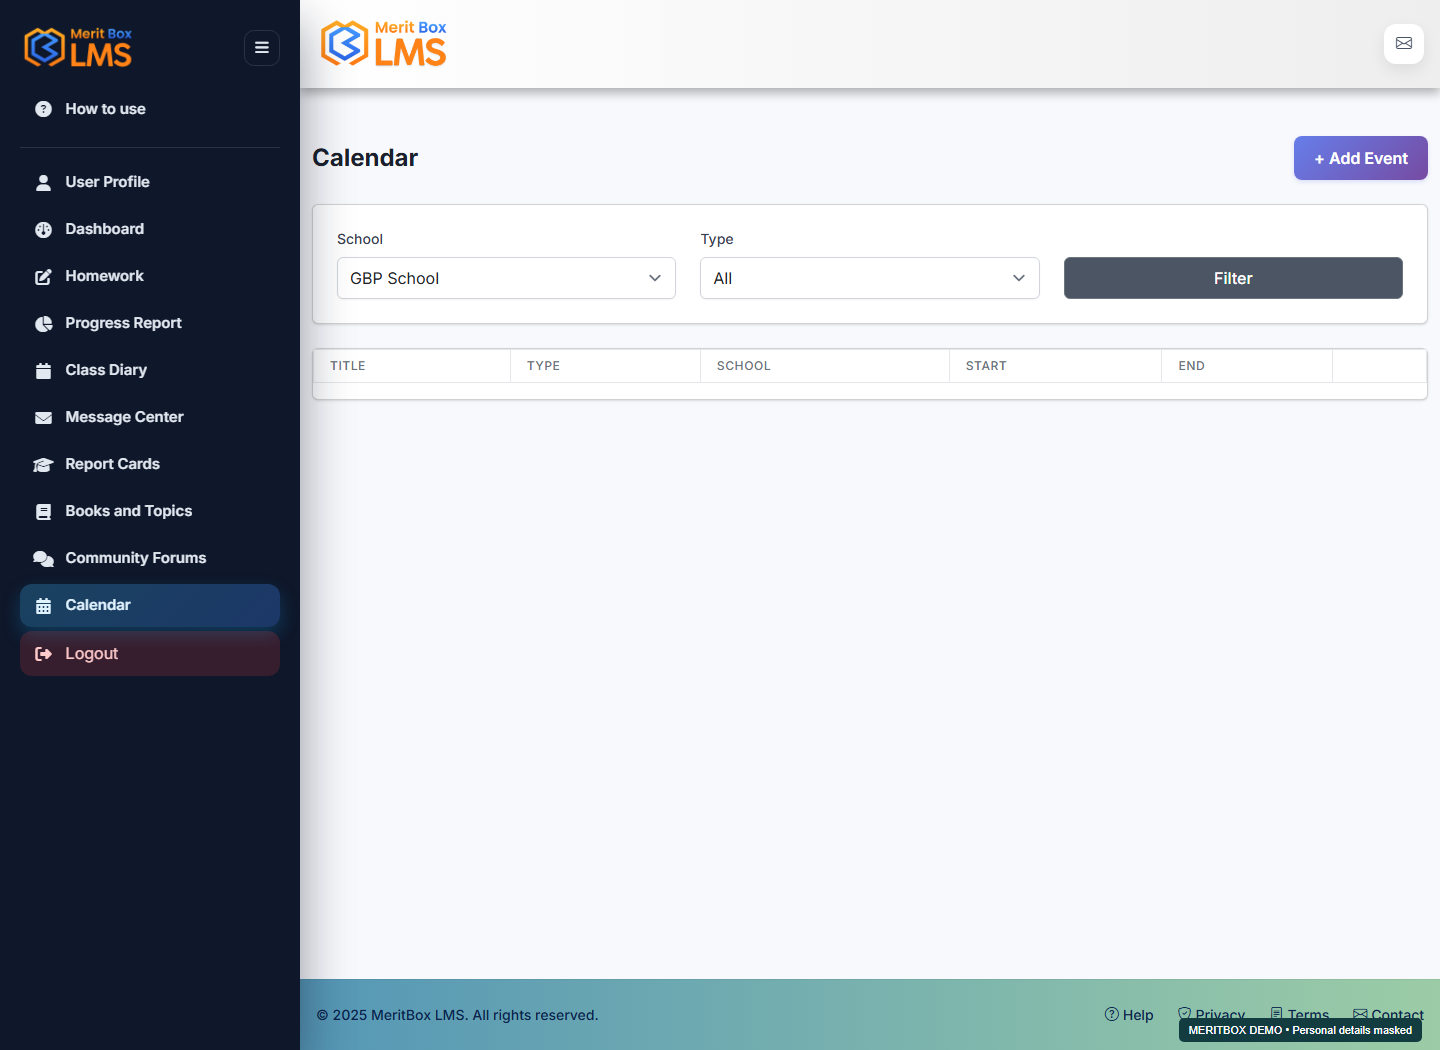
View school events in Calendar

Where to go: Calendar

Before you start: The school or platform must make events available to your account.

Follow these steps

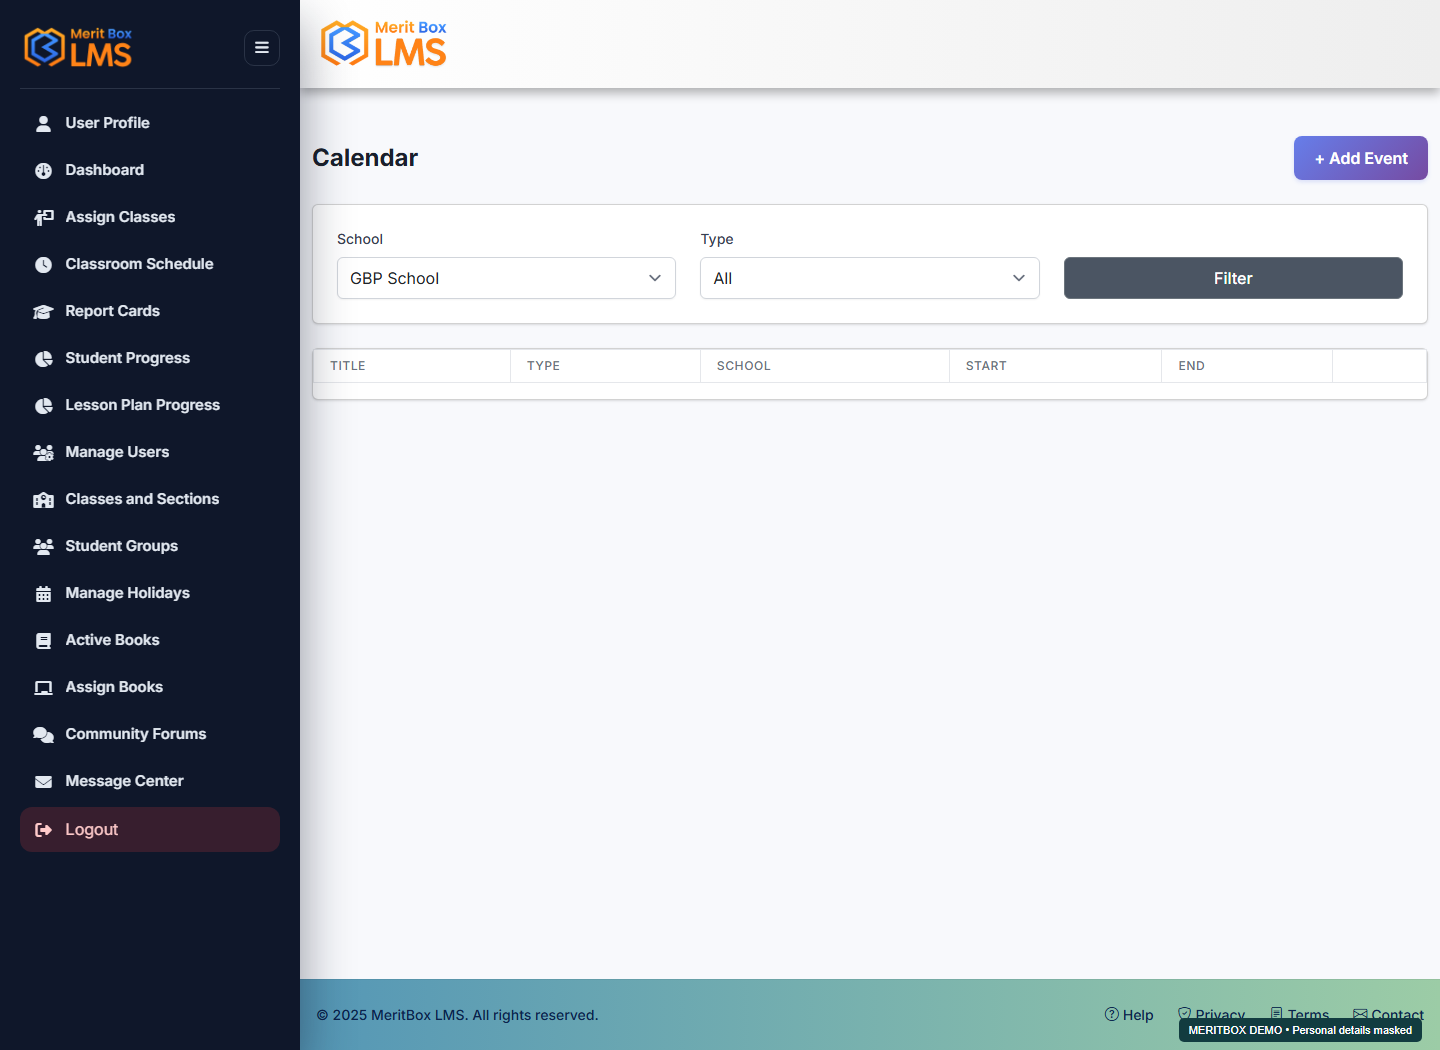
  1. Open Calendar to view the school events table.
  2. Choose the available School and Type filters, then click Filter. Read the Title, Type, Start and End columns.
  3. Compare event dates and times with school messages and instructions. Parent accounts can read events but cannot create or edit them.
View school events in Calendar — MeritBox LMS screen View full-size screenshot
Demo screen · Personal details are masked where needed.
Expected result

The events available to your account appear in the table.

Troubleshooting

If an event is missing, clear the Type filter and ask the school to verify your account's school assignment. Contact your School Admin for changes; Parent accounts cannot use Add or Edit actions even if those controls appear.

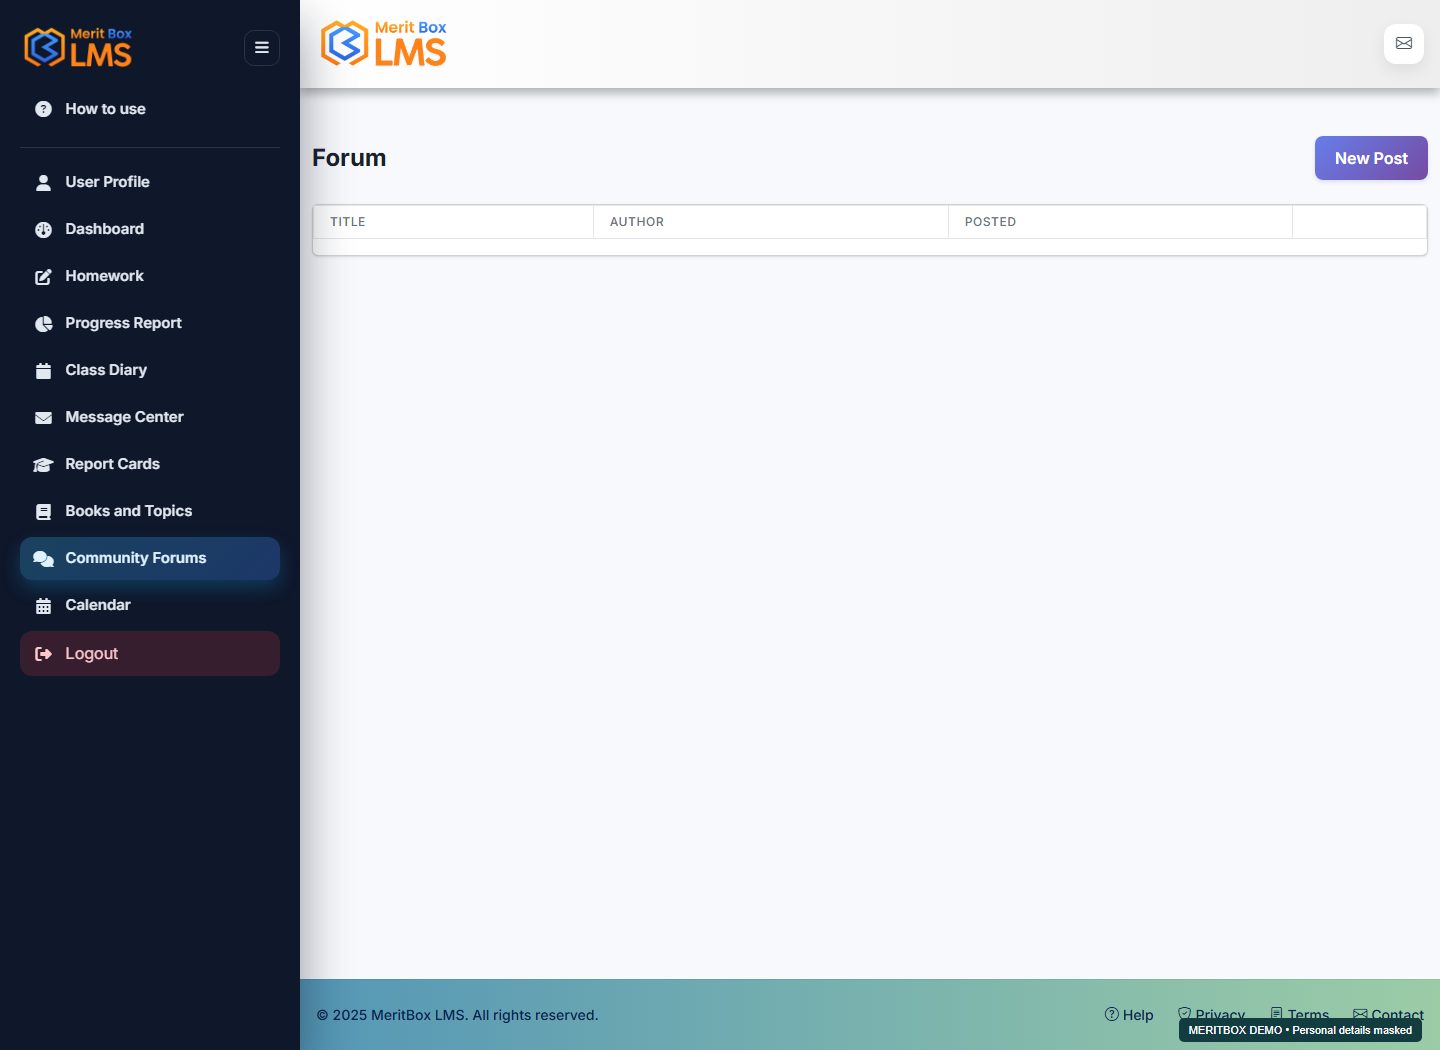
Use Community Forums

Where to go: Community Forums

Before you start: Choose a topic relevant to the school community.

Follow these steps

  1. Read the forum discussions and open the relevant thread.
  2. Use the available create or reply action to ask a question.
  3. Write a clear title and message, review the content, then submit it.
Use Community Forums — MeritBox LMS screen View full-size screenshot
Demo screen · Personal details are masked where needed.
Expected result

Your post or reply appears in the community thread.

Troubleshooting

Contact the school directly about your child's marks, contact details or account issues instead of posting that information in a public discussion.

WE'RE HERE TO HELP

Still need help?

Teachers, Students and Parents should contact their School Admin. School Admins should contact platform support. Include the feature name, class or section, time of the issue and error message. Do not share your password or one-time code.

↑ Back to getting started

100%